Users Management Service E-SCIENCE.PL allows for managing Teams and Groups of users, as well as granting access to various Services offered by WCSS. Manager may invite other users of E-SCIENCE.PL to his Teams and further group them in smaller entities named Groups. Invitation may be done by entering the e-mail address of a given E-SCIENCE.PL user. Each e-mail address may be linked to only ONE E-SCIENCE.PL account (therefore, to only one WCSS account). If the selected e-mail address is not linked to any of the E-SCIENCE.PL account, an invitation letter to create new account will be sent instead.
Each Team or Group has its own Manager that may add or remove users to this Team or Group, as well as grant administrative rights to selected users, which allow for similar user management.
Account on the E-SCIENCE.PL Service may be created by a person after completing each stage of registration. However, particular rights to use Services at WCSS are granted according to user's (academic) affiliation, or by being paid.
After creation of new account on E-SCIENCE.PL one may create its own Team, and furthermore, Groups.
Questions or eventual problems can be reported to the E-SCIENCE User's Support Team and sent to the e-mail address: helpdesk@e-science.pl.
¶ User Registration
To create new account at the E-SCIENCE.PL Service one has to complete full registration procedure explained below:
- On the https://users.e-science.pl, click on the 'Register' button.

- Enter a valid e-mail address that will be linked to the newly created user account (each e-mail address may be linked to only ONE account at E-SCIENCE.PL) and click the 'Continue' button.

- To the specified e-mail address, a letter with a confirmation link will be sent.
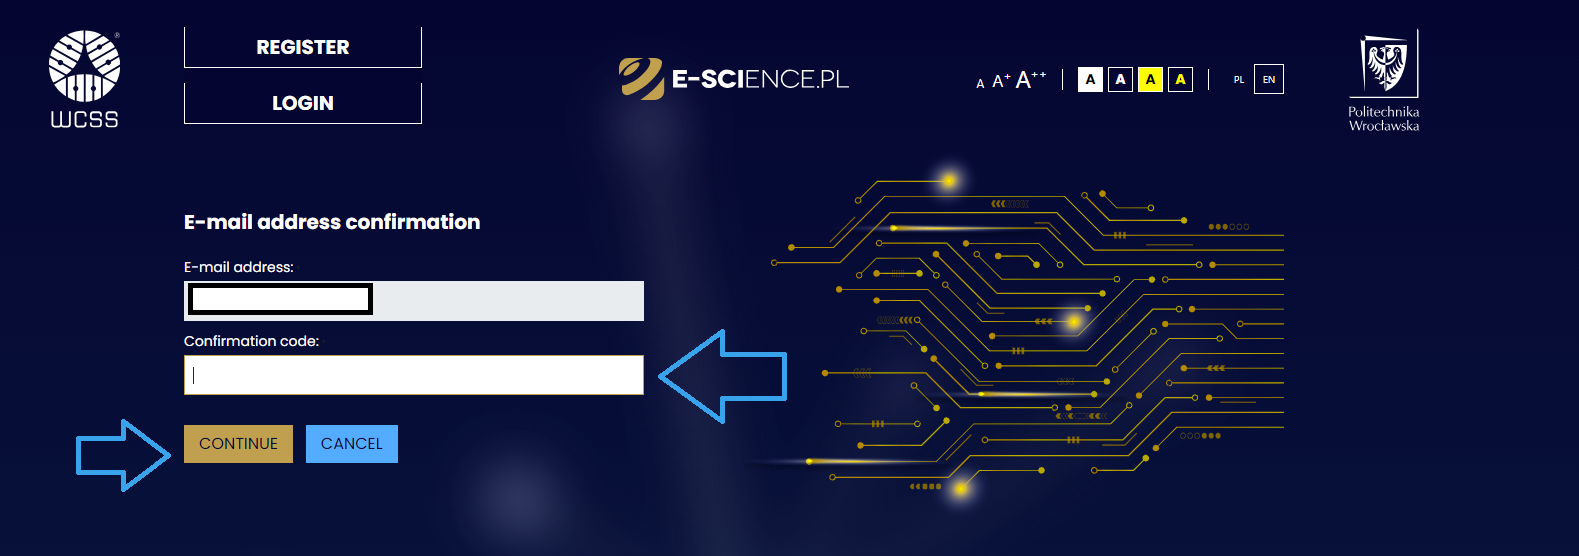
- One must validate it either by:
- clicking on the provided link
- entering the 'Confirmation Code' provided in the emain manually to the webpage
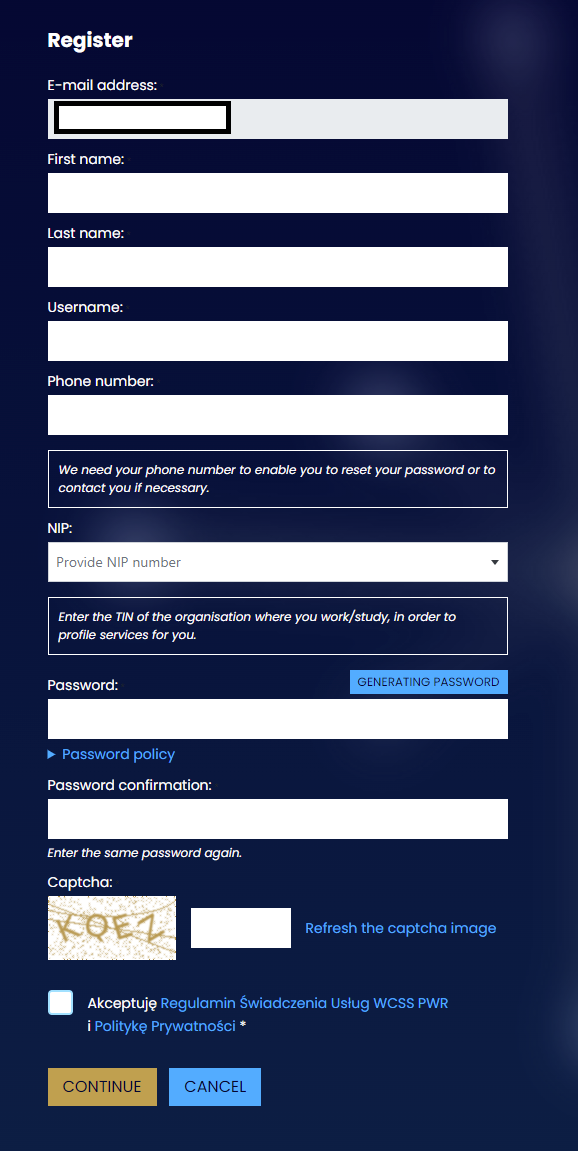
- On the next step, one must fill the Registration form.
Registration form:
-
E-mail address - already filled out without possibility to be modified;
-
First name;
-
Last name;
-
Username - name of the account that will be used for example to log to the Supercomputer;
-
Phone number - required, used for the eventual password recovery or for contact purposes (if necessary);
-
NIP: - VAT identification number of the organization that you work or study;
-
Password - one must enter a valid password according to the rules below or by automatic generation using the "Generating Password" button
Password rules:
-
minimum length: 10 characters;
-
allowed characters:
abcdefghijklmnopqrstuvwxyzABCDEFGHIJKLMNOPQRSTUVWXYZ0123456789!"#$%&'()*+,-./:;<=>?@[\]^_~` ; -
minimum number of small-case letters: 1;
-
minimum number of upper-case letters: 1;
-
minimum number of numbers: 1;
-
Password confirmation
-
Captcha - one must enter the sequence of characters from the image
After filling out all of the fields one must read and accept the Privacy policy and Terms and Conditions. Afteerwards, one can continue using the "Continue" button.
-
An activation code will be sent through SMS that must be entered on the following webpage, in order to finalize the activation form.
-
After successful activation, one may log in to the newly created account at https://users.e-science.pl by providing the right credentials.
¶ Loging
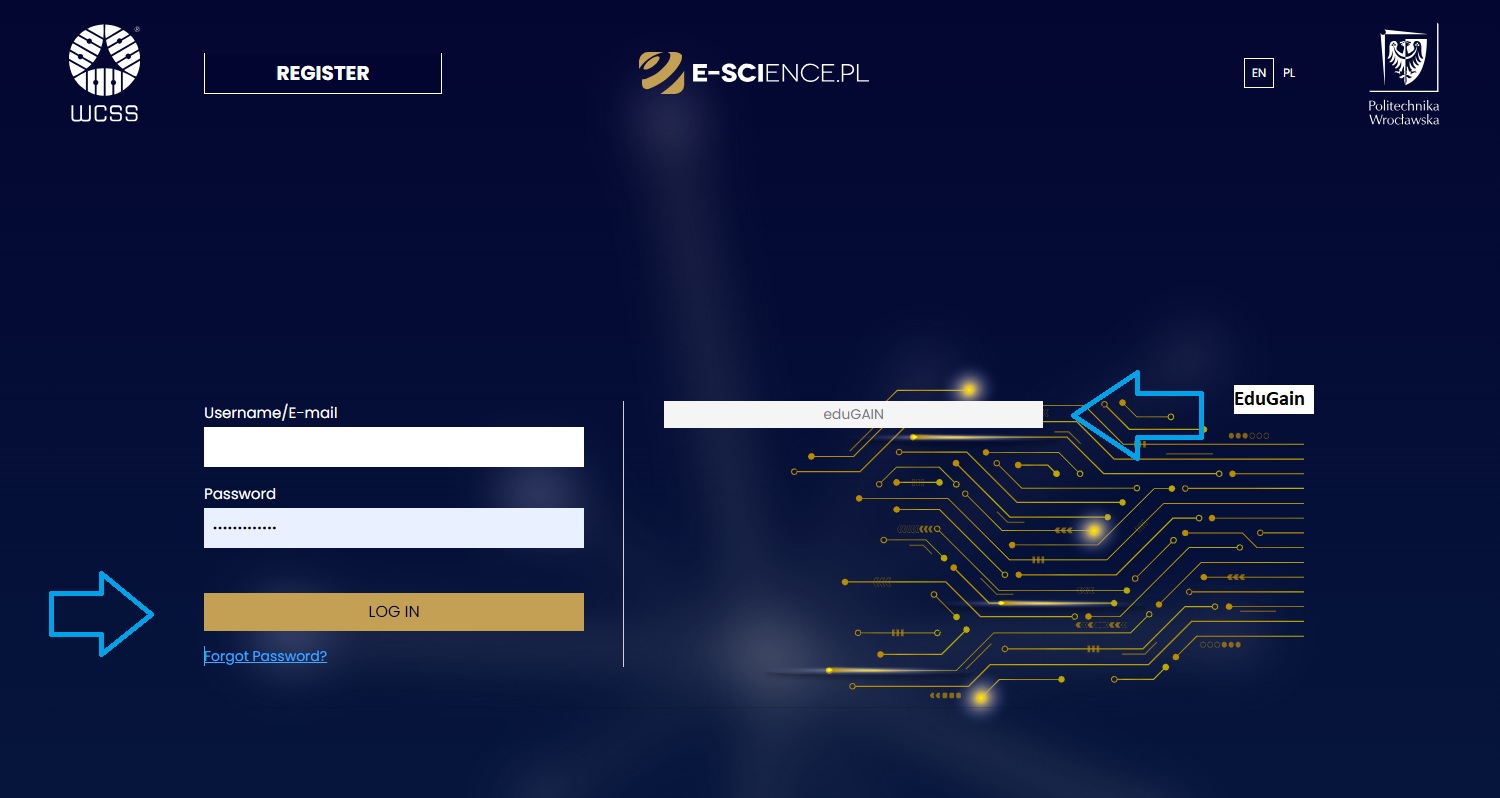
One may log into the E-SCIENCE.PL Service using two methods - either by specifying the credentials directly on the https://users.e-science.pl webpage, or by using the international interfederation service eduGAIN.
¶ E-SCIENCE.PL
One may log to the E-SCIENCE.PL Service by providing the correct credentials to its account (Username or e-mail address and the password). Afterwards, one should click the 'Log in' button.
¶ Password reset
-
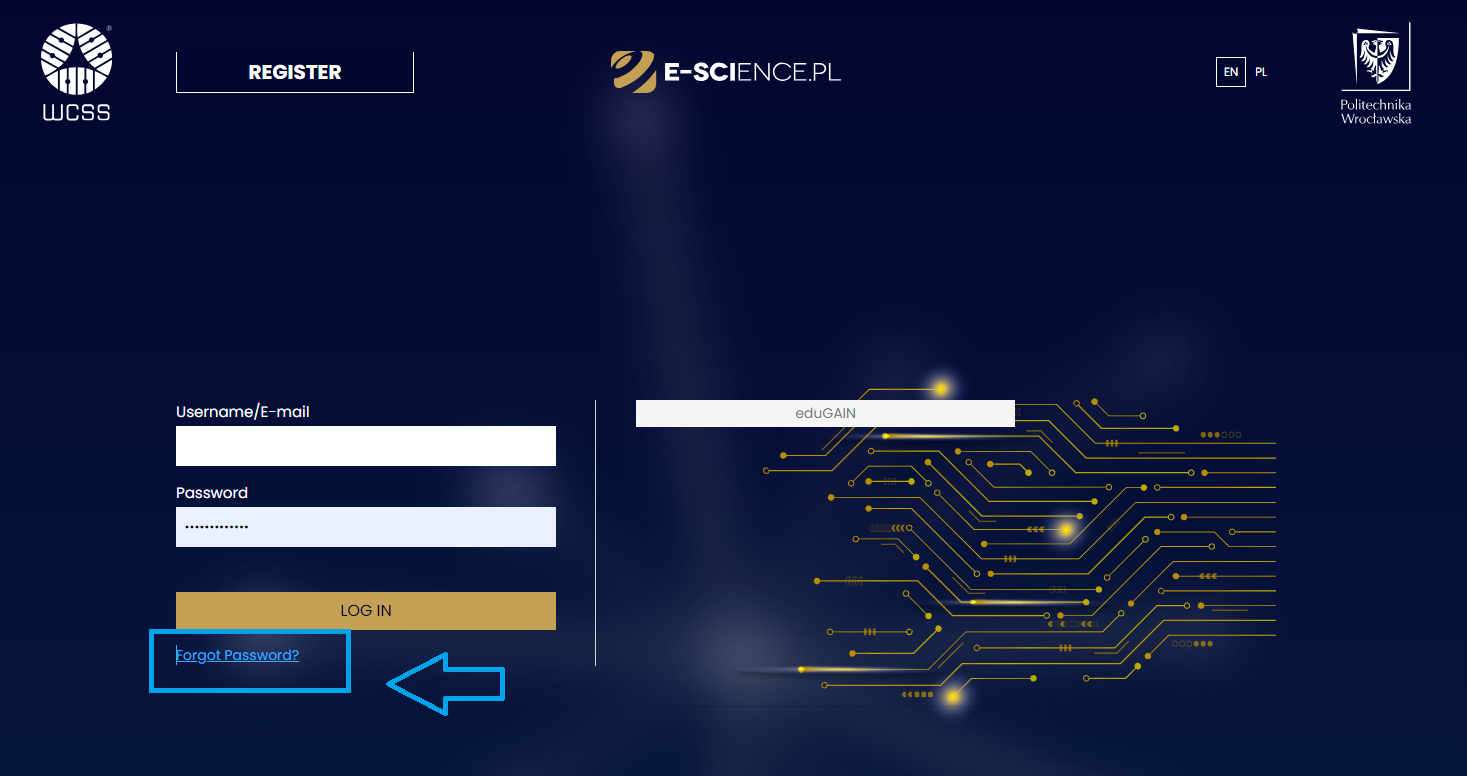
In case of failed attempt to log in, one may request a reset of the account's password by clicking the button 'Forgot Password?'.
-
One must enter the e-mail address that is linked to the user's account as well as complete the Captcha test. Next, one should click the 'Send' button.
-
A letter to the specified e-mail address will be sent. It will contain the link to reset the password.
-
One must enter the link and enter the new password (according to the Password rules) and click the 'Save' button.
¶ eduGAIN
-
To log in using the international service connecting identity management federations, select the eduGAIN button
-
Then search for your institution and select it.
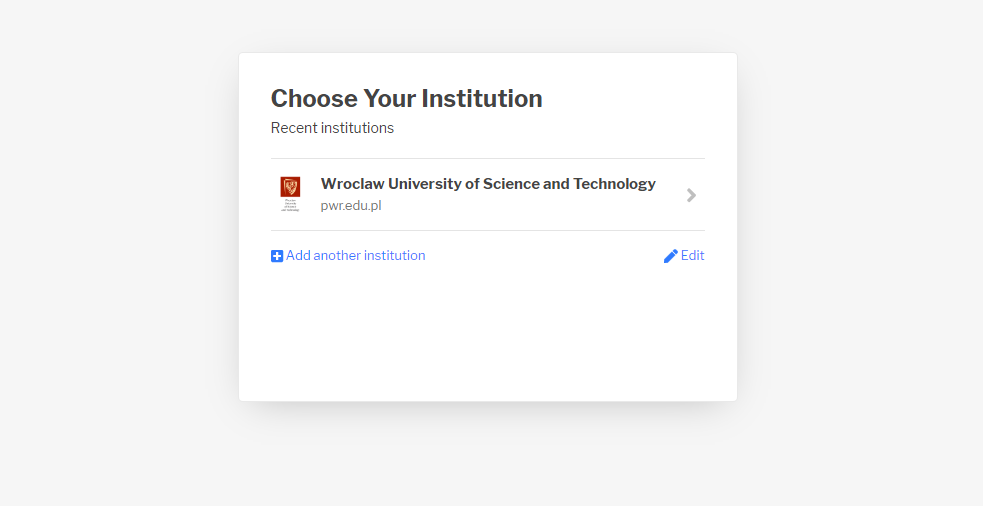
- Enter your credentials into the login system of the selected institution.

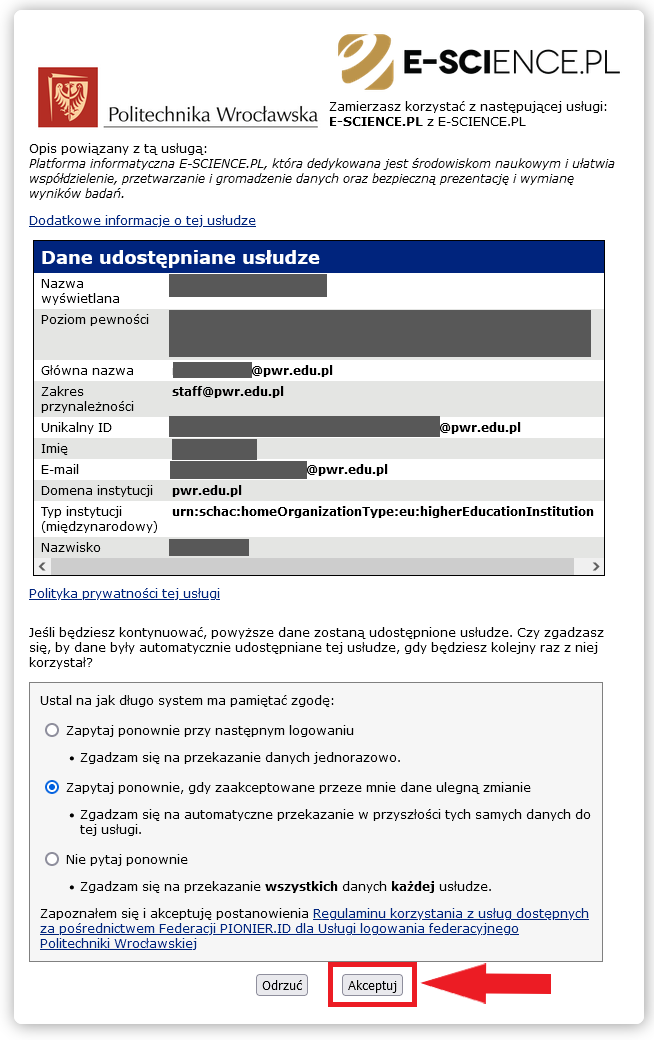
- Consent to sharing data with the E-SCIENCE.PL service - by pressing the Accept button.
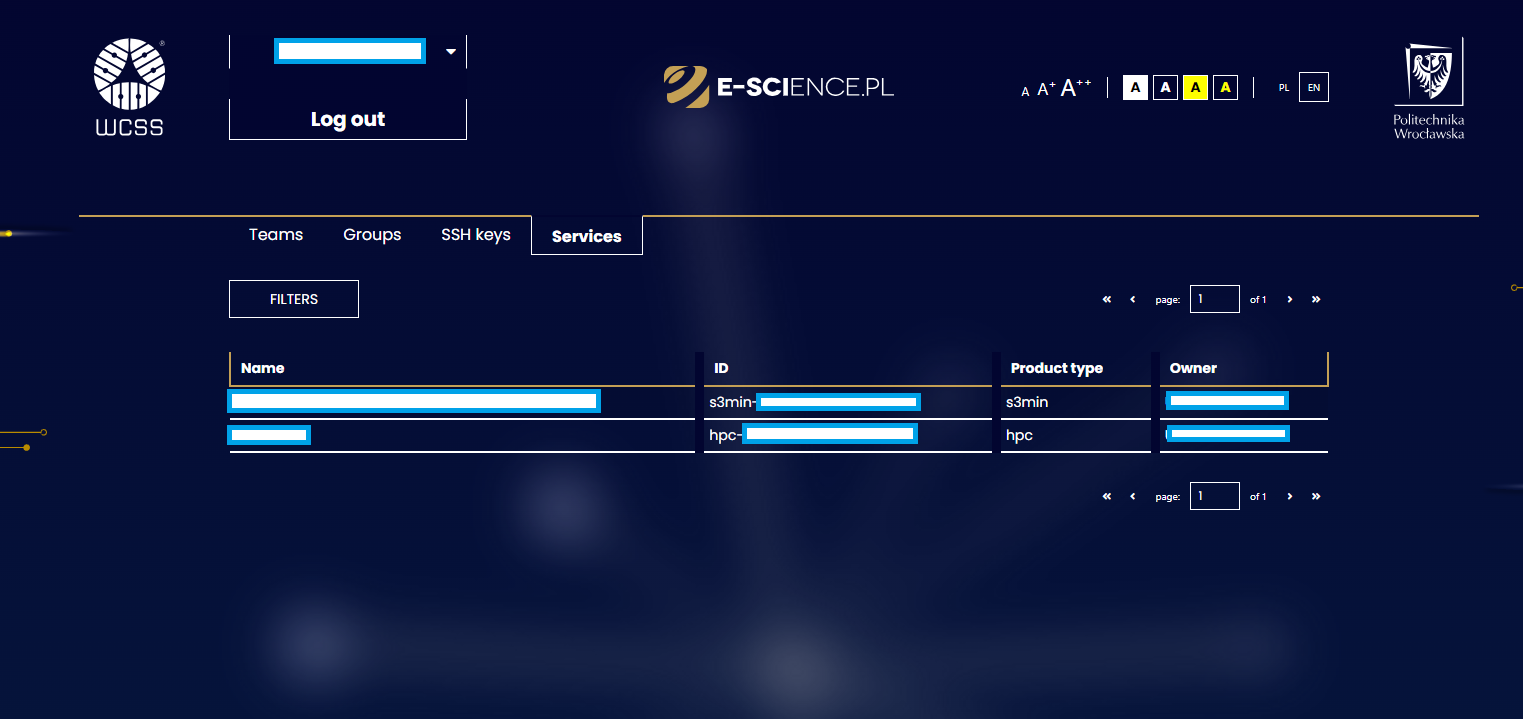
- You will be logged into your user account.
¶ Team
¶ Registration
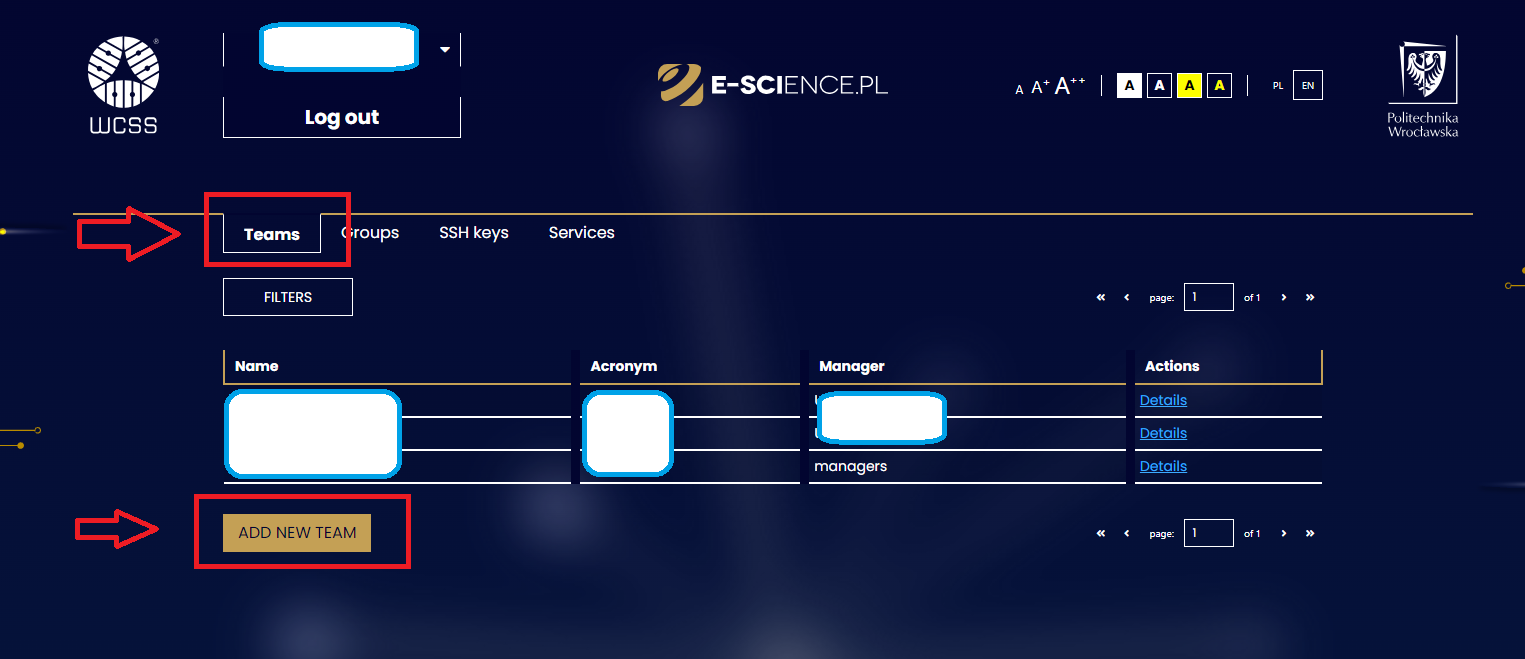
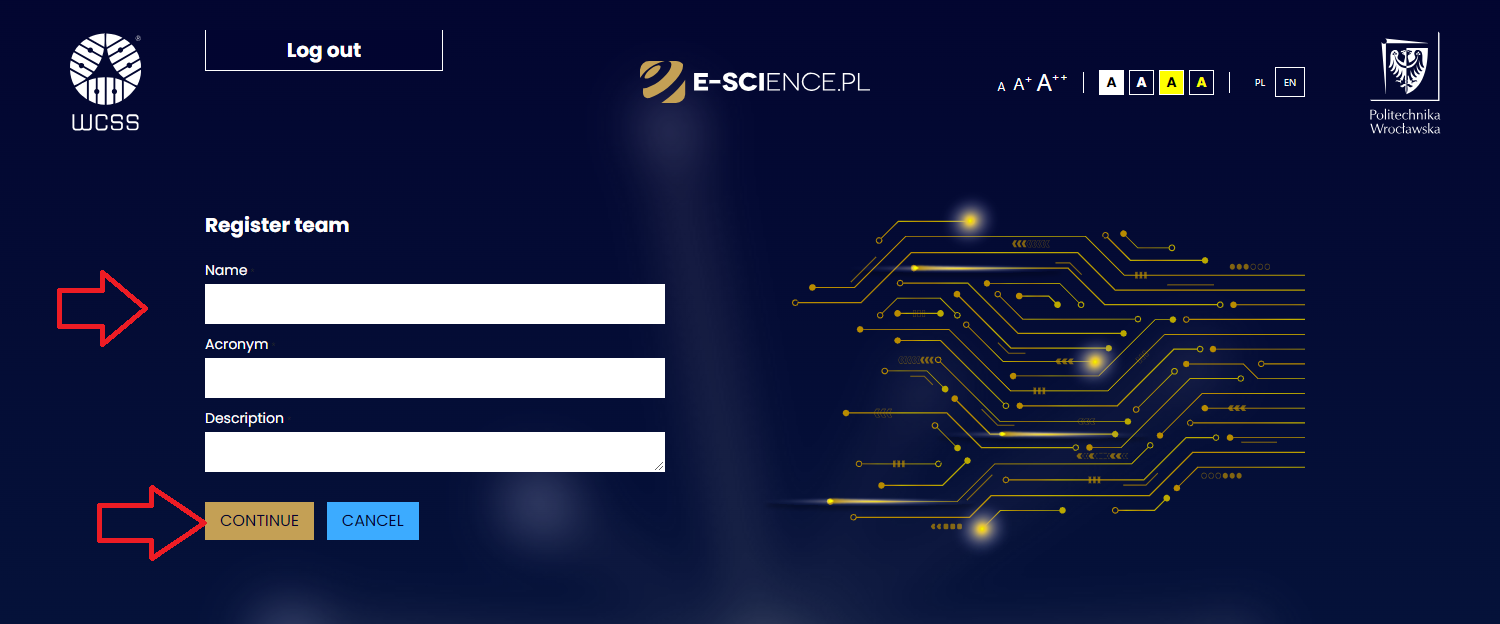
A person authorized to register a unit and manage its users can create teams, which are a form of organizing collaborators. To do this, perform the following actions in the following order: 1. After logging into your account, go to the Teams tab and click the ADD A NEW TEAM button.
- Fill in the appropriate fields of the team registration form:
- Name,
- Acronym - only letters and numbers are allowed,
- Description.
After filling in the form, click the CONTINUE button
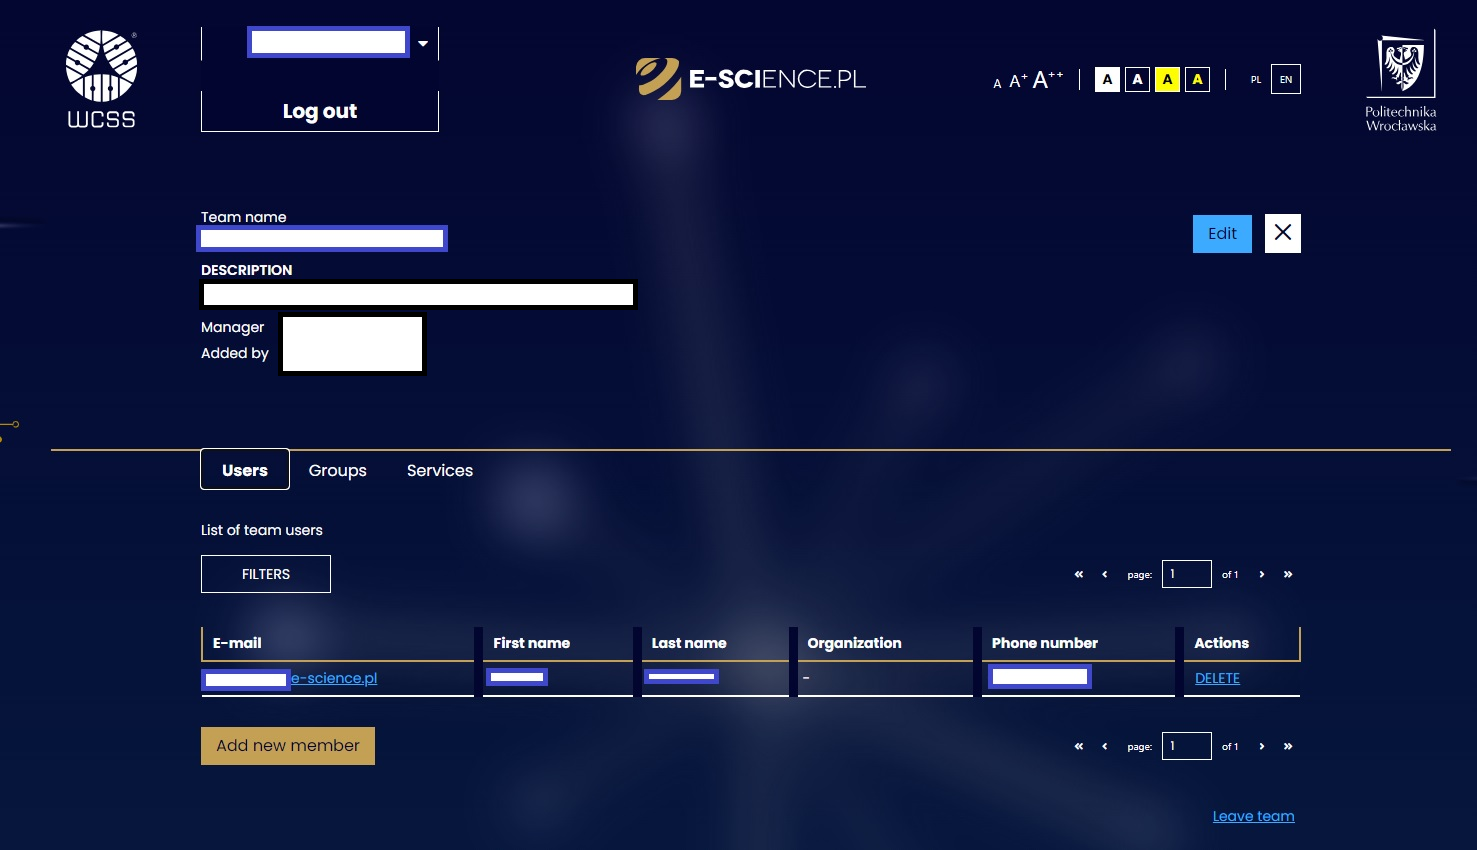
- After creating a team, the user is redirected to a page with information about the created team.
¶ Management
¶ Edit
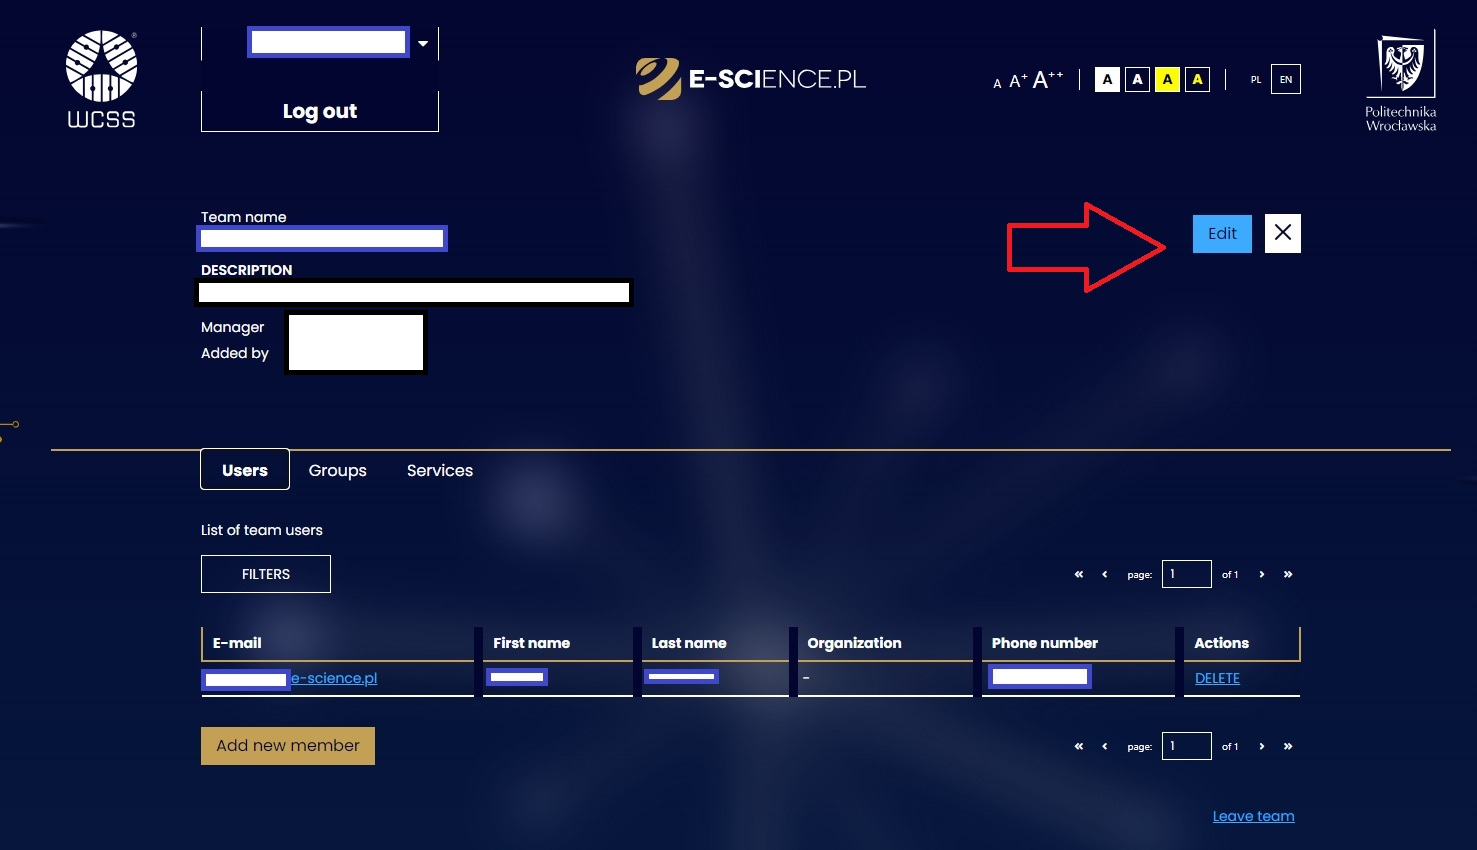
The team can be edited via the blue Edit button.
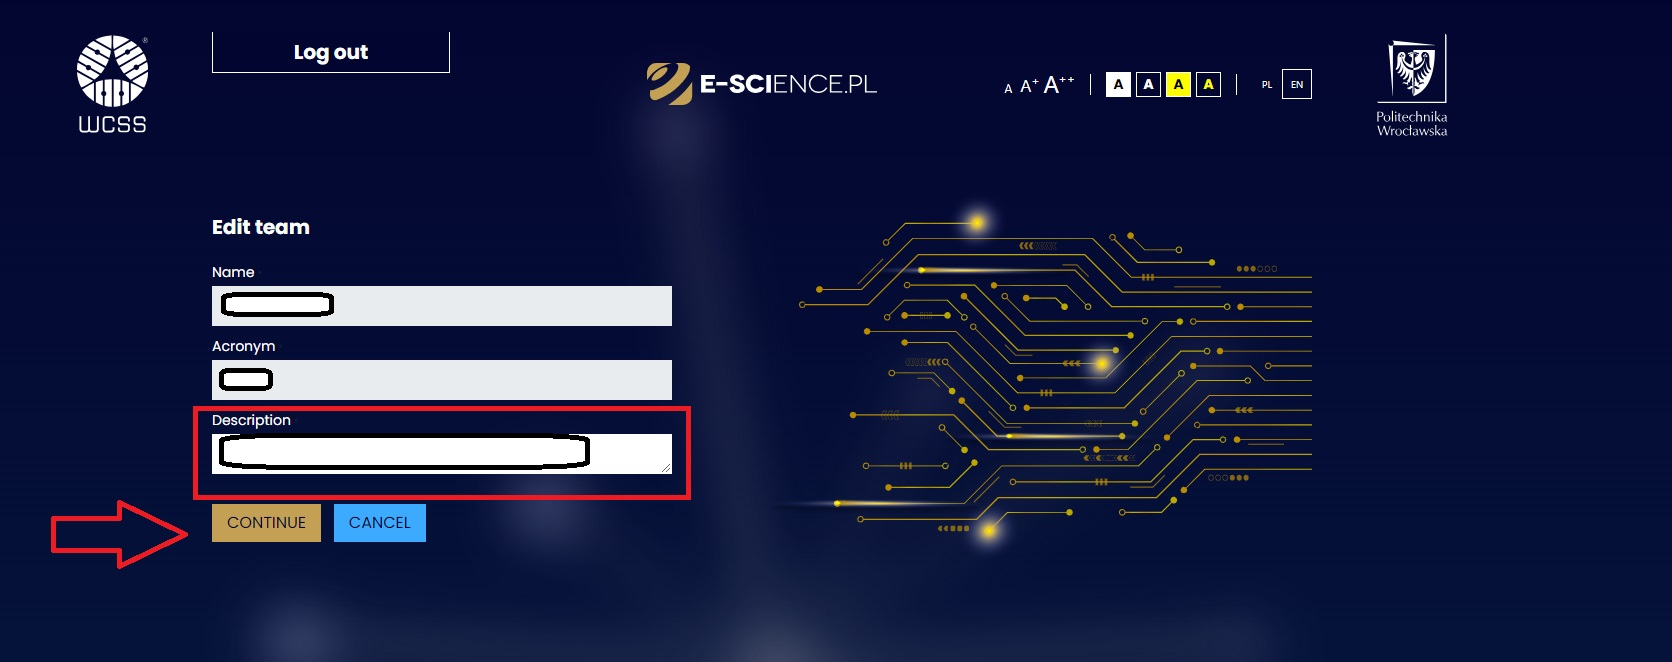
An edit window will then open, where you can change the description (you cannot change the name or acronym). The changes you have made must be accepted by selecting the CONTINUE button.
¶ Leaving a team
A user can leave a team by clicking on the blue text Leave team
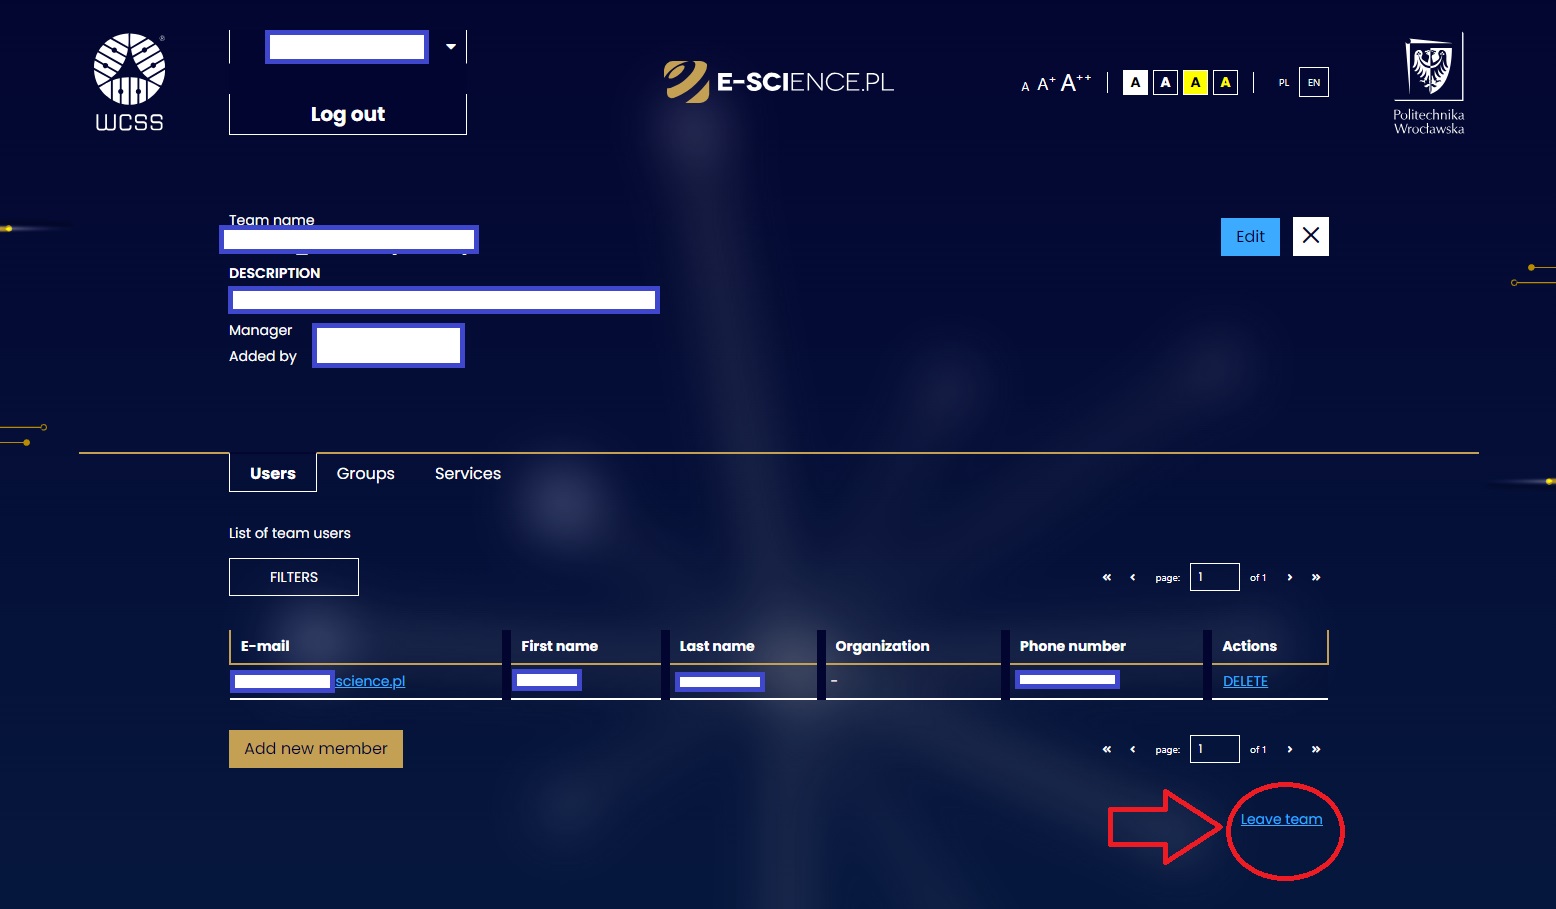
If the user is a team manager, they will be asked to transfer permissions to another person who is a team member.
¶ Groups
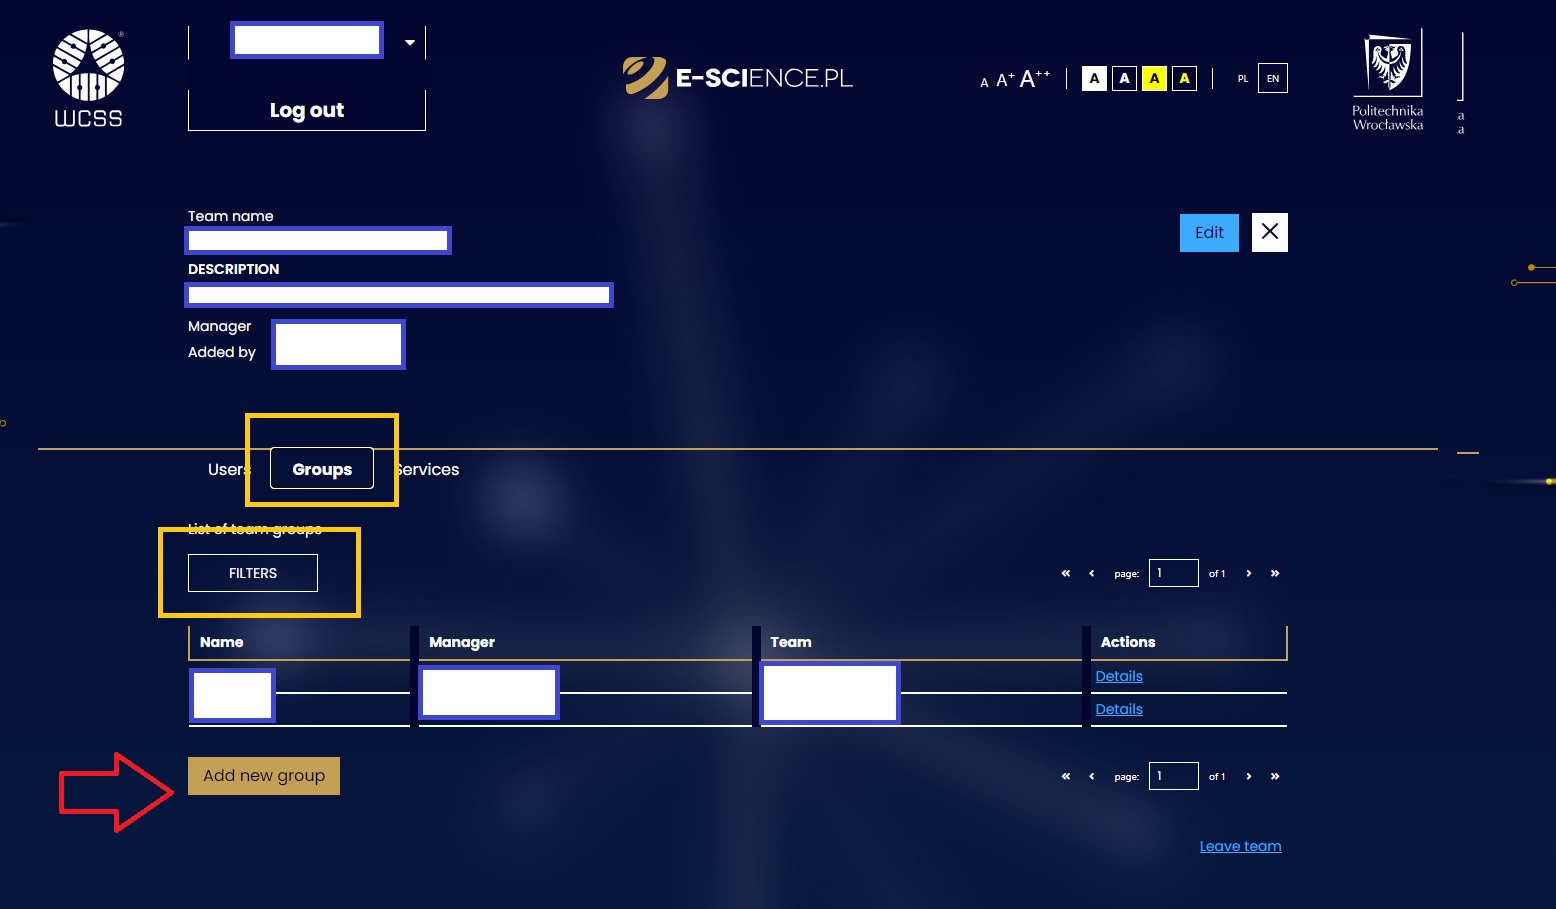
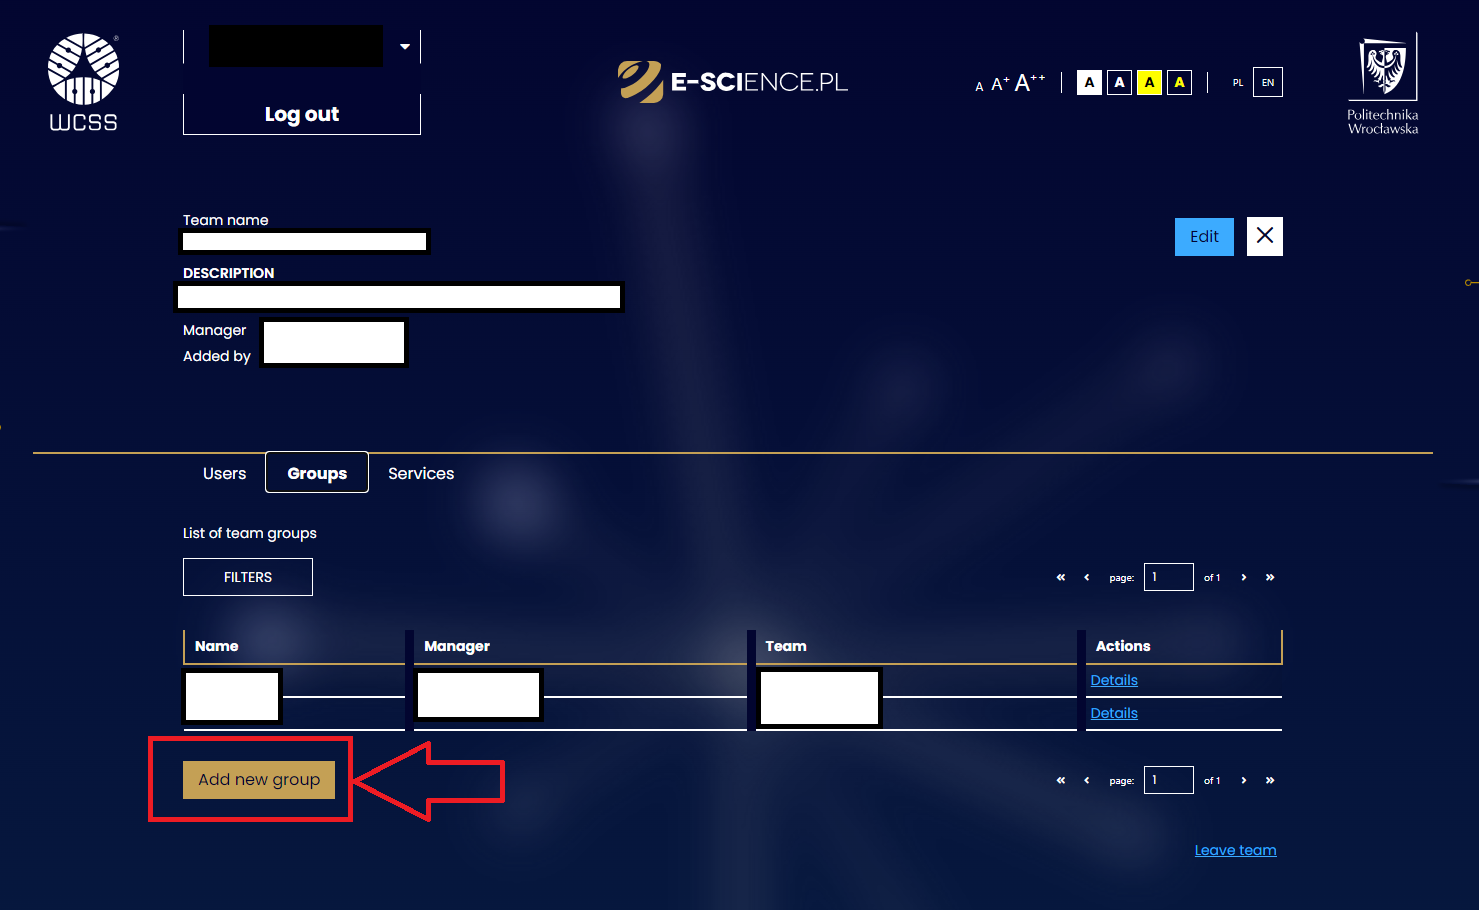
It is possible to add new groups using the Add new group button, which will be described later in the manual. If there are more groups created in the team, you can use filtering by name or description on the collective list to search for the selected one.
¶ Users
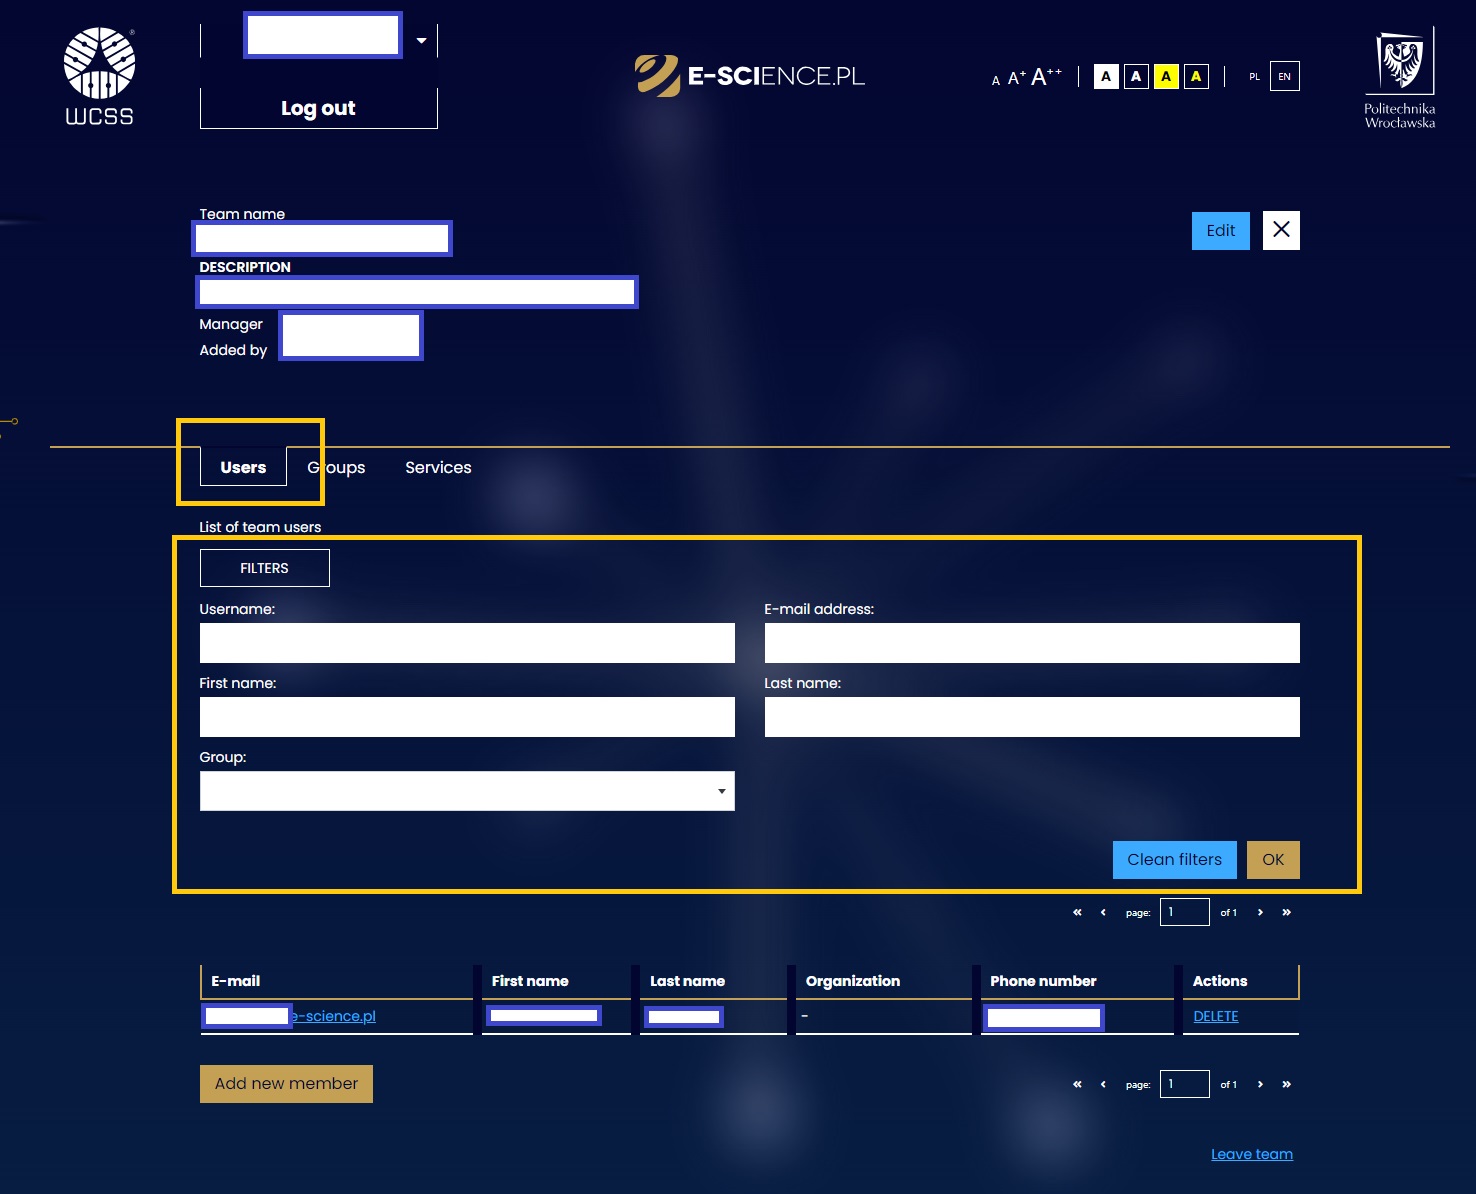
It is possible to search for a selected person from the list of team users, by filtering. Possible methods to use include: username, email address, first name, last name - or the group they are a member of
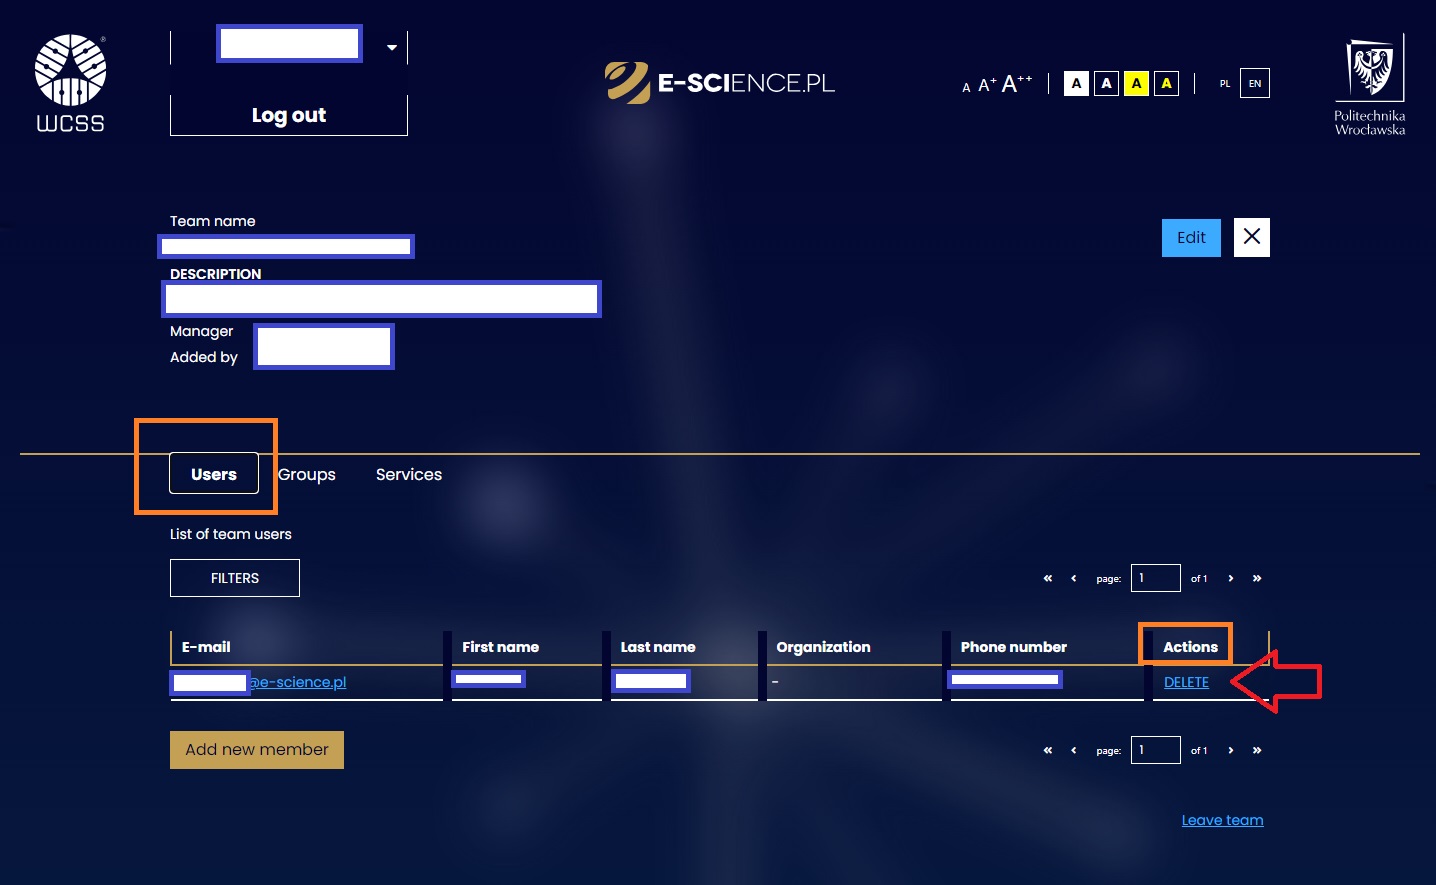
- The person managing the team (the Manager) can remove selected users using the DELETE button located on the right in the Actions section.
- The person managing the team can add new team members using the Add Member button.
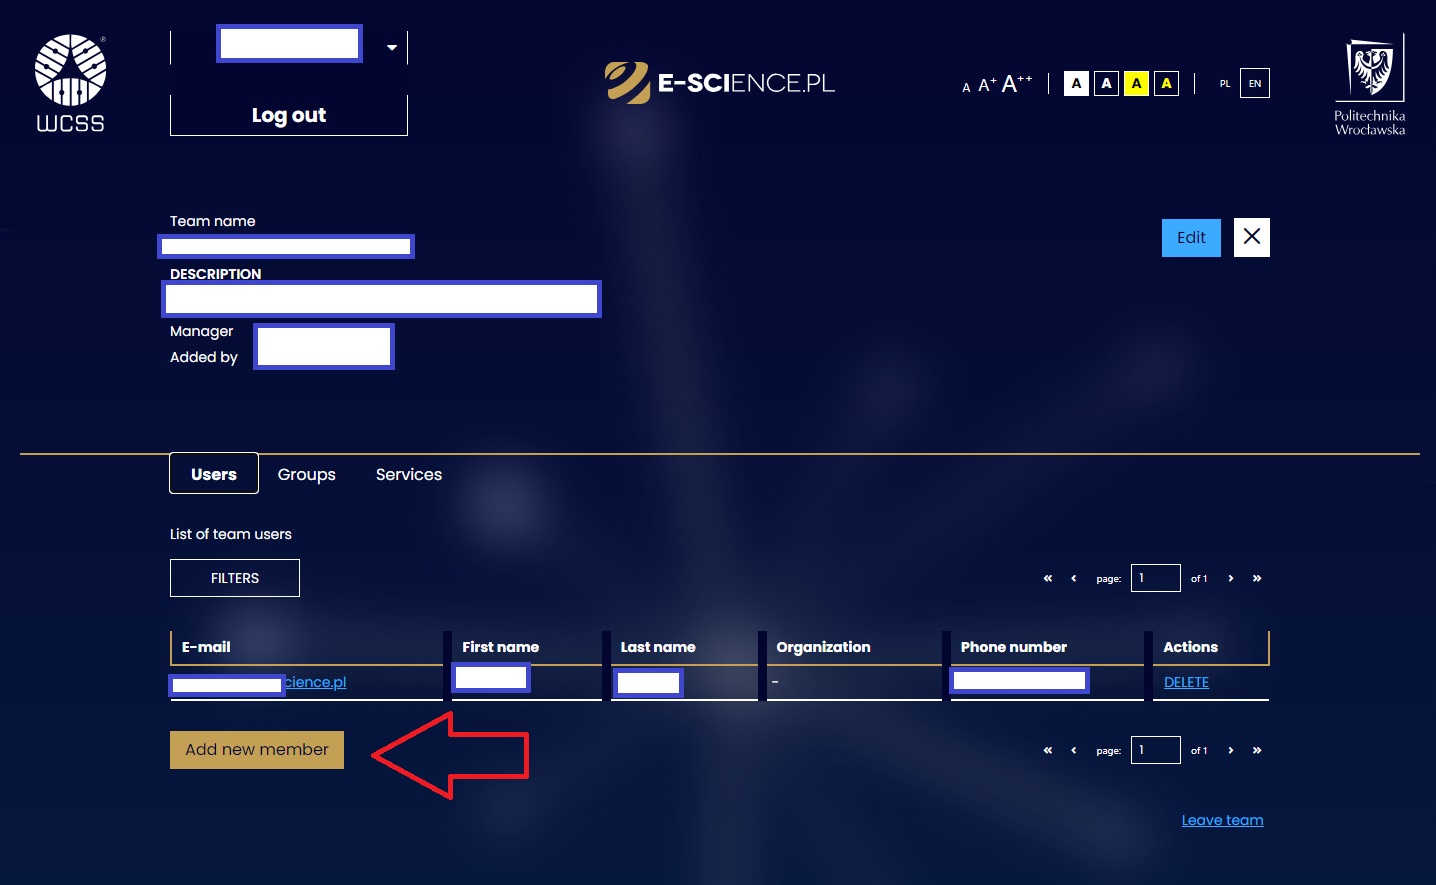
There are two methods for adding users to a team:
-
Inviting one or more people from the list of all users who have accounts on the E-SCIENCE.PL platform. In order to make it easier to find a specific person, you can use filters. With the data of the appropriate person, just click INVITE, and that person will receive an e-mail with an invitation to join the team.
-
Using the Send Invitation button, where you need to provide the email address of the person you want to invite to the team and click the Send button.\
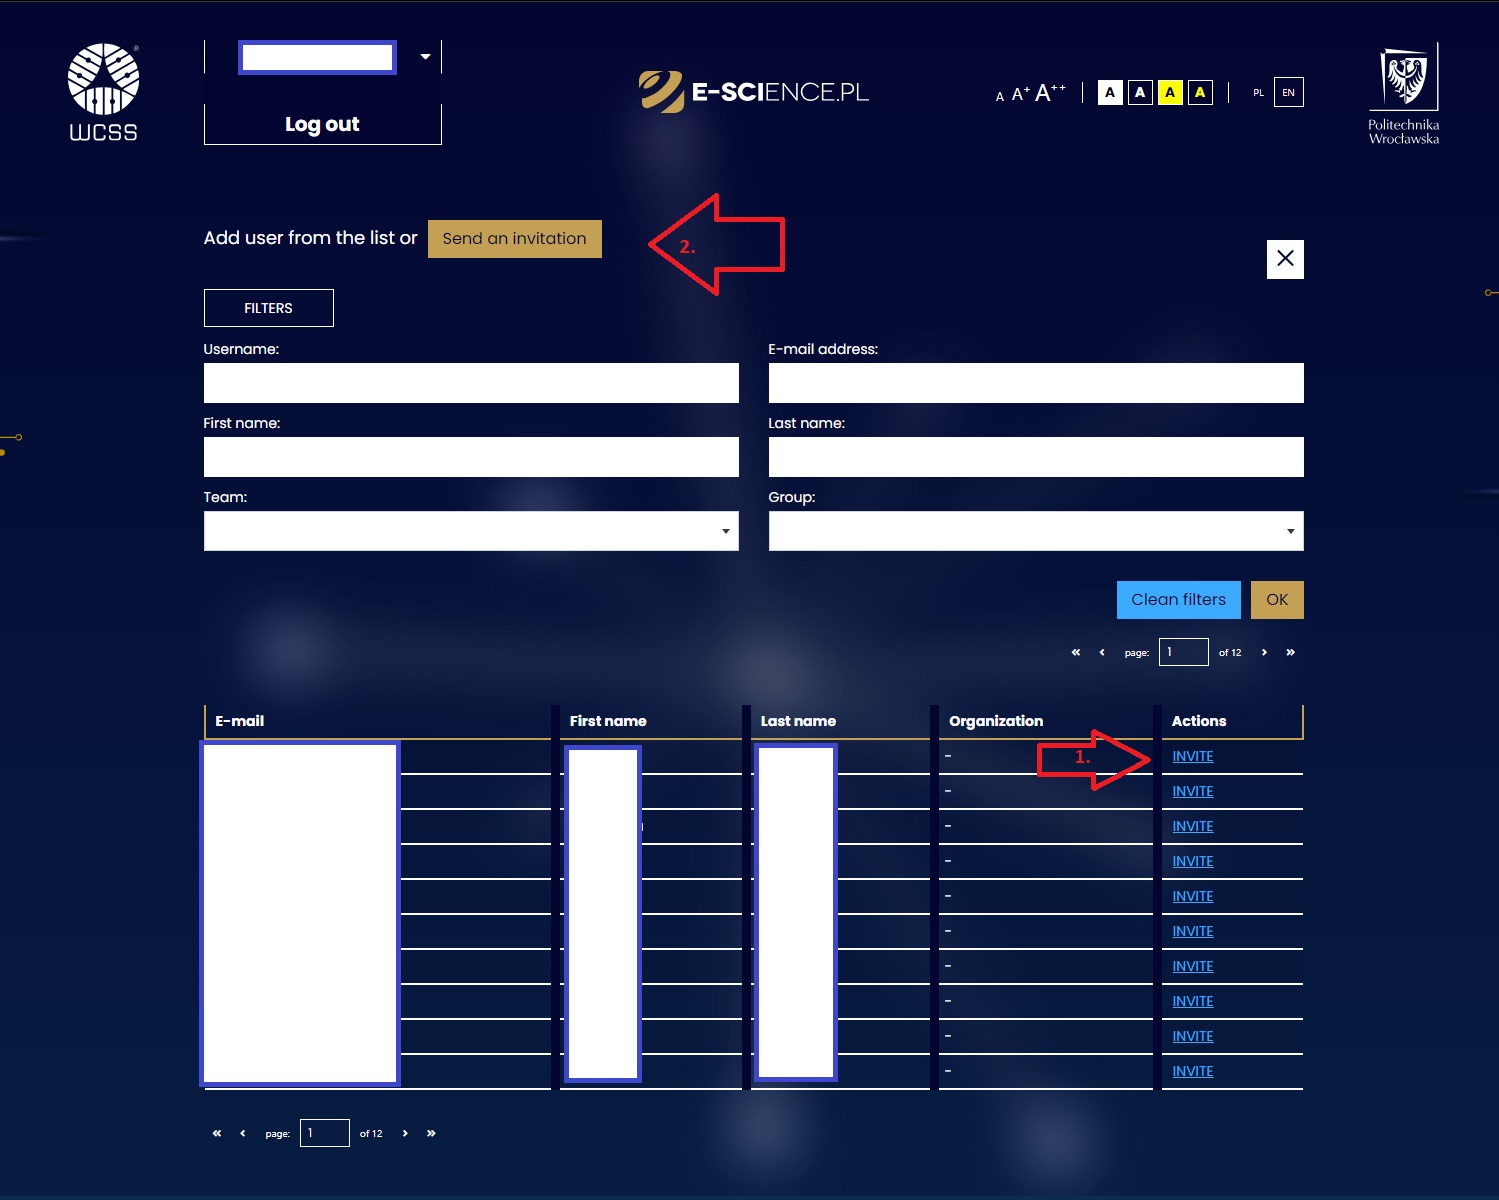
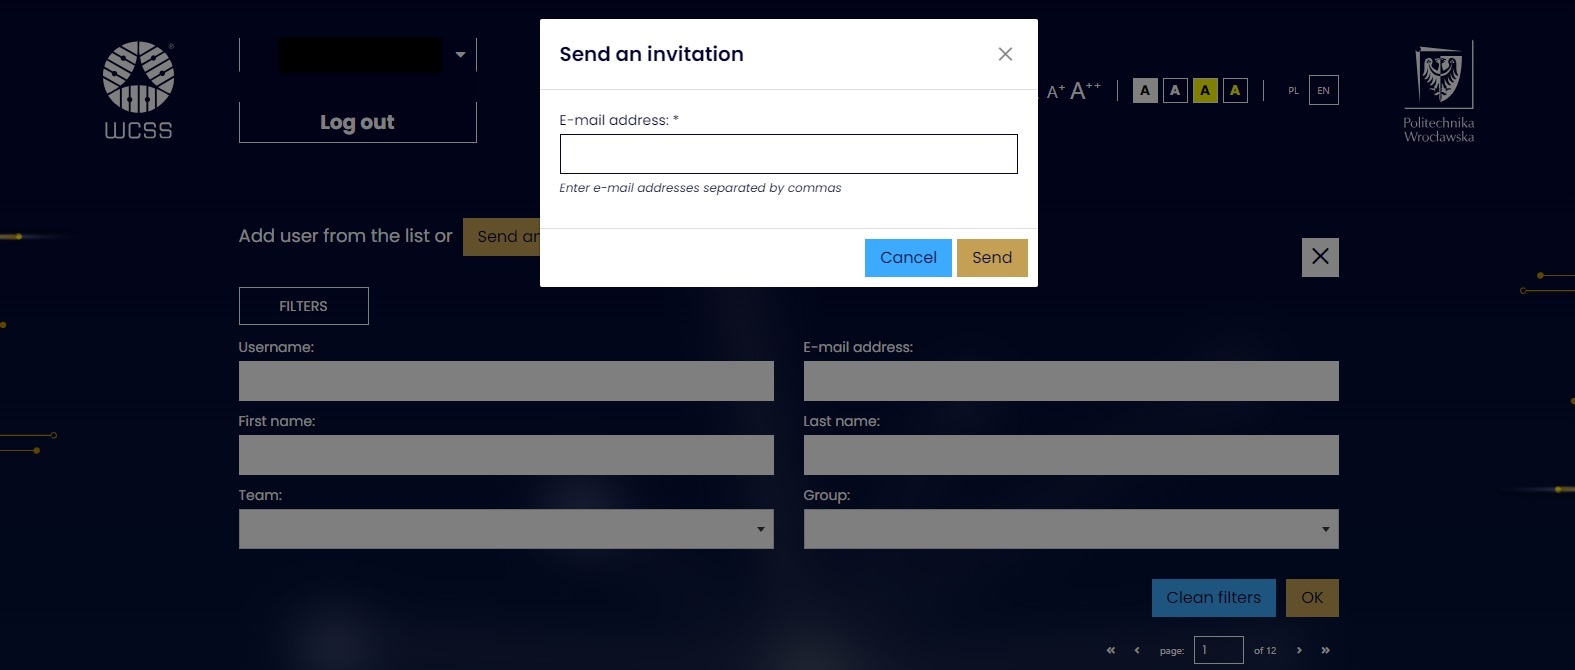
People who receive an invitation through the E-SCIENCE.PL user management service will receive an email message to their address describing the actions that need to be taken to join the team.
¶ Invitations
Users with accounts on the E-SCIENCE.PL platform can check active invitations to teams or groups at: https://users.e-science.pl/zaproszenia/
¶ Services
In the Services tab you can see all the services that have been shared with this team. If the team has more services, then you can use FILTERS (service name, ID, product type) to search.
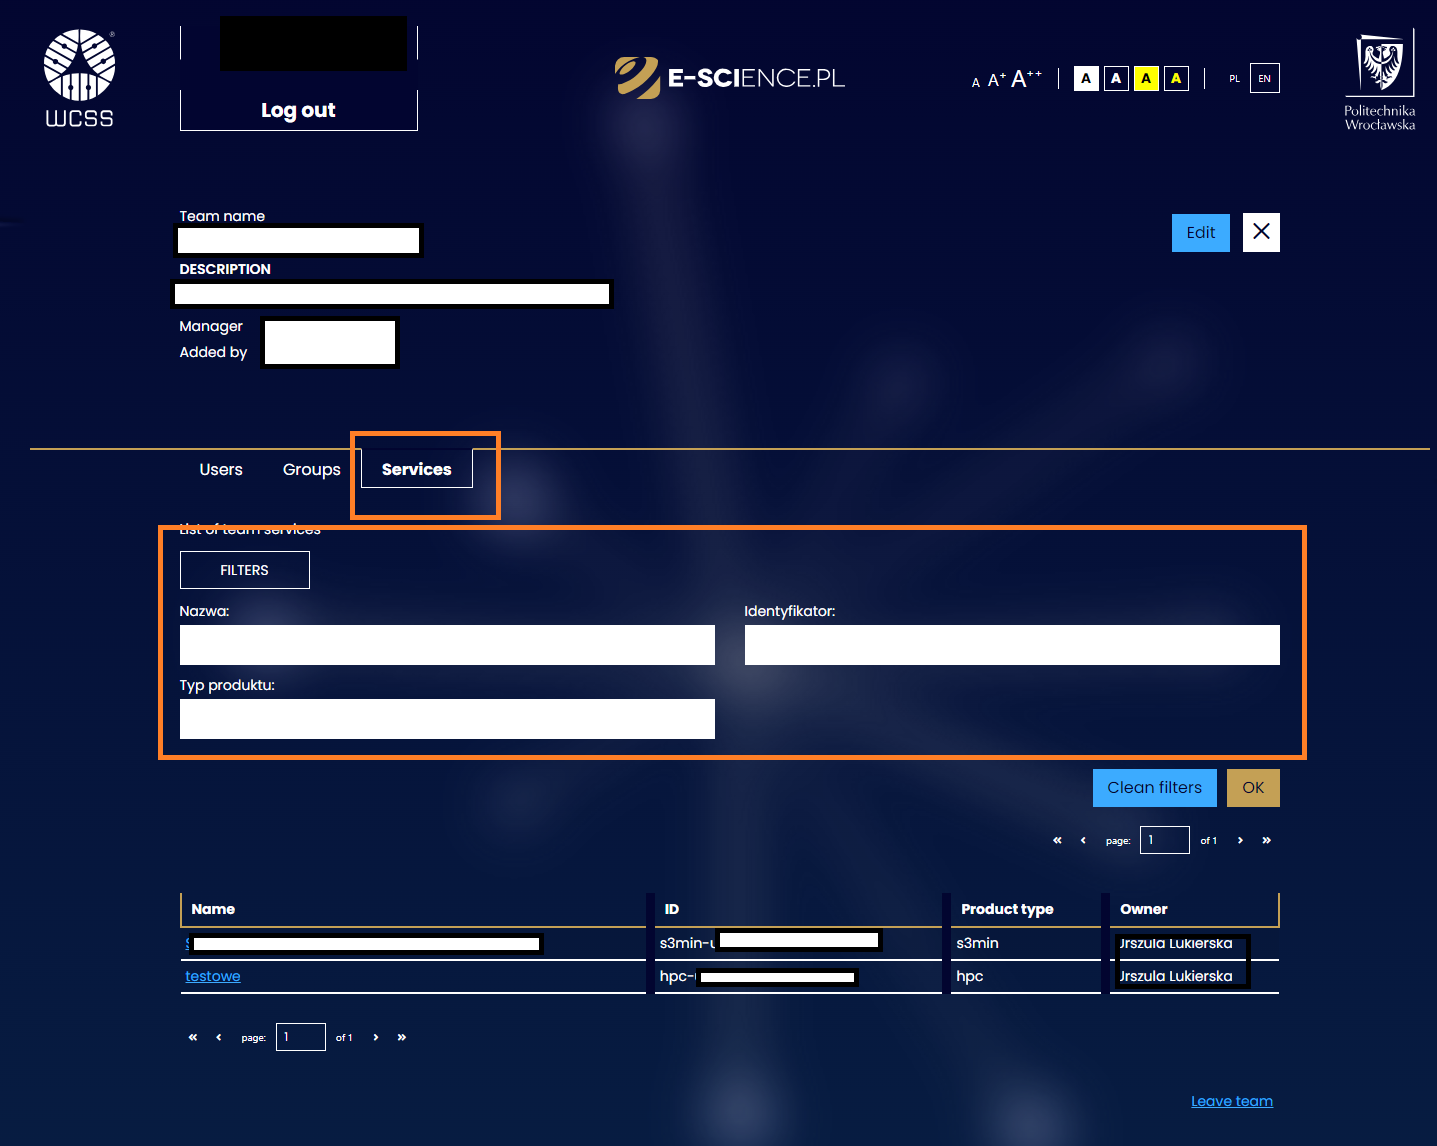
¶ Groups
As part of the provided team management tool - it is possible to separate registered and active users from the team into smaller sets (groups).
In addition, you can assign people from outside the previously created team to them (provided that such users have an account on the E-SCIENCE.PL Platform).
Each group has a leader who has the right to manage users within it. He adds or removes users, but cannot block them. The consequences of creating groups are revealed when using group work services and tools. Only the team leader has the right to create groups within his team.
¶ Registration
A group is created by performing the following steps:
- After logging into your account, go to the Groups tab and click the ADD A NEW GROUP button.
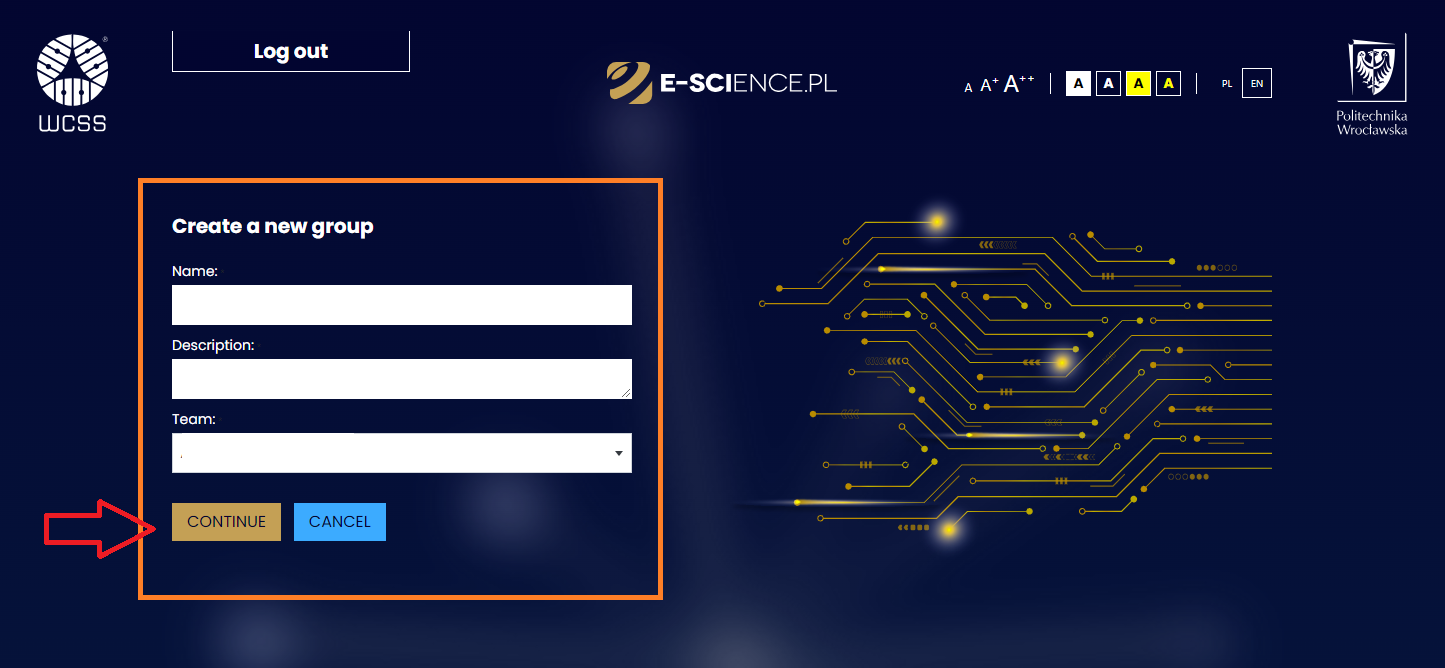
- Fill out the registration form, which contains the following fields:
- Name
Group name can contain only lowercase letters, digits and special characters .-.
It cannot contain Polish characters. It must start with a letter and end with a letter or number
- Description,
- Team name - you must indicate the team within which you want to create a group.
After filling in the required fields, click the CONTINUE button.
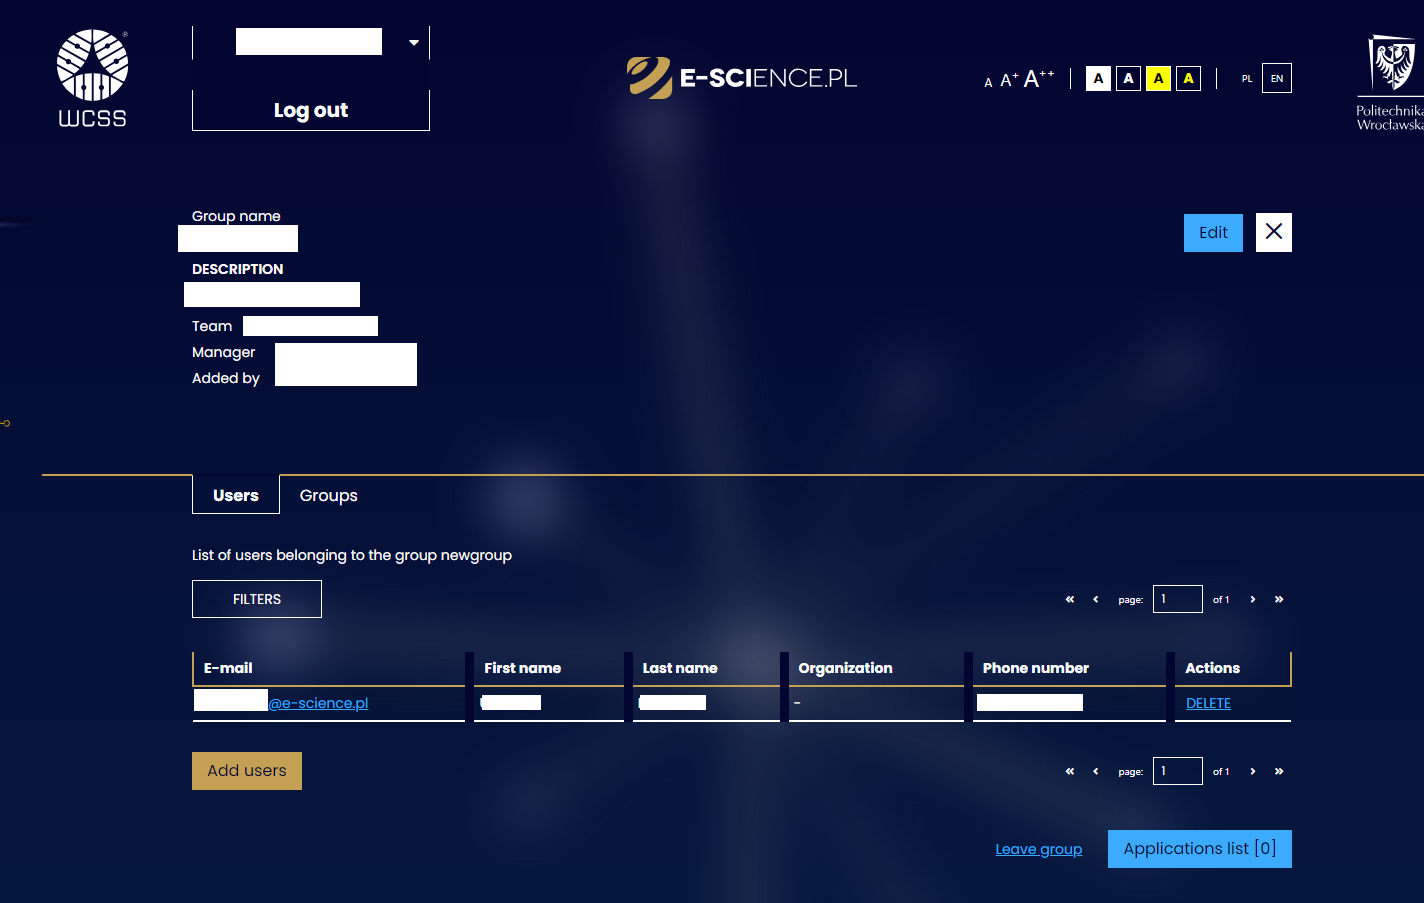
- After creating a group, the user is redirected to a page with information about it.
¶ Management
¶ Edit
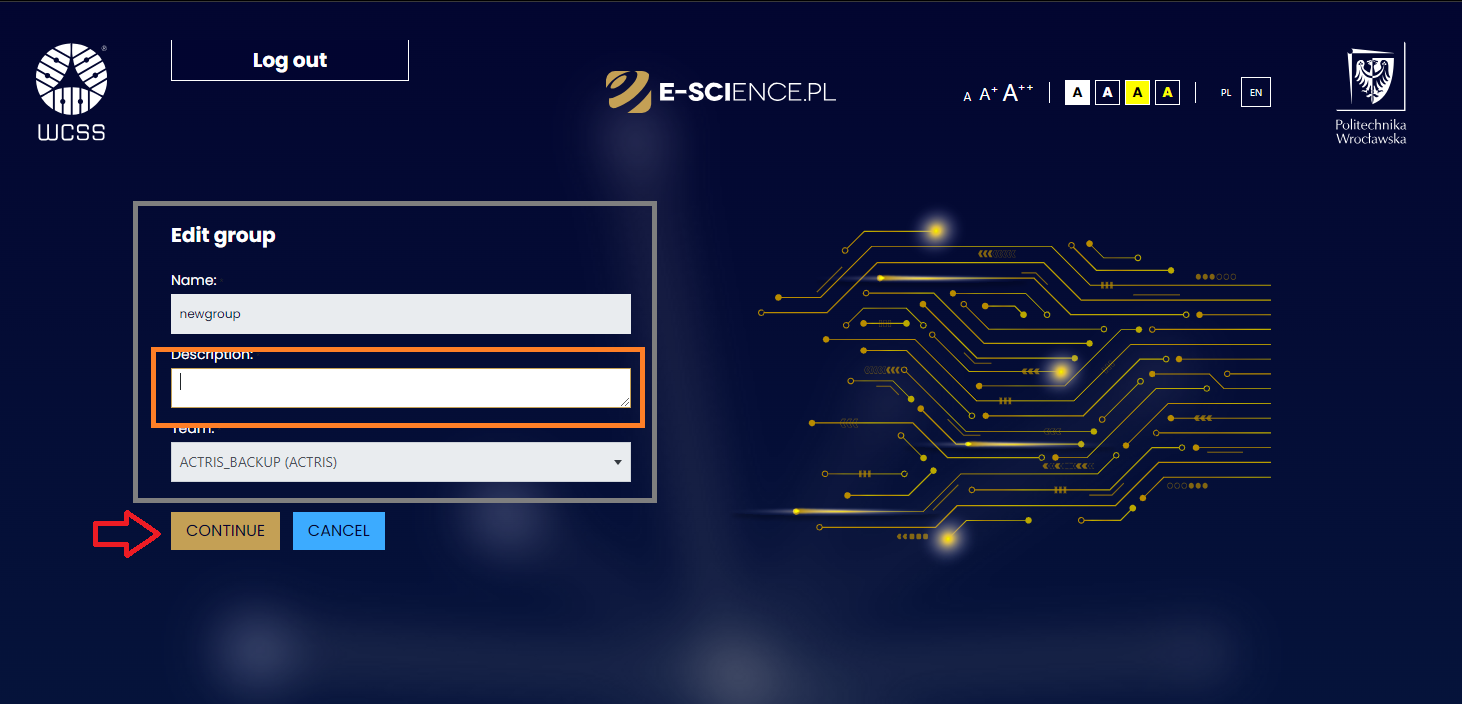
The group can be edited by using the blue Edit button.
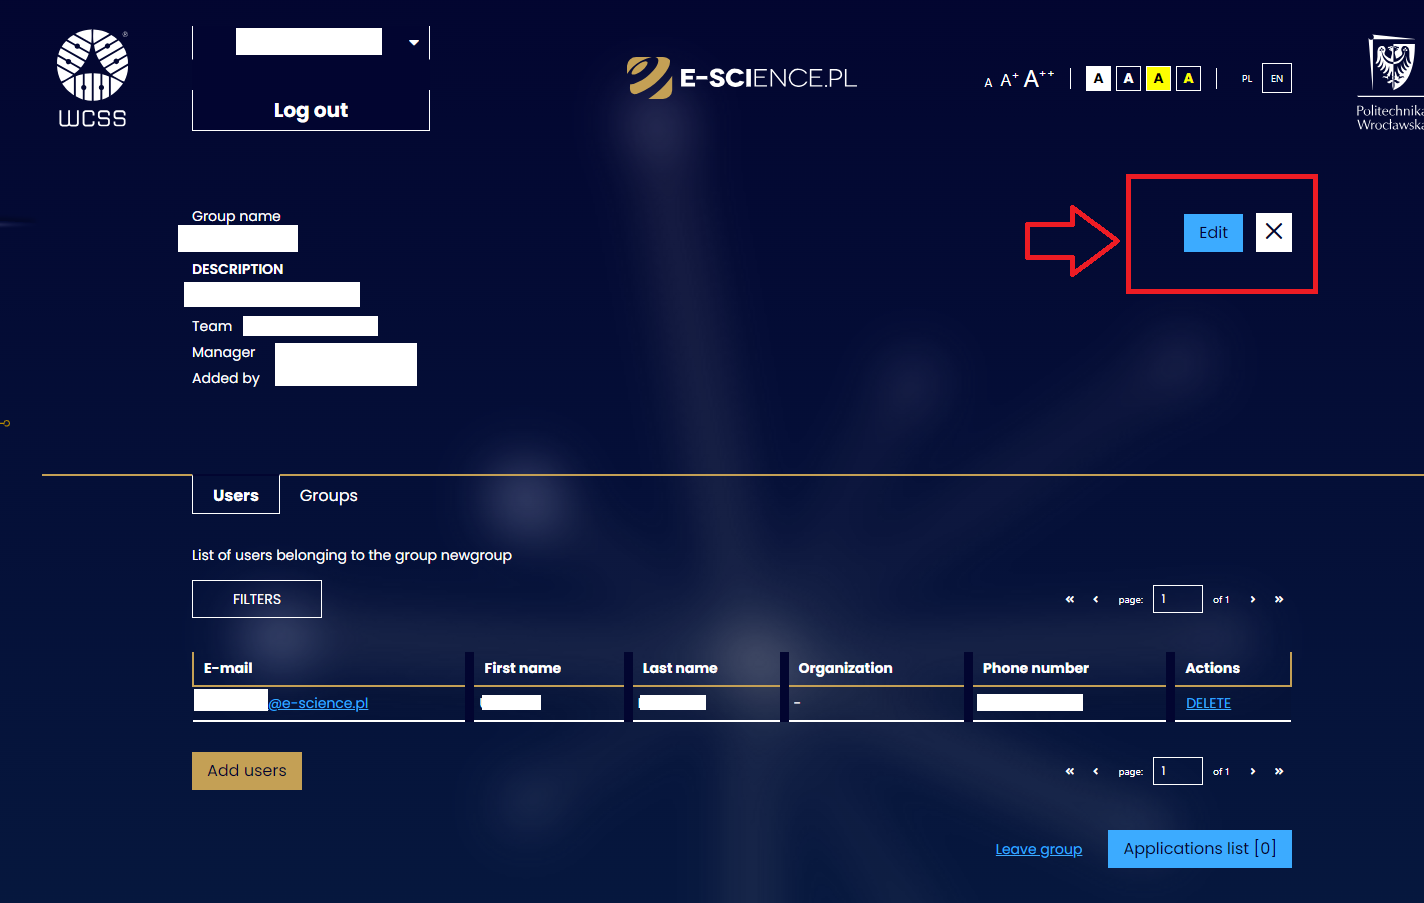
The user is then transferred to the edit window, where the description can be changed - however, it is not possible to change the group name and assign it to the team in which it was created.
The changes made must be accepted by selecting the CONTINUE button.
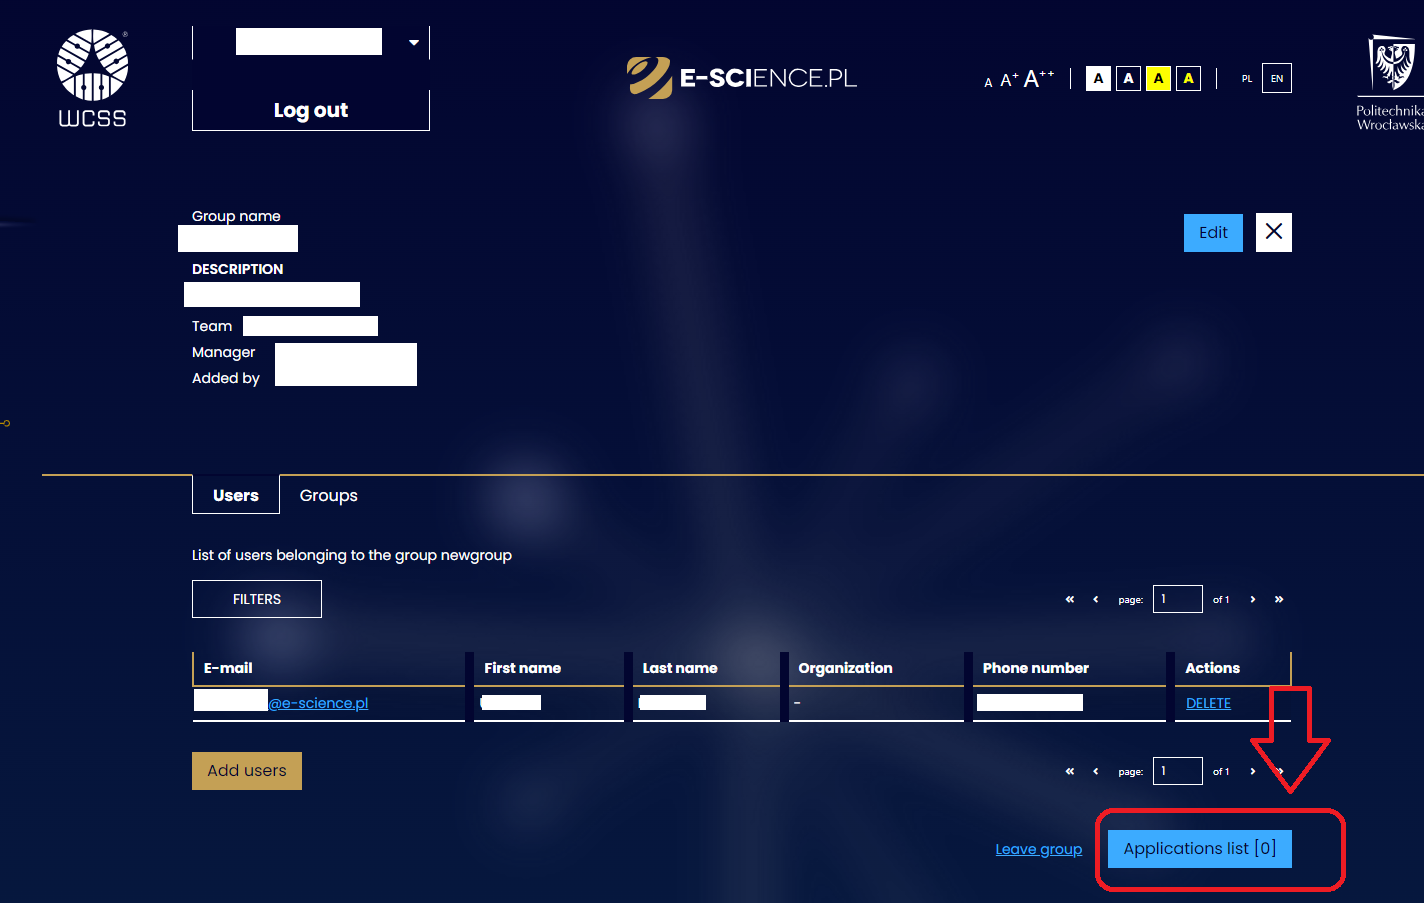
¶ Application List
The blue Application List button allows you to see a list of user applications for the selected group in square brackets.
After clicking, the user is taken to a new window - with visible group applications.
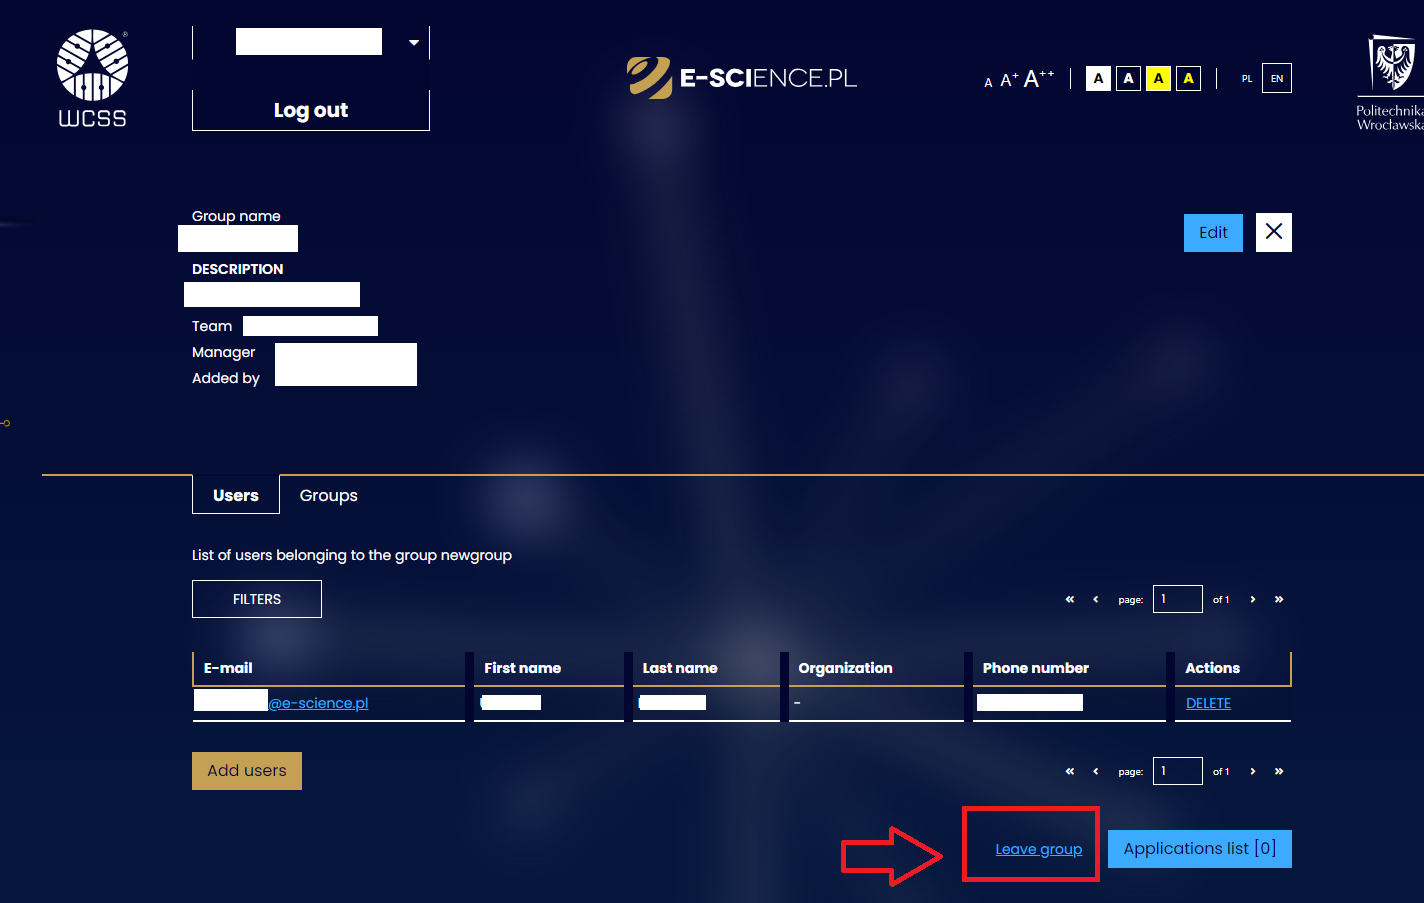
¶ Leaving the group
The user can leave the team by clicking the blue inscription Leave group.
¶ Users
You can search for a selected person from the full list of team users by using filters - by username, e-mail address, first name or last name.
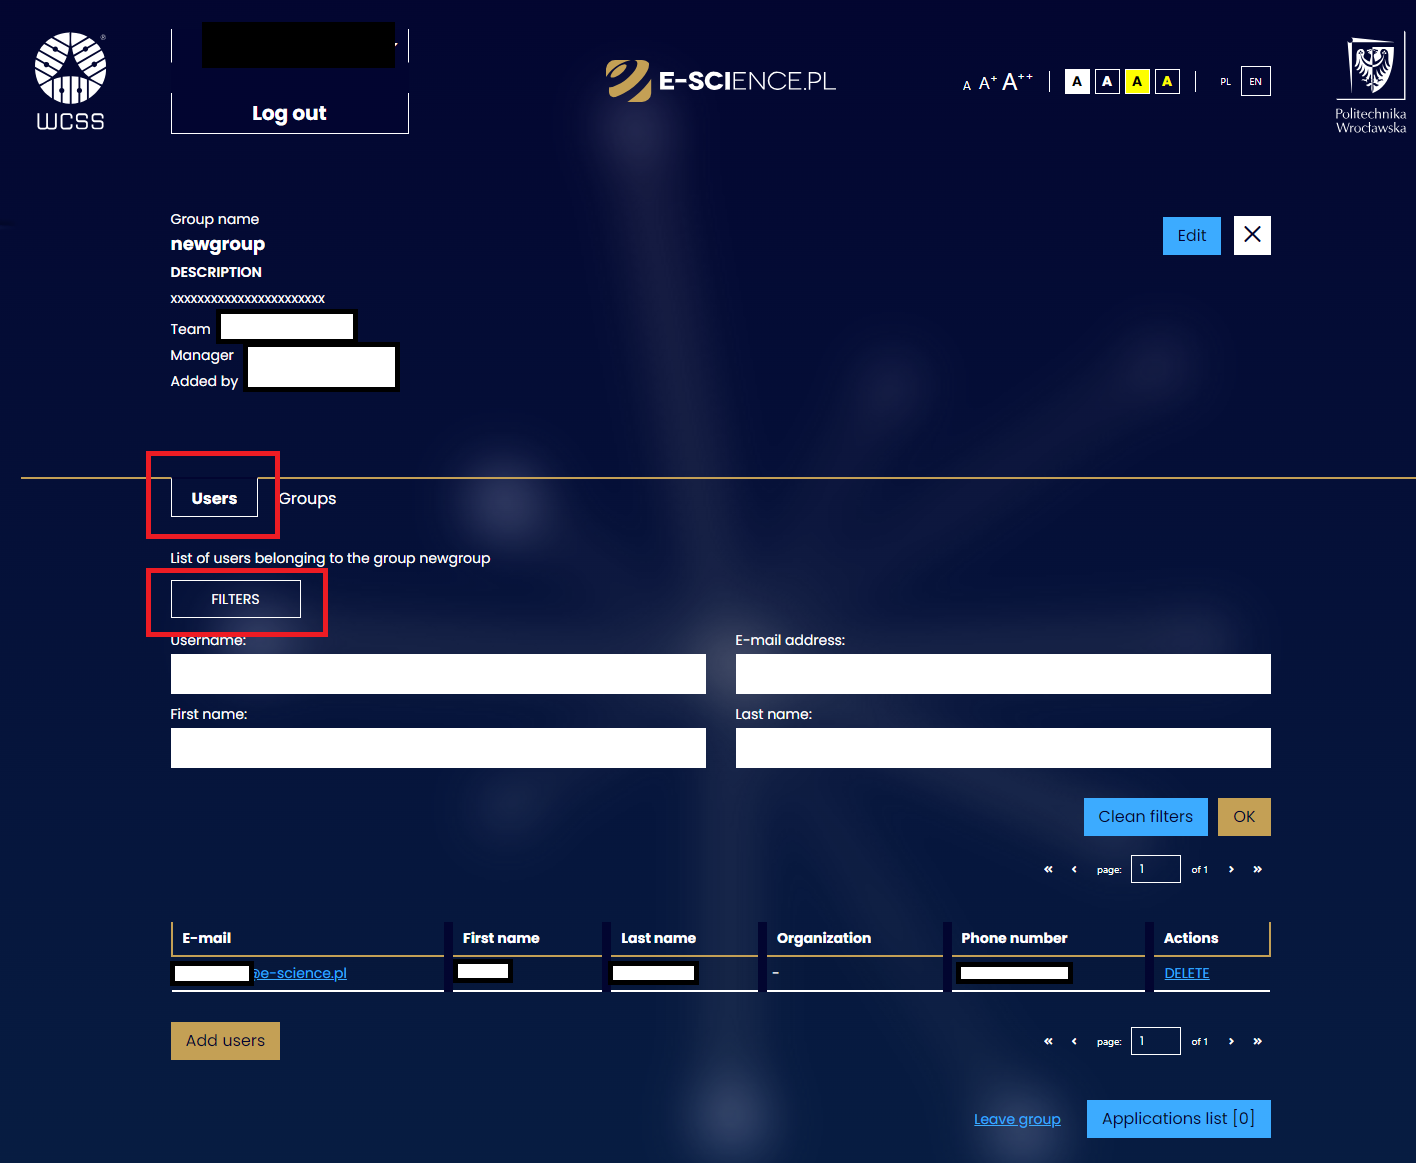
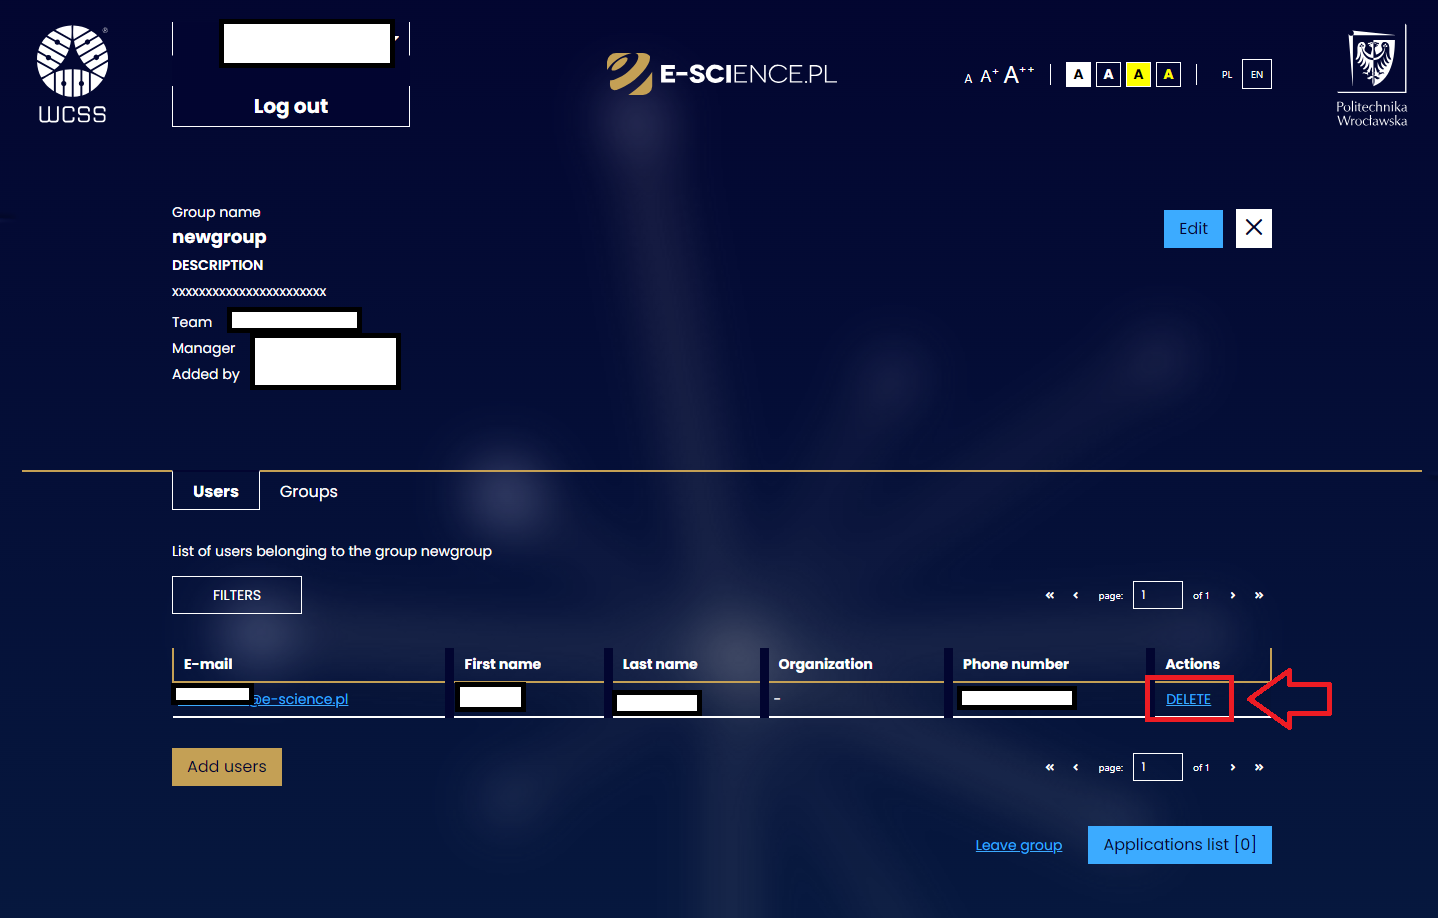
- The person managing the group can remove selected users using the DELETE button located on the right in the Actions section.
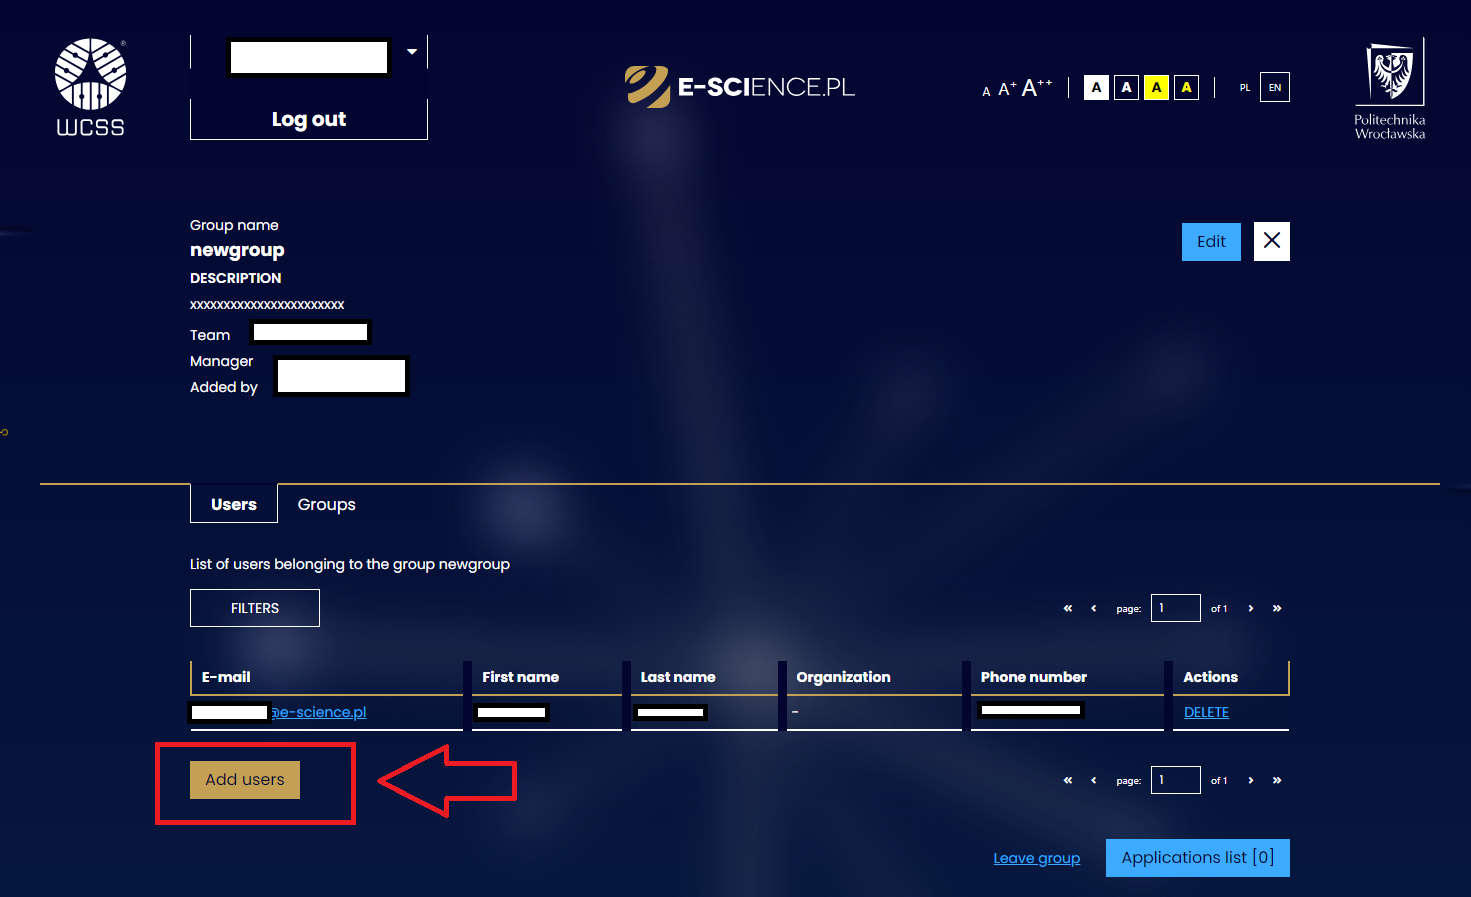
- The person managing the group can add new members using the Add Users button.
- Adding new users can be done in two ways:
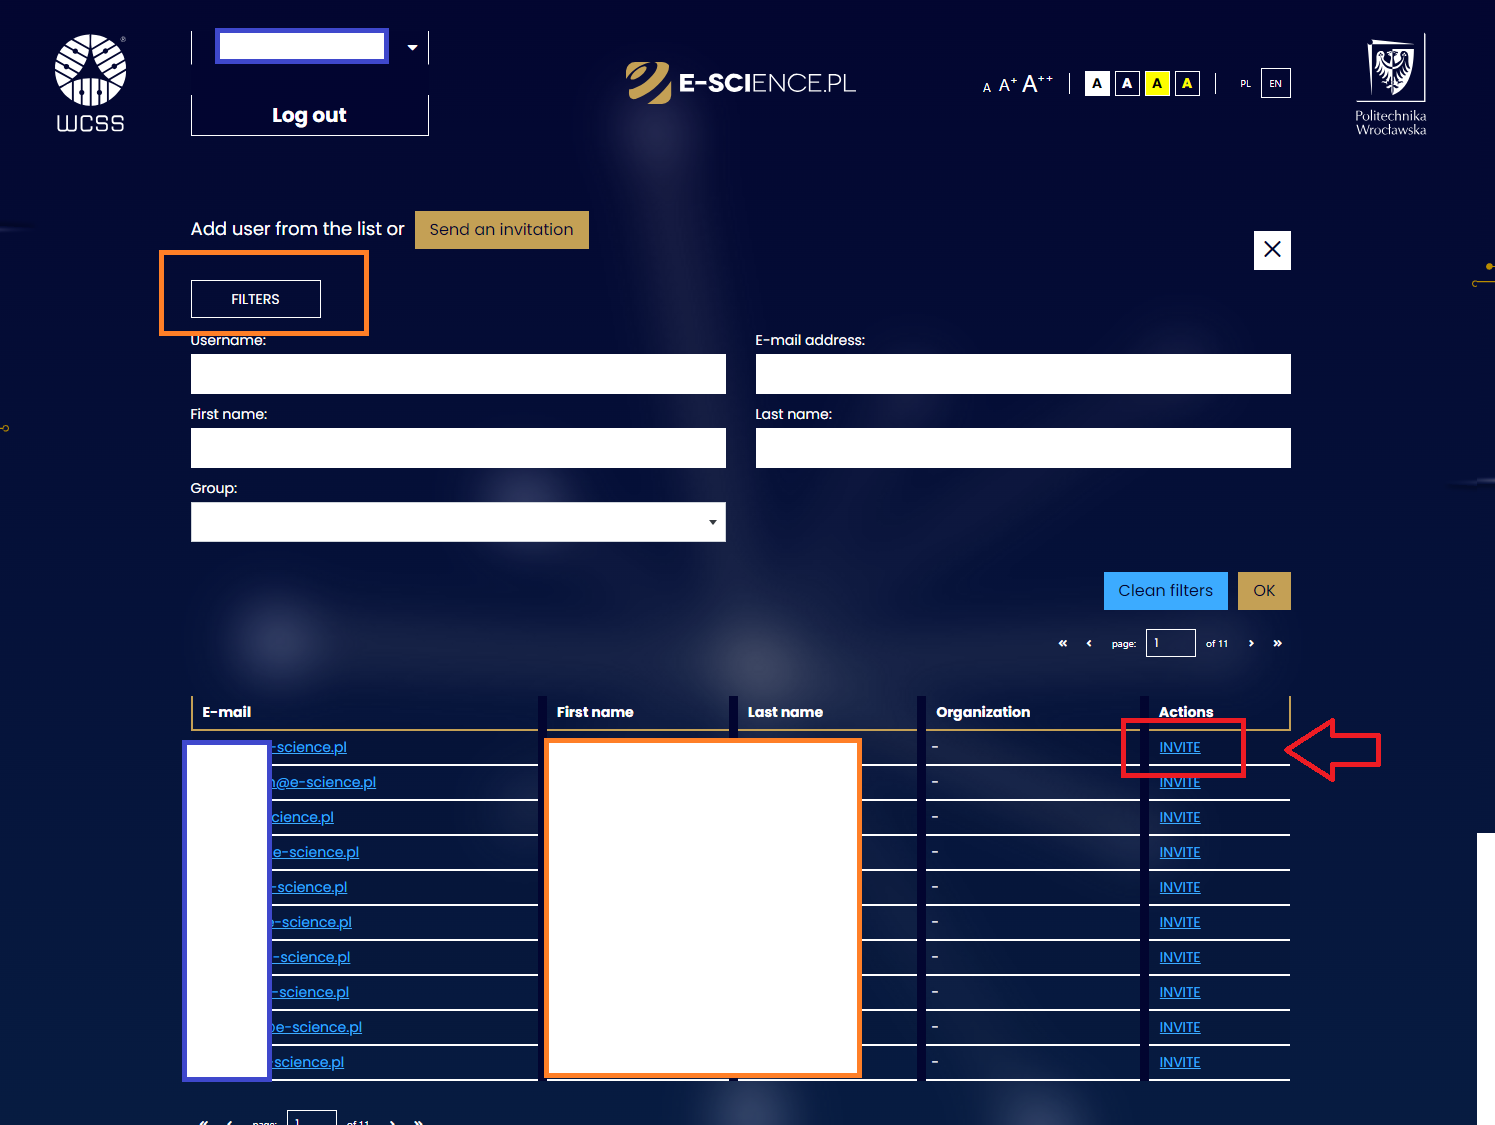
- Inviting a selected person or people from the list of all users who have accounts on the E-SCIENCE.PL platform. Finding a specific person is easier thanks to the filtering mechanism. Inviting to the group is done using the INVITE button - located in the Actions column.
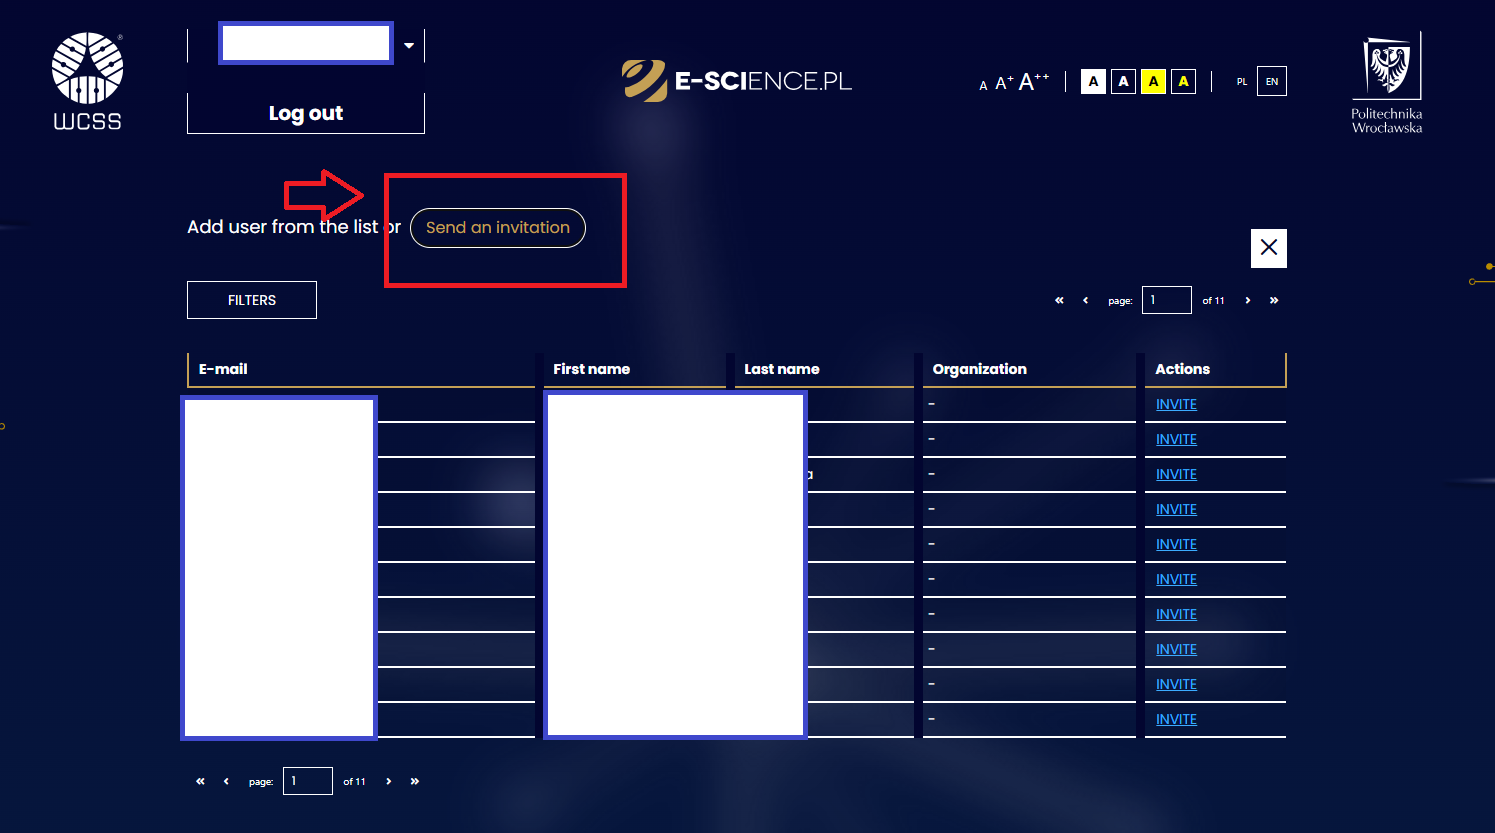
- Using the Send Invitation button, where you need to provide the appropriate email address of the person and use the Send button
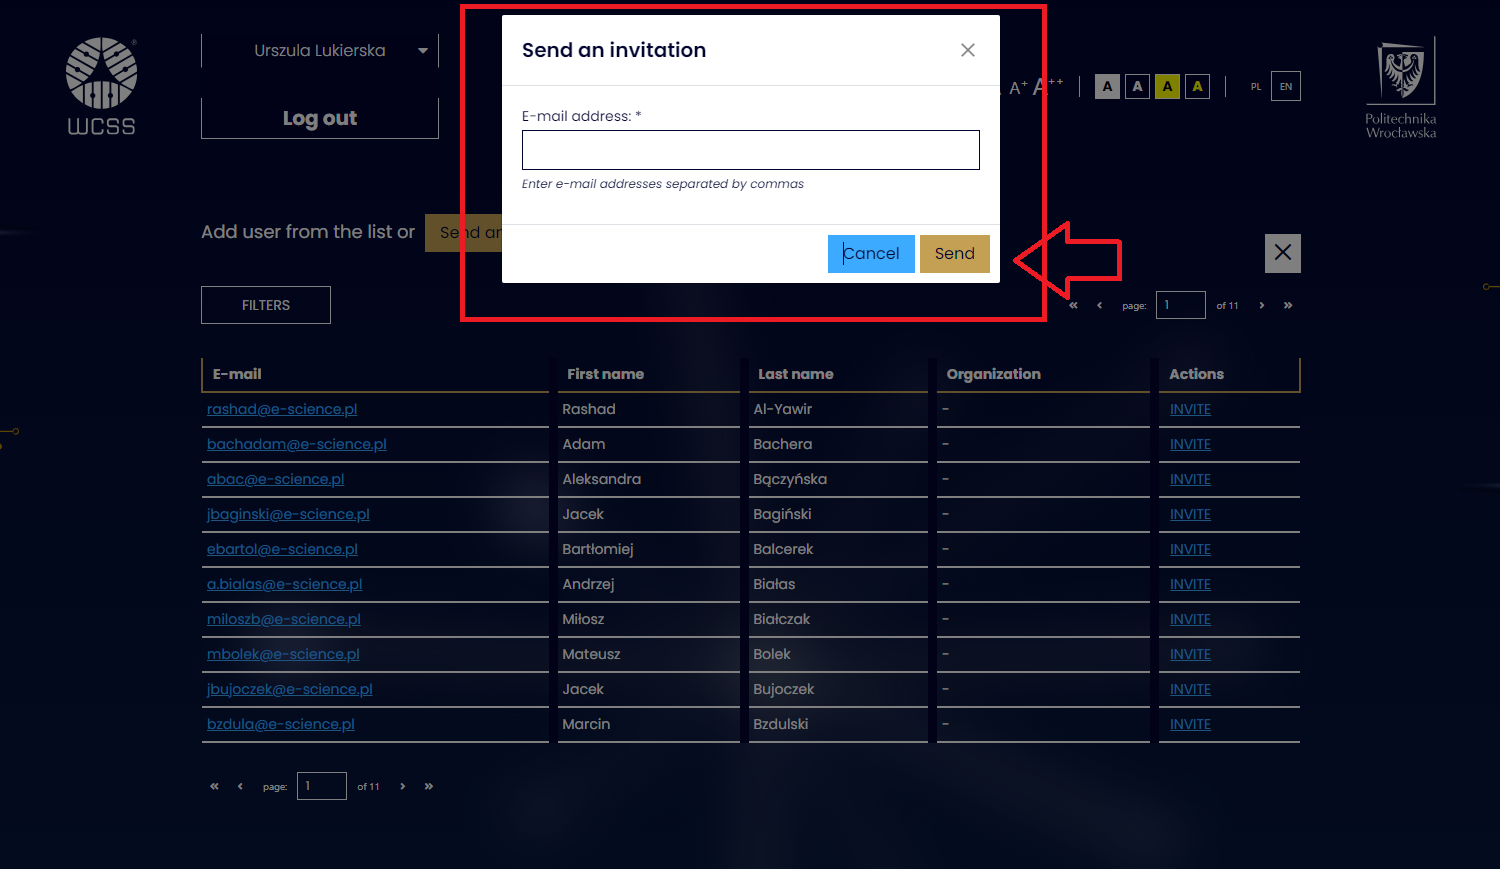
People who receive an invitation - sent via the E-SCIENCE.PL user management service, will receive an email message describing the actions necessary to take to become a group member.
¶ Invitations
Users with accounts on the E-SCIENCE.PL platform can check active invitations to teams or groups at: https://users.e-science.pl/zaproszenia/
¶ Groups
- There is an option to add an existing group via the Add existing group button.
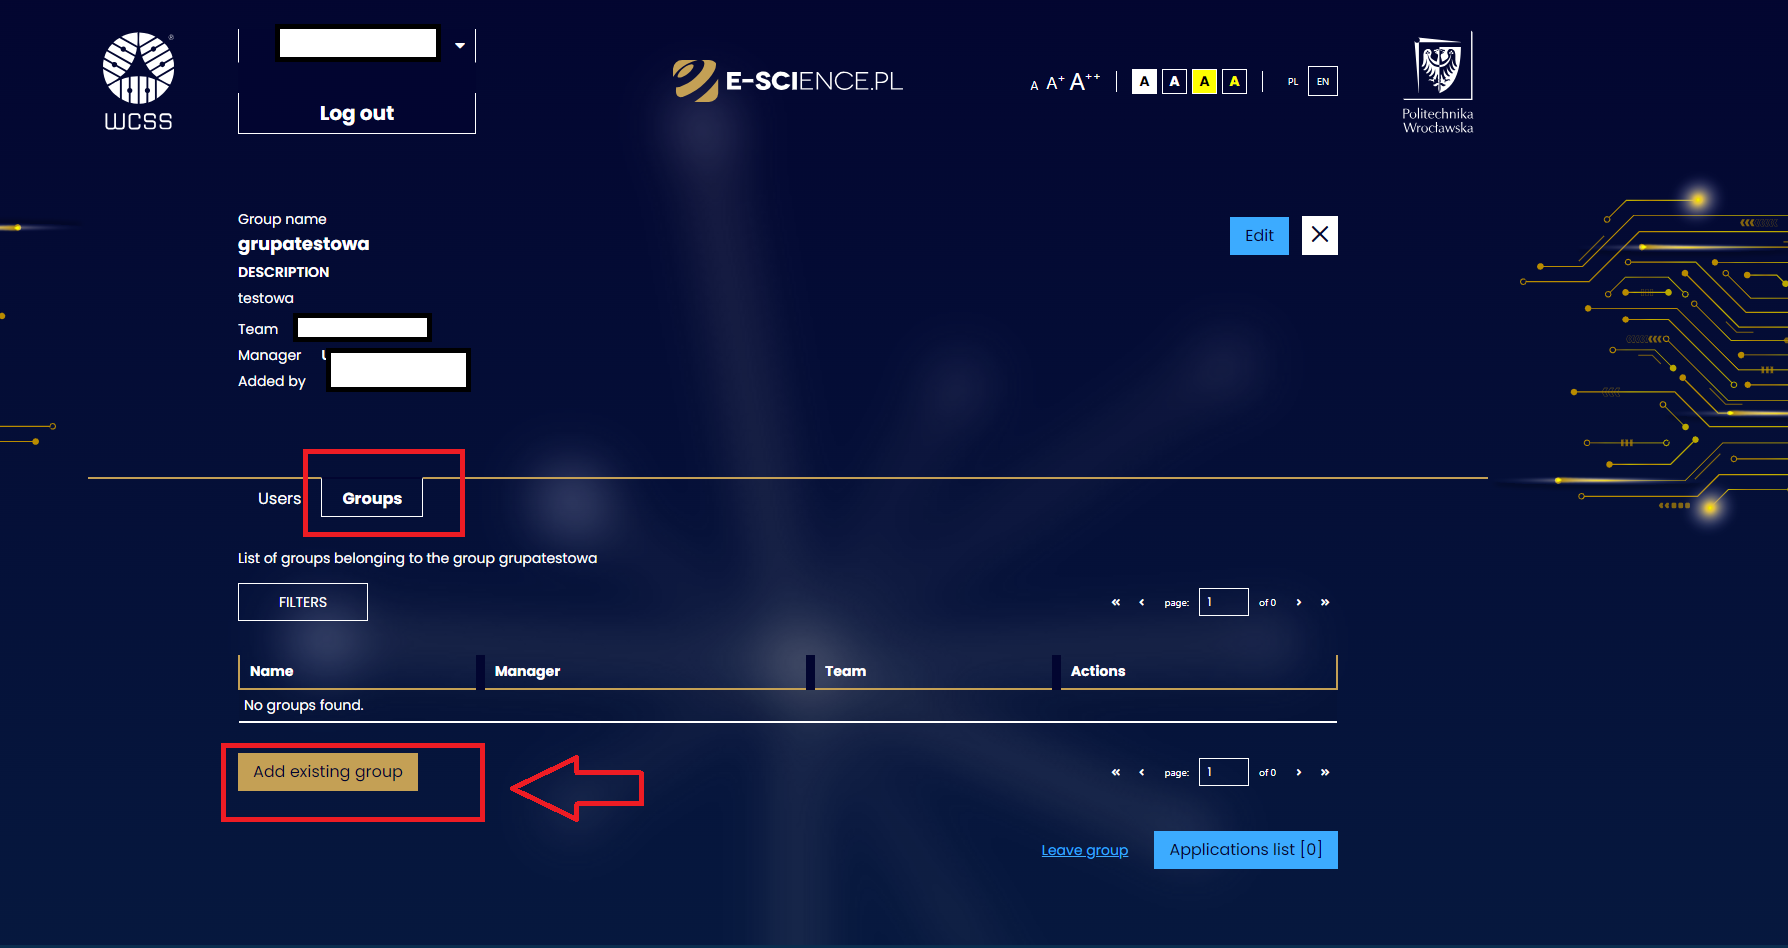
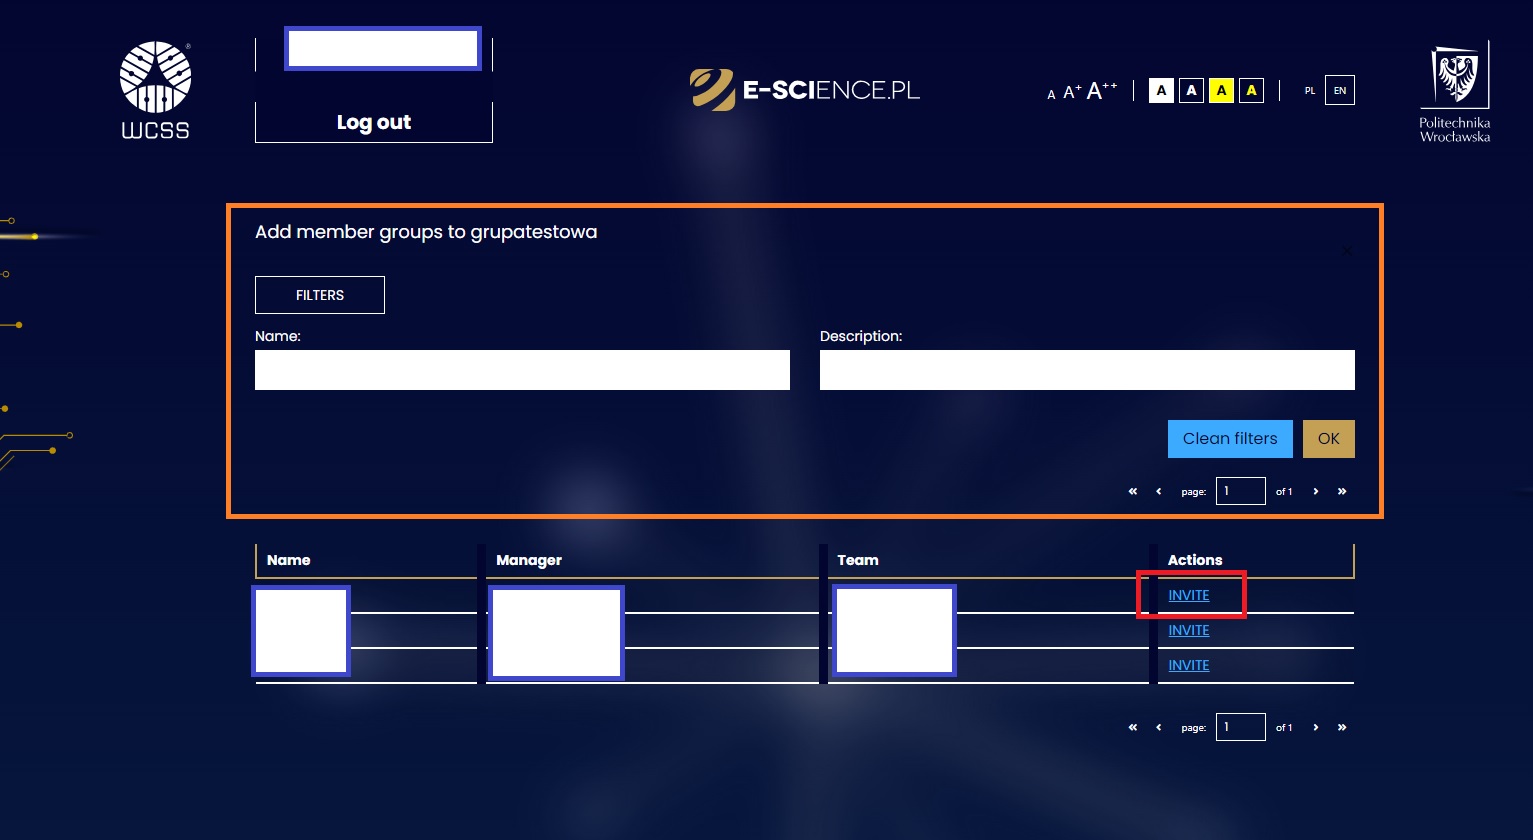
- Clicking the button takes you to a page where you can select a group from the collective list - or search for it using *filters *(by name or description).
¶ Management Permissions
To access management permissions, expand the submenu under the user's name and surname and select Delegation of management permissions

There are two tabs available here - Team Management and Group Management.
¶ Team
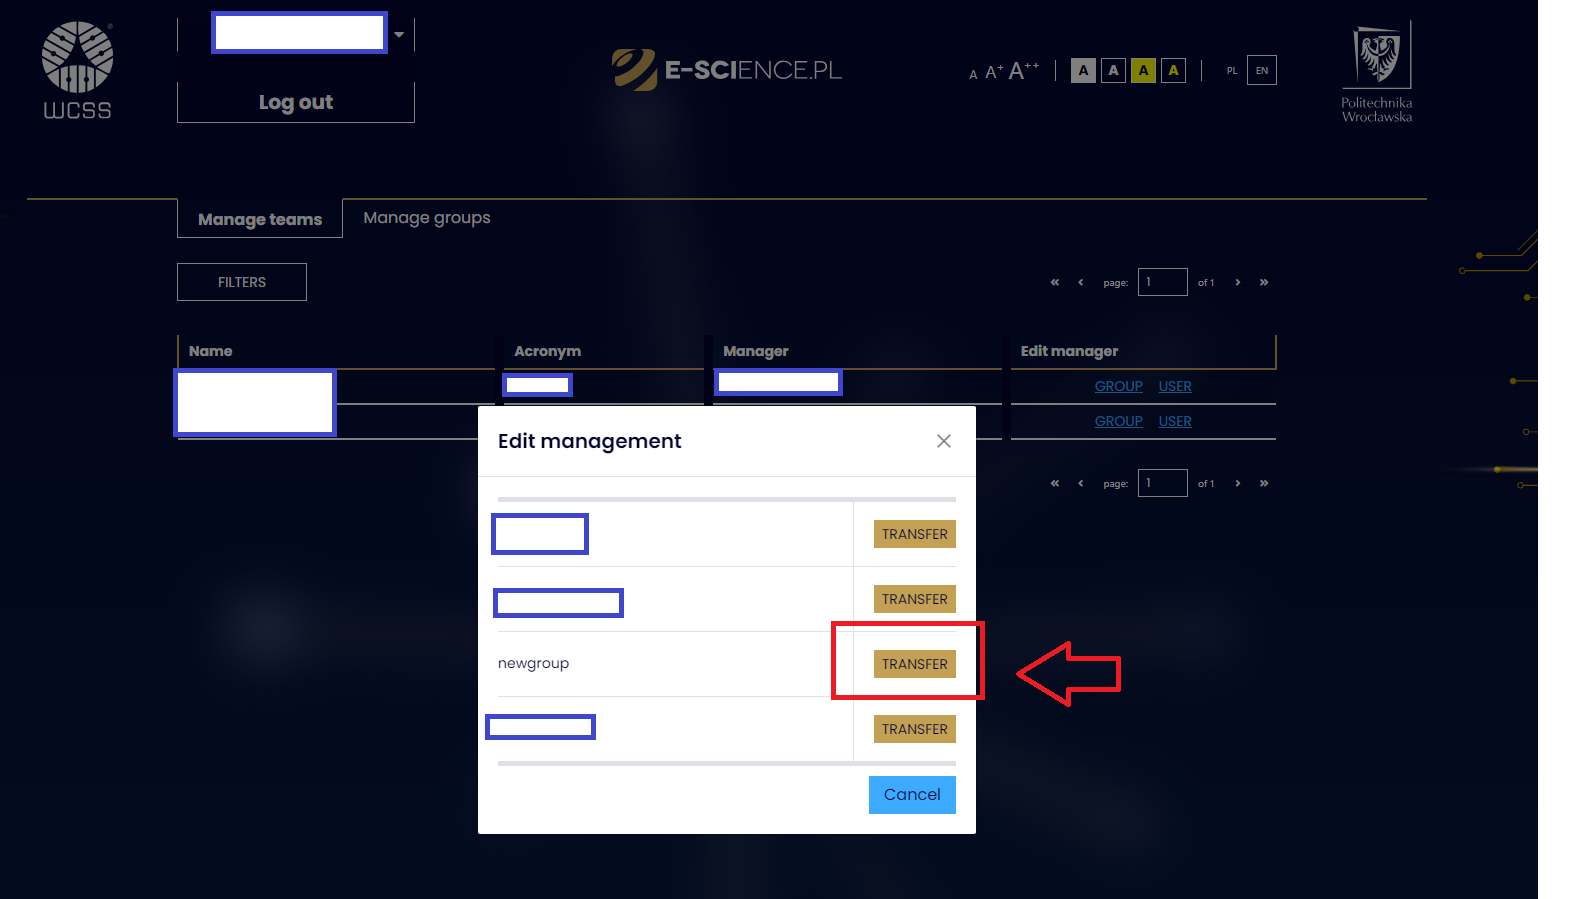
In the Manage Teams tab you can edit the people who manage groups and/or users within a given team. If the user manages more than one team, they can use filters to search for a specific one (search by: name, acronym, description, activity).
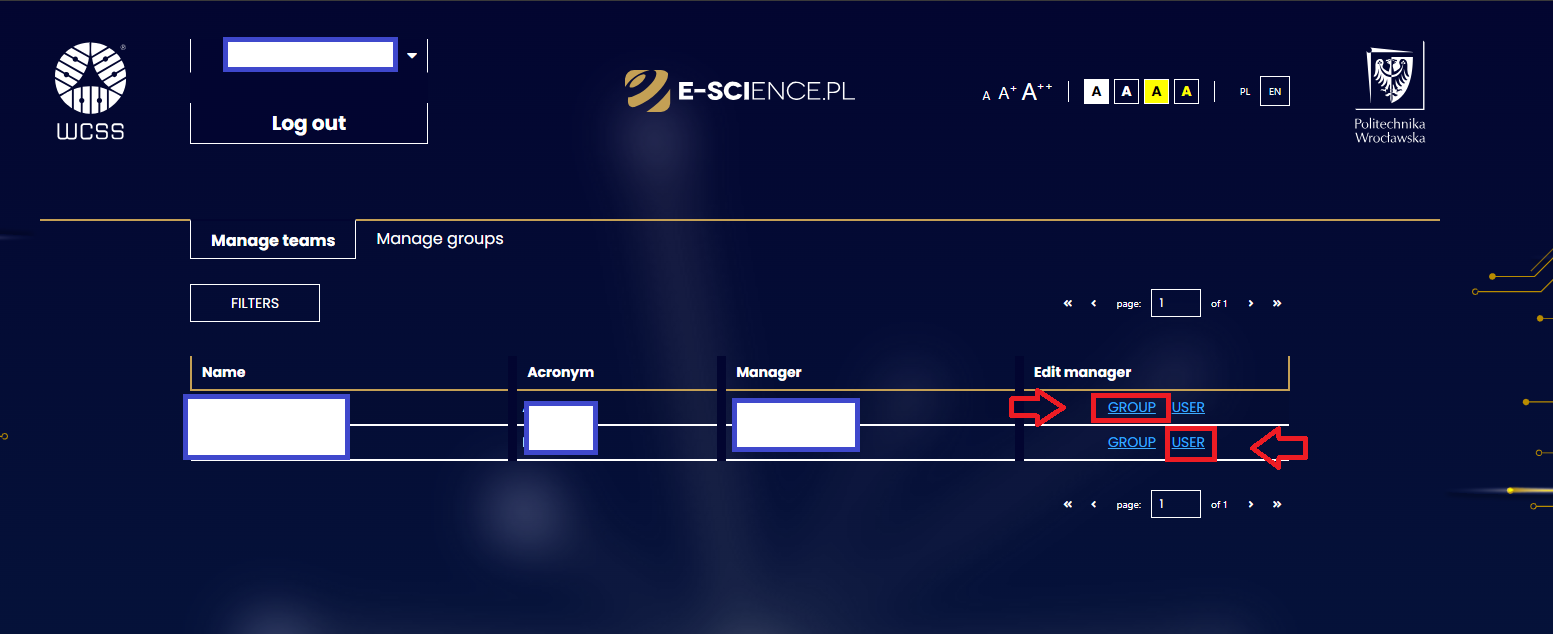
After clicking** the GROUP** or USER buttons, respectively, the group names will appear or users and on the right side the TRANSFER buttons - next to each item.
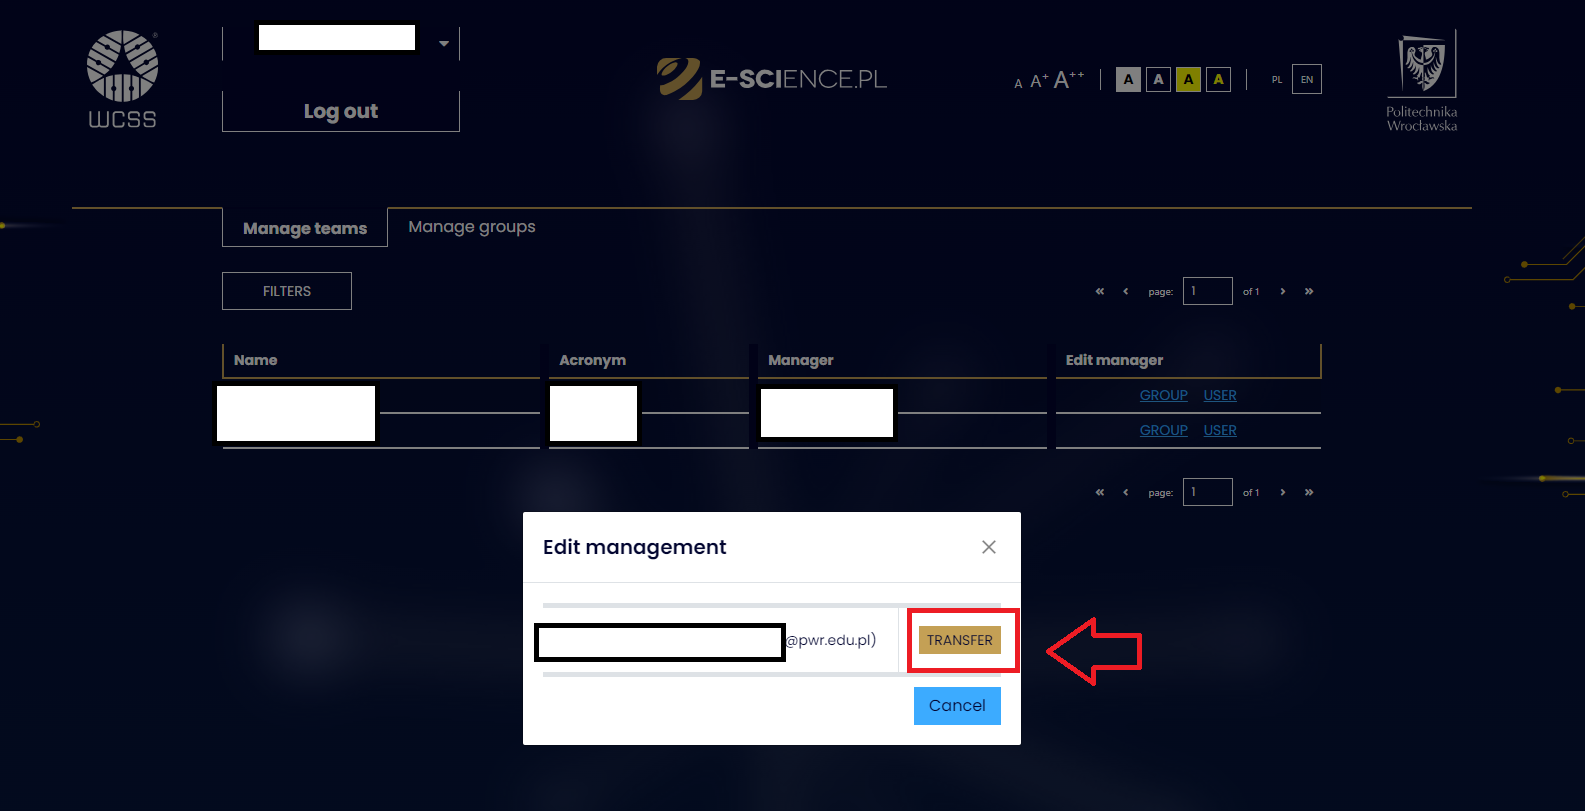
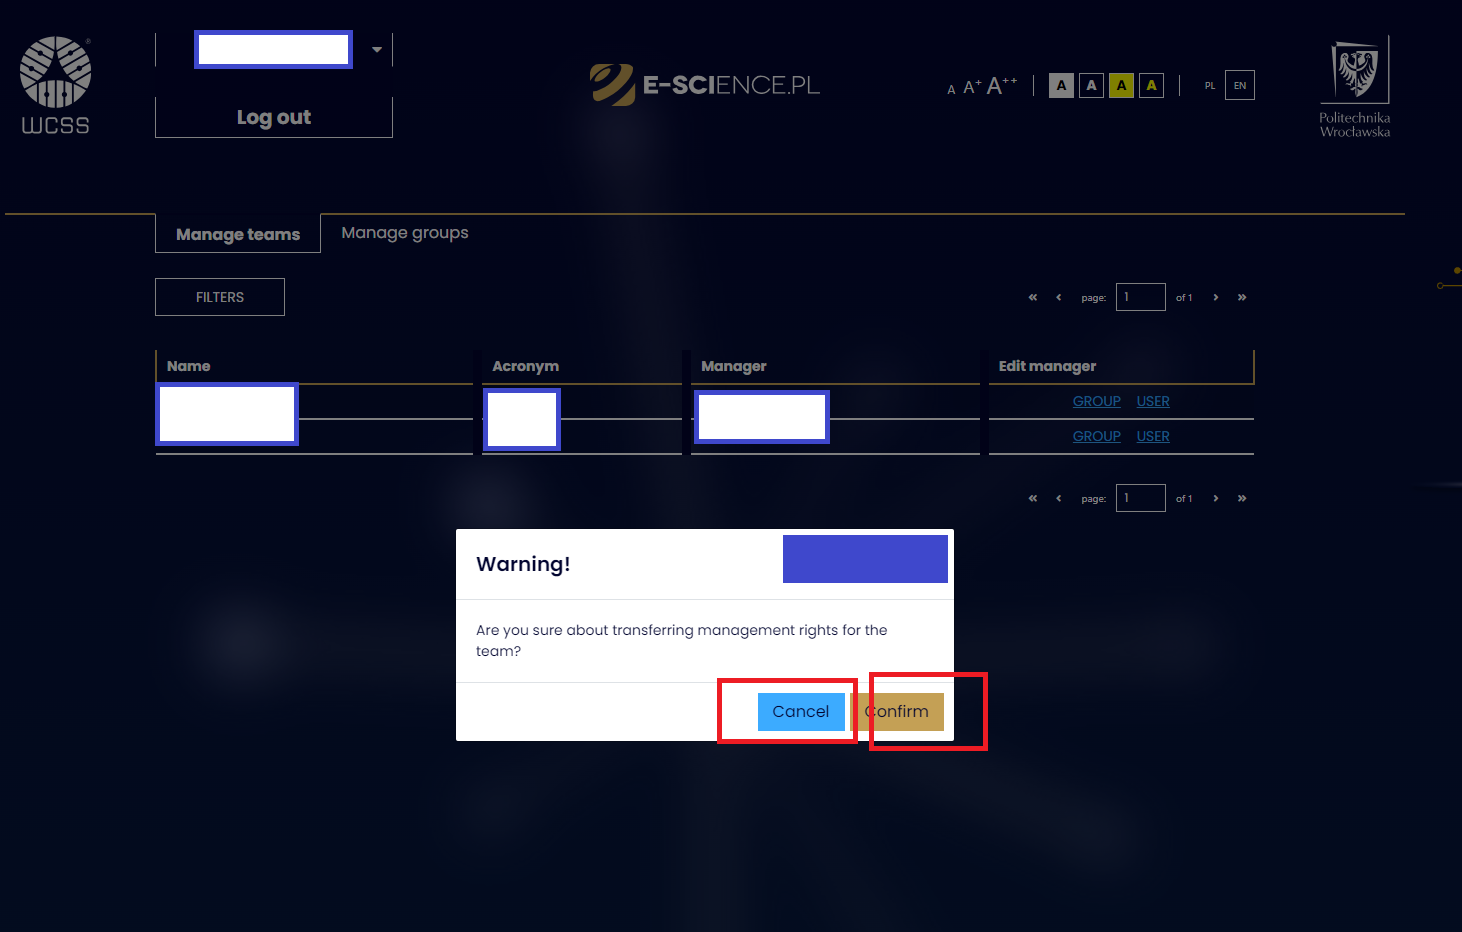
After clicking the TRANSFER button, the user will be asked to confirm this action. Clicking the Confirm button finalizes the process, the Cancel button interrupts it.
¶ Group
In the Manage Groups tab you can edit the group managers and/or users within a given team and group. If the user manages more groups of different teams, they can use filters to search for a specific one (search by: name, description, team, activity).
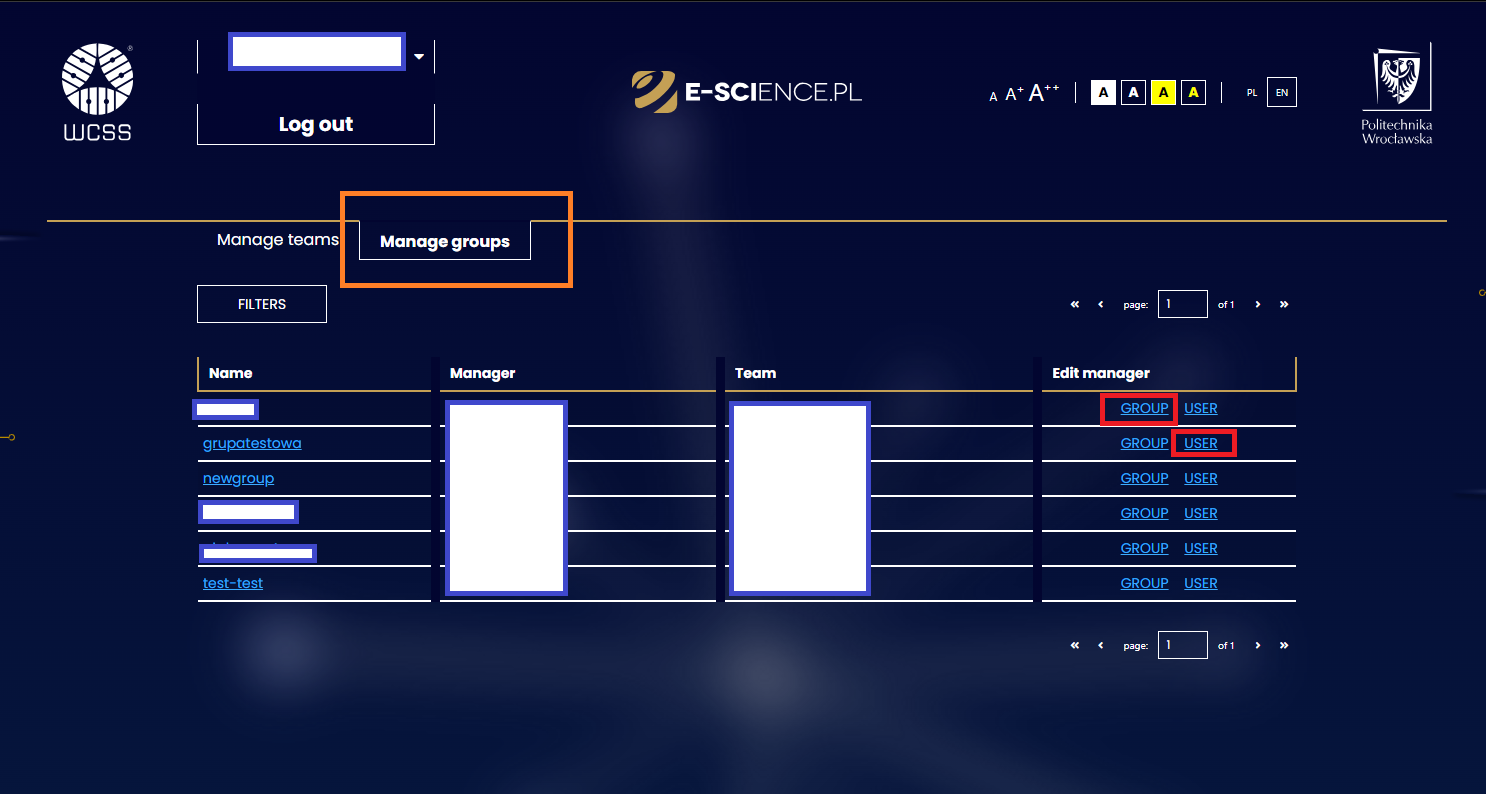
After clicking the GROUP or USER buttons, the group name will appear or users and on the right side the TRANSFER button next to each item.
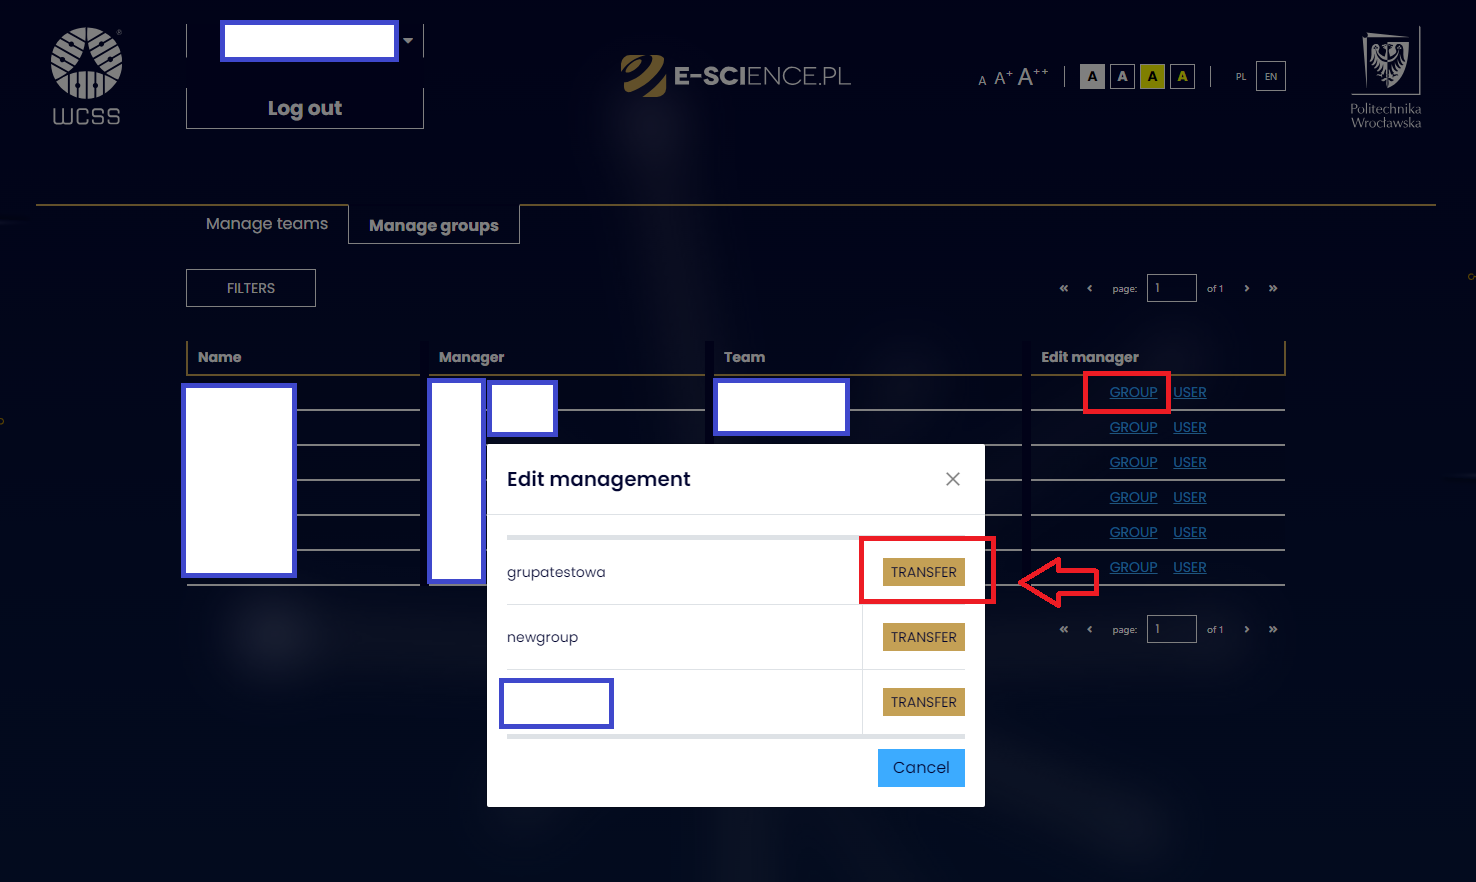
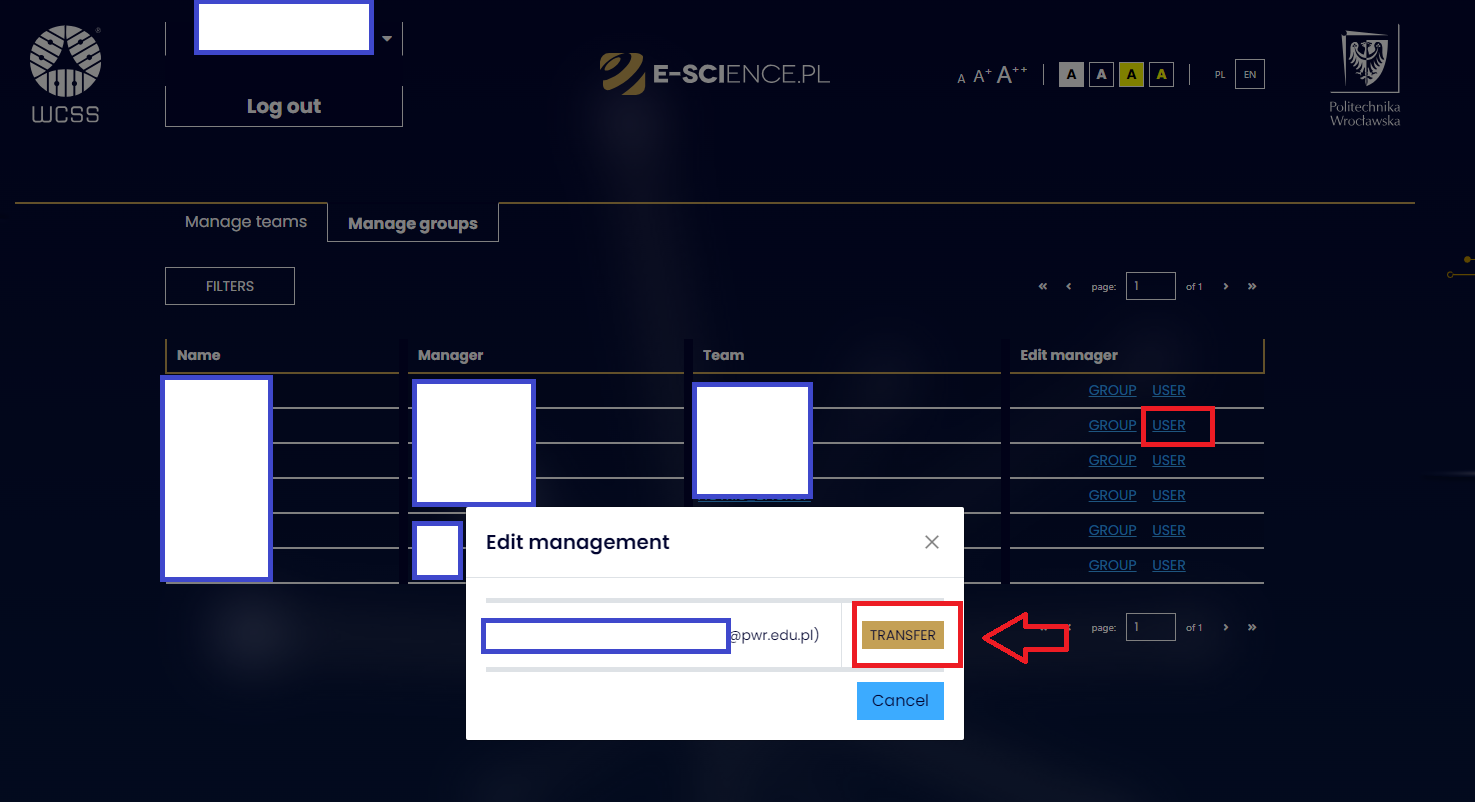
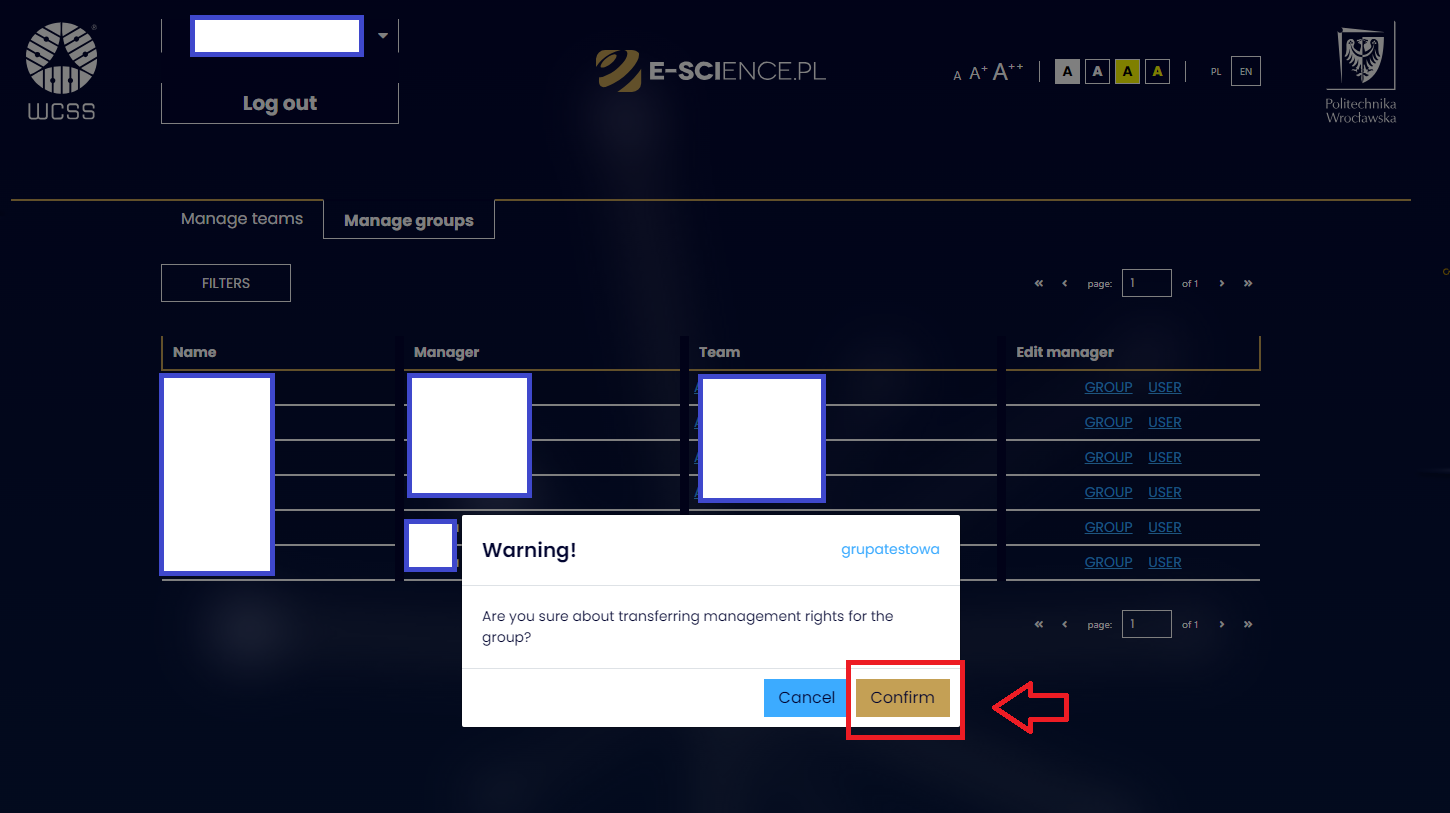
After clicking the TRANSFER button, the user will be asked to confirm this action. Clicking the Confirm button finalizes the process, the Cancel button interrupts it.
¶ Services
The Services tab shows all services that the user owns or belongs to.
The credentials required to log in to the E-SCIENCE.PL account and the access data to the supercomputer are identical.
¶ Access to services
¶ No services
People who have not previously purchased services - after going to the Services tab, they see the sentence YOU DON'T HAVE SERVICES and button ORDER SERVICES
A person wishing to gain access to WCSS services should submit an appropriate application via https://e-science.pl/ or click the Order services button, then they will be redirected to the aforementioned website.
If the user belongs to the world of science, before placing an order for a service, they must add an affiliation to their account. This can be done by clicking the blue inscription add your institution.
After positive verification of the application, the active services of the user will appear in the Services tab.
¶ Active Services
A person who has active services that they own or are a member of will see the following view in the Services tab.
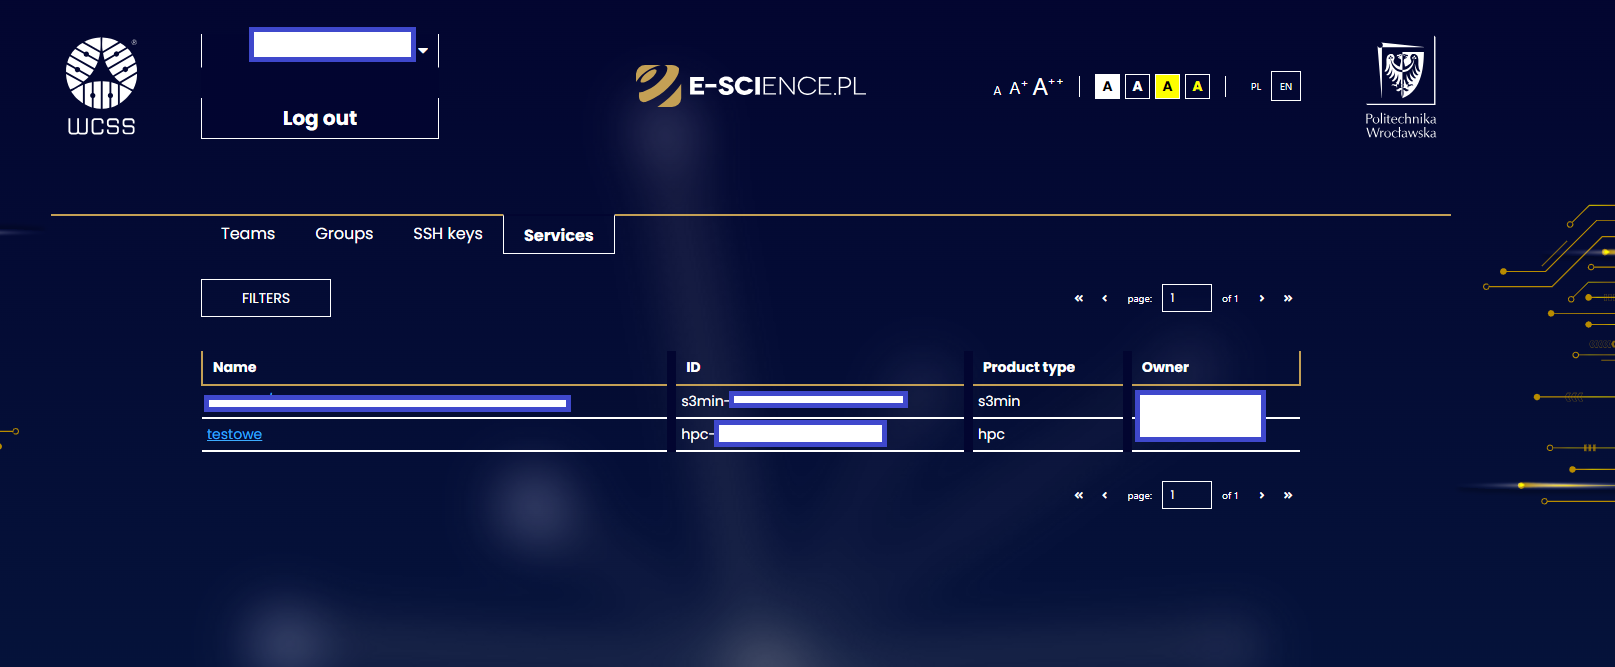
People who own a service can manage user access by clicking on** the name of that service**. A person who is just a user of the service cannot manage it.
¶ Sharing with a Team
There is an option to share your service with all users of a given team (now is only polish version)
To do this, click on the square located under the service details.
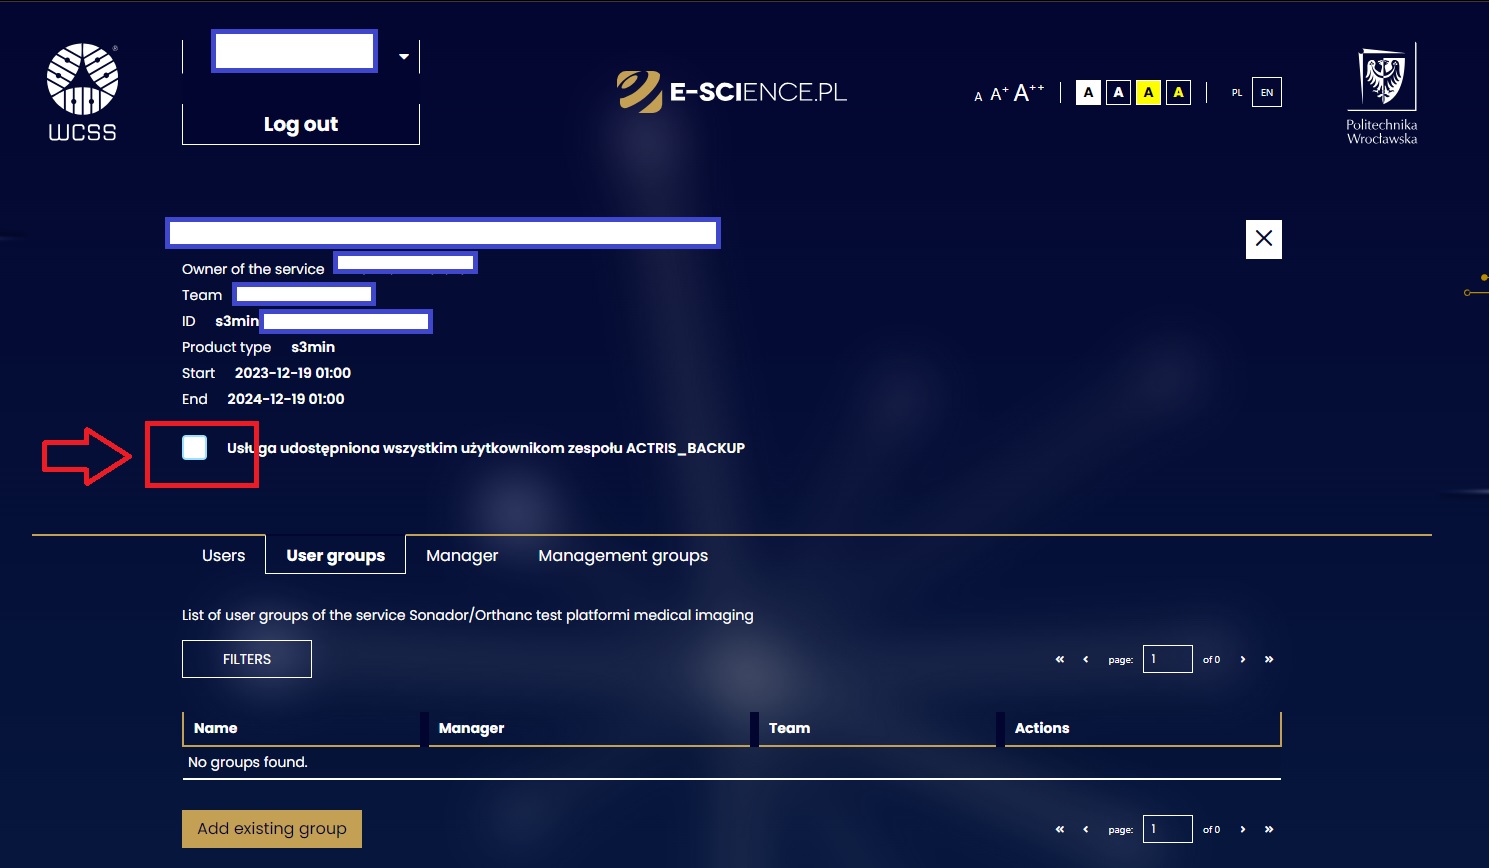
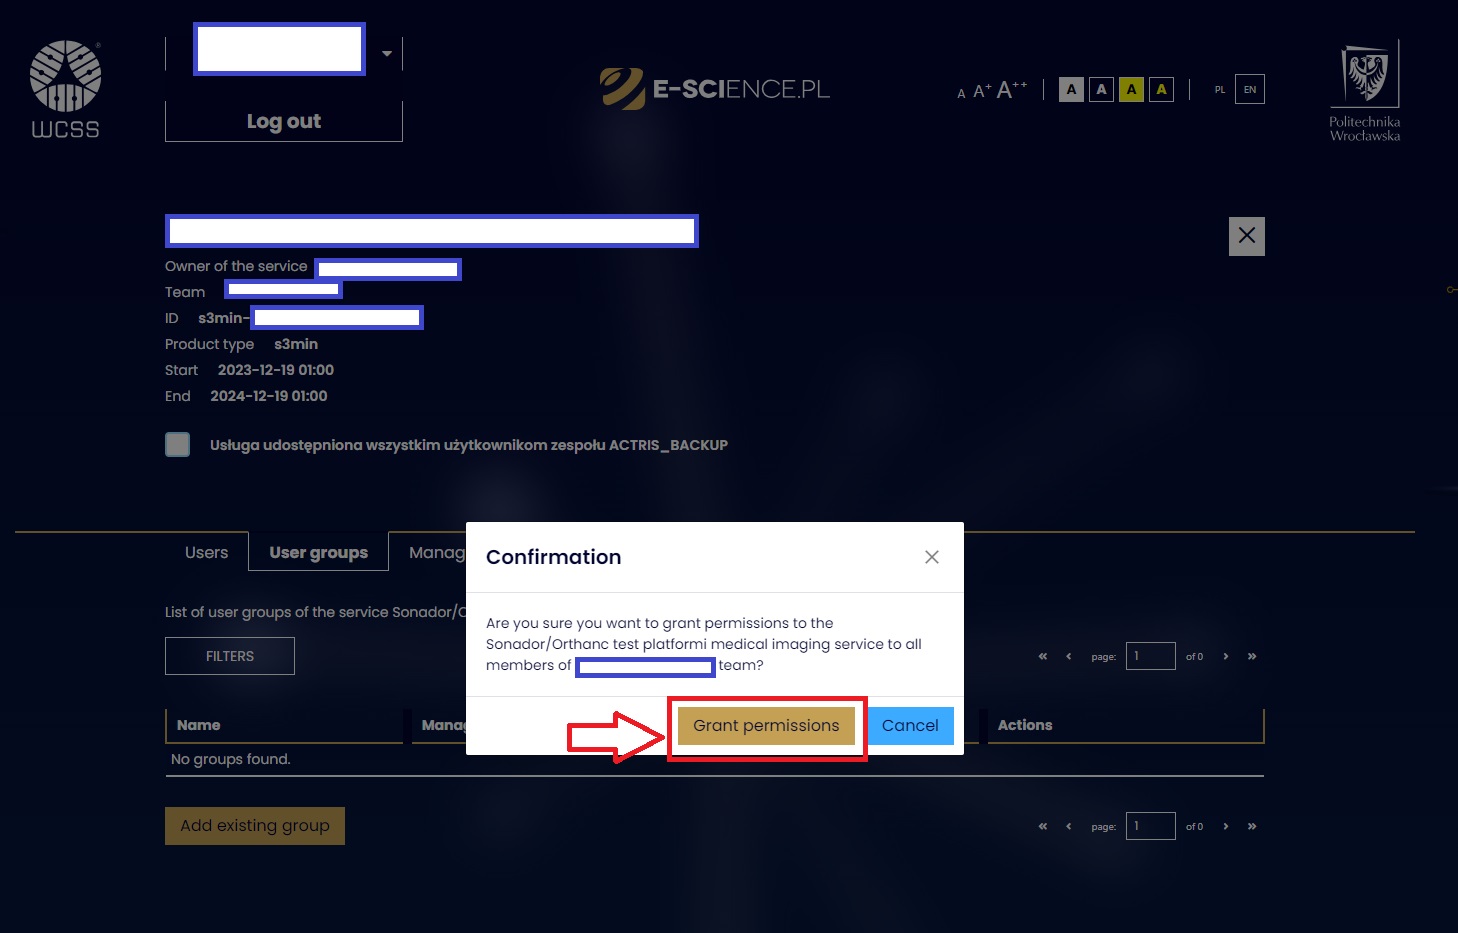
A message will appear asking you to confirm granting permissions to the selected service to all users of the given team. Acceptance is done by clicking the Share Service button, resignation by clicking the Cancel button.
¶ Users
¶ Adding a user
To add a user to your service you must:
- Be the owner or manager of the service;
- Select a service from the range visible in the Services tab.
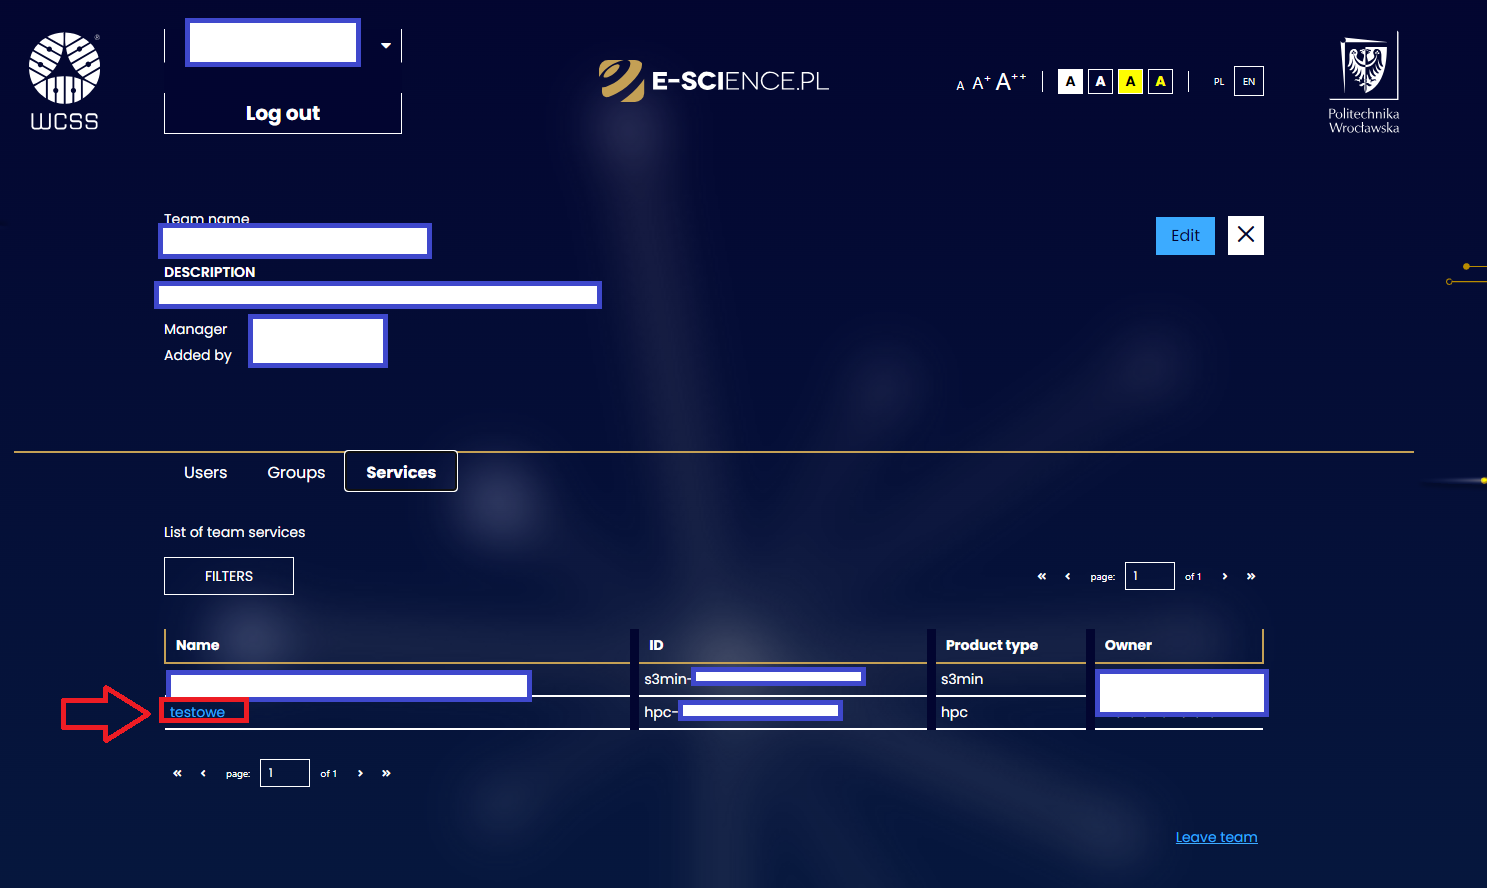
- After going to the detailed view of the service, select the Users tab.
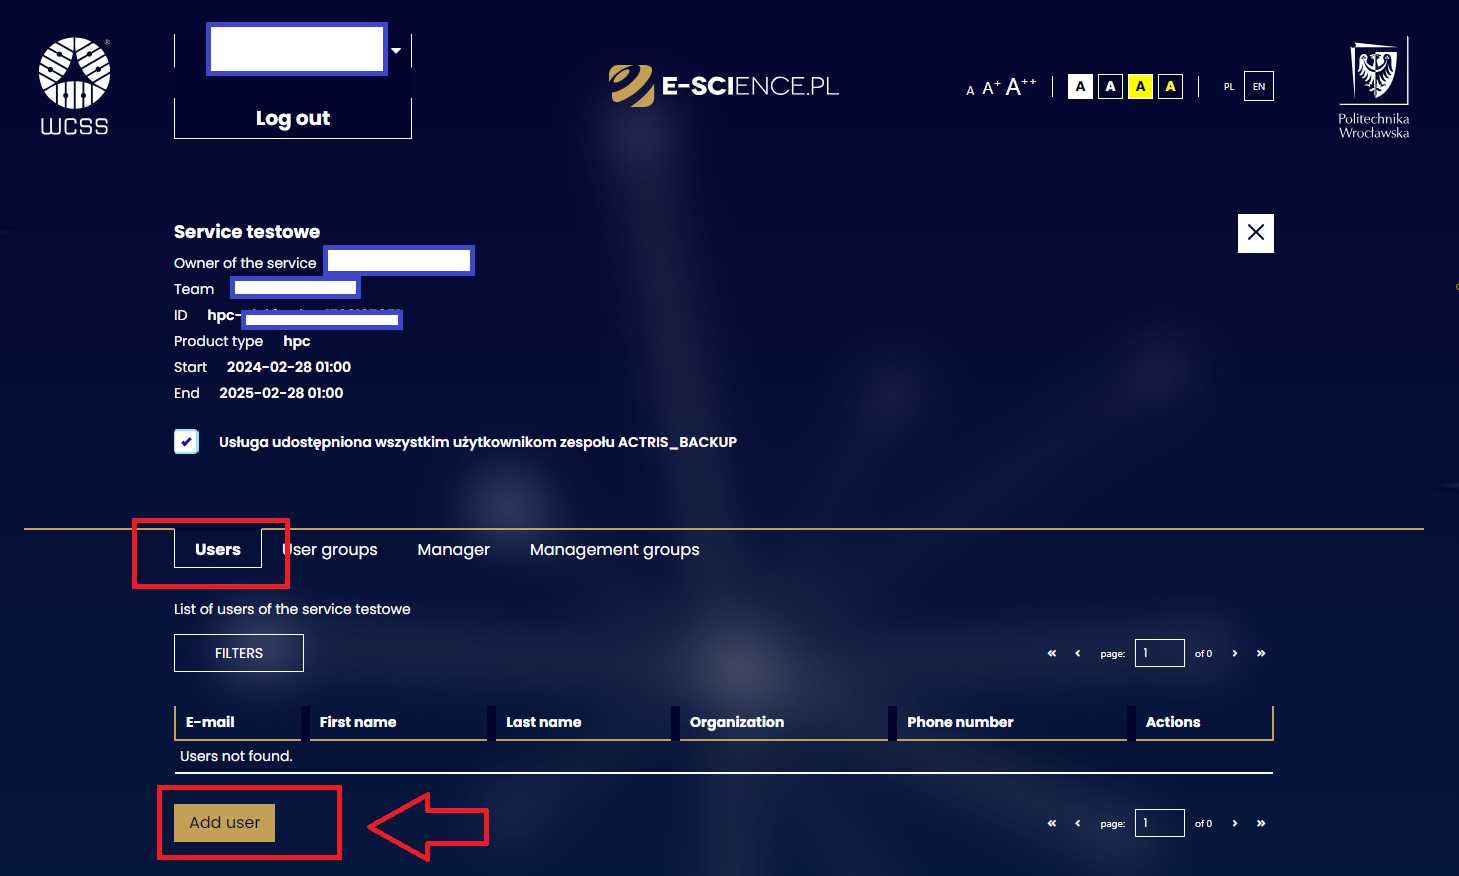
-
Then click the Add User button.
-
From the displayed list of users, select the person you are looking for and click the ADD button next to their data, located in the Actions column.
If the list contains many users, you can use the available search filters (by username, email address, first name, last name, team or group they belong to) to narrow down the list of presented values.
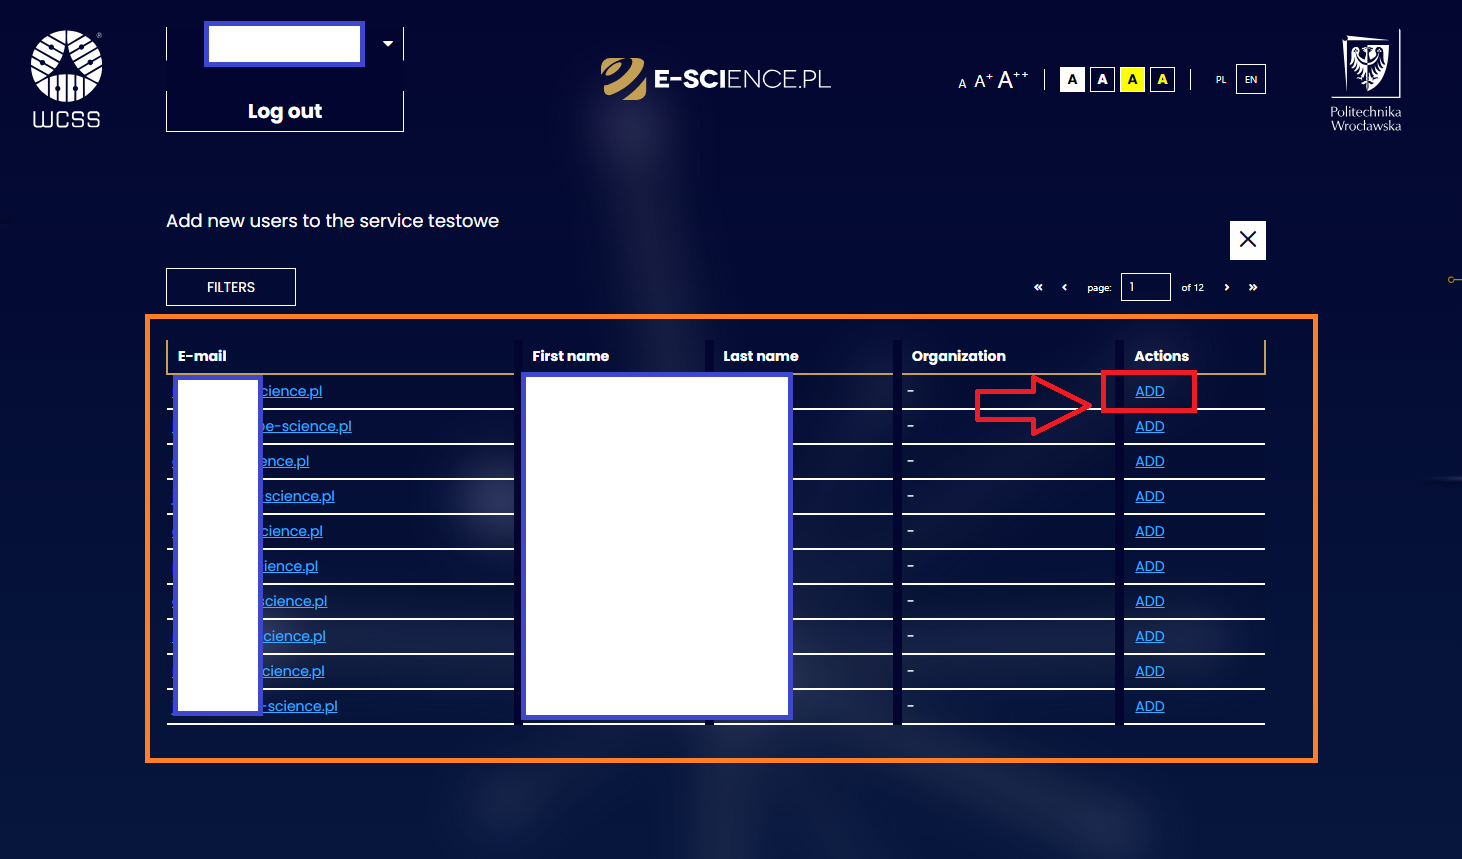
- After adding the user users, he/she can use this service.
¶ Removing a user
To remove a user from your service, you must:
-
Be the owner or manager of the service.
-
Select a service from the range visible in the Services tab.
-
After going to the detailed view of the service, select the Users tab.
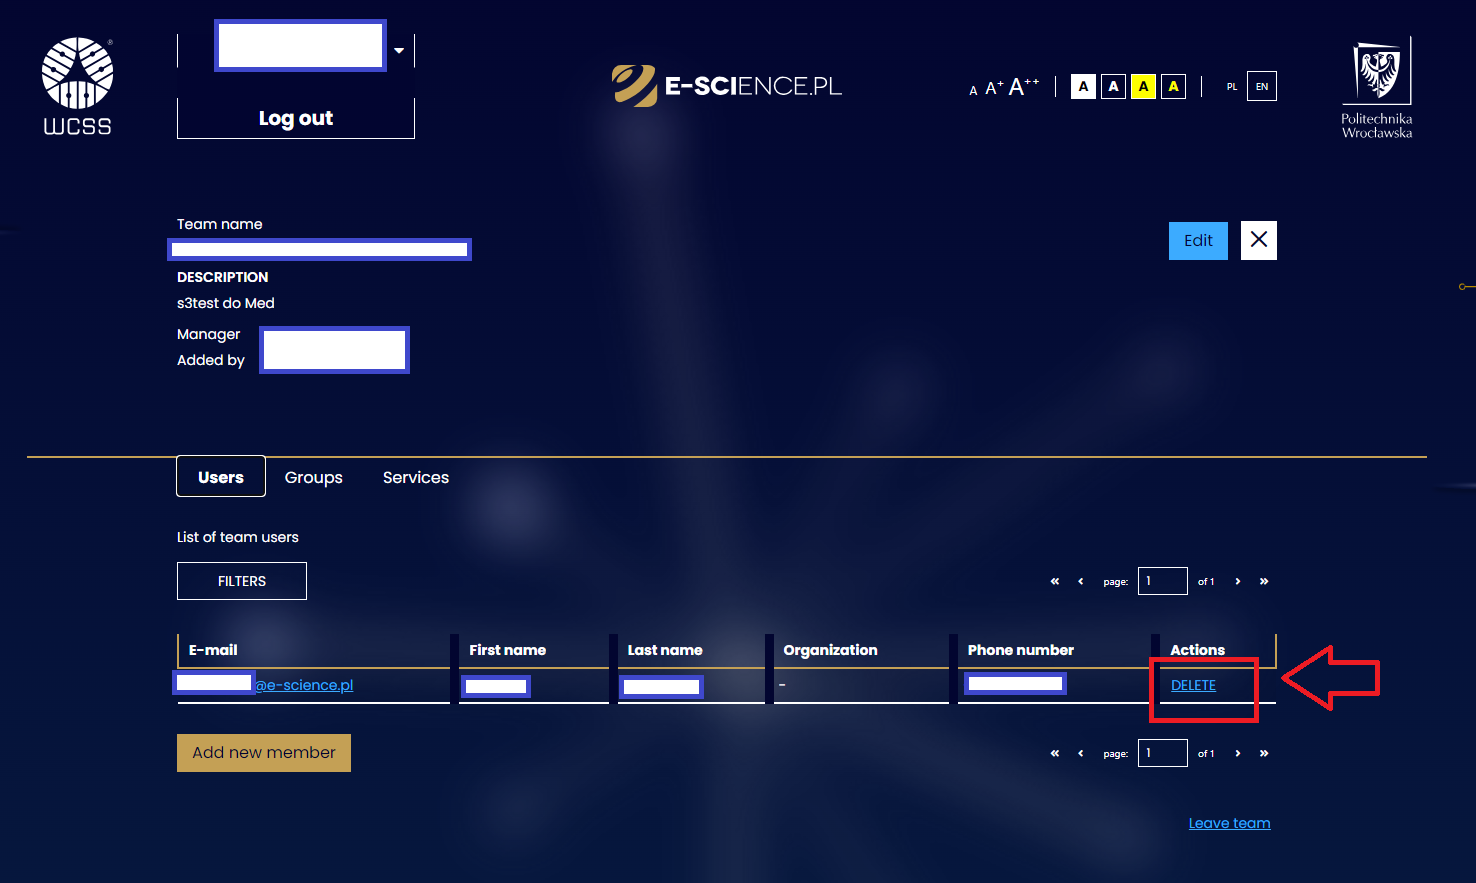
-
To remove a user, in the Actions column, use the REMOVE button. If the user is not immediately visible in the view, you can search for them using the available search filters (username, email address, first name, last name, team, group, activity).
-
Once a user is deleted, they no longer have access to that service.
¶ User Groups
¶ Adding a User Group
Adding a user group allows you to grant access to a service to an entire group or several groups within selected teams.
This is a faster method, without having to add each user individually to the service.
To add a user group to your service, you must:
-
Be the owner or manager of the service.
-
Select a service from the range visible in the Services tab.
-
After going to the service - select the User Groups tab.
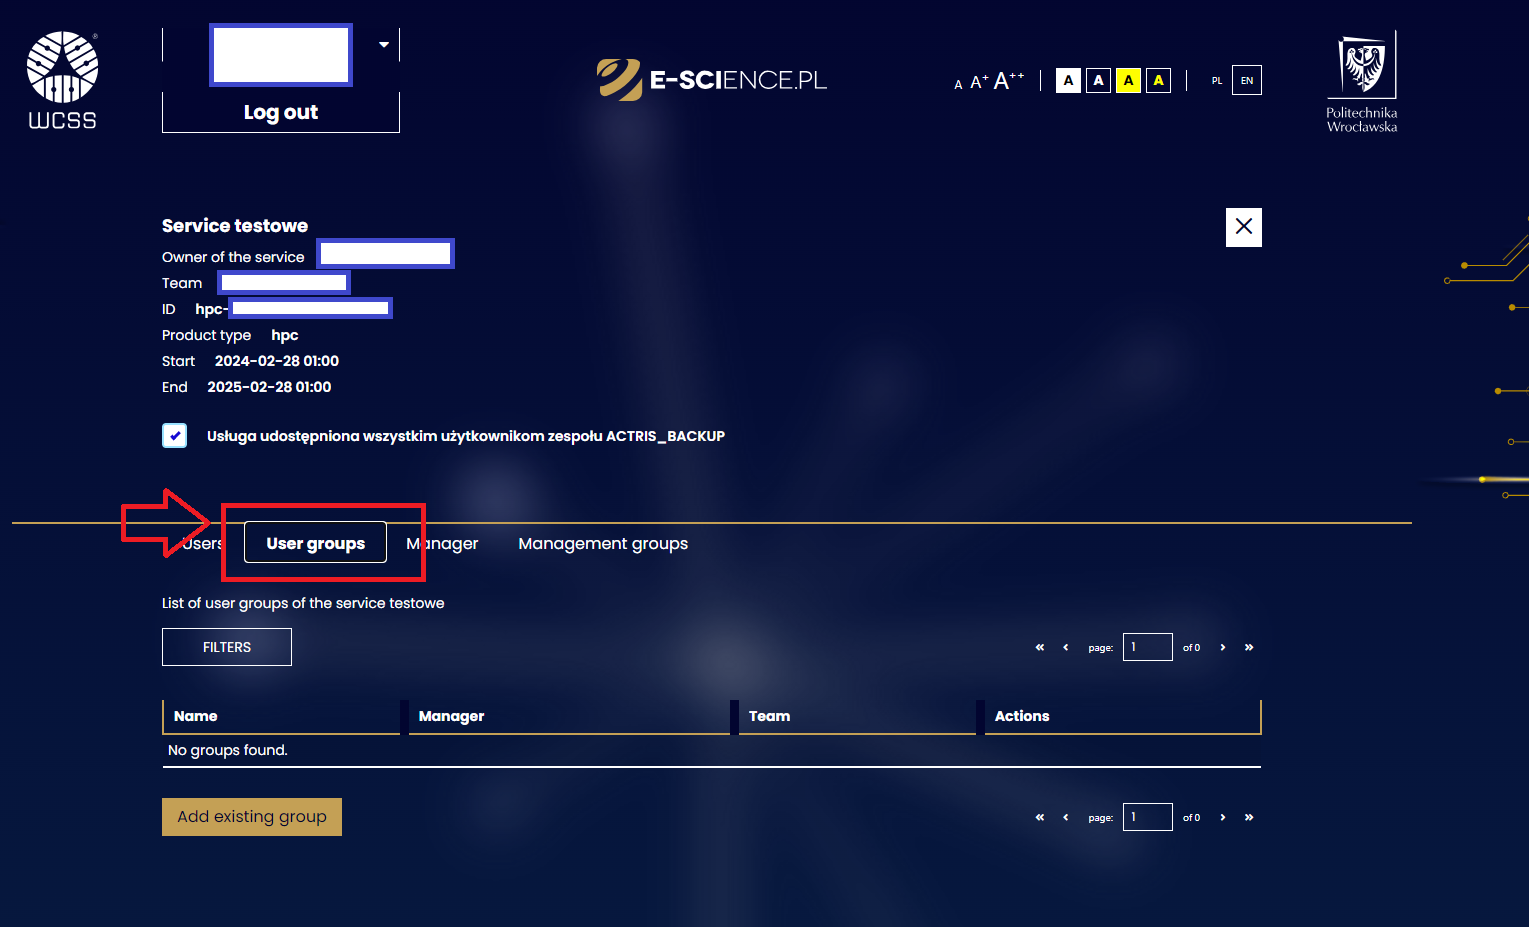
- Use the Add existing group button
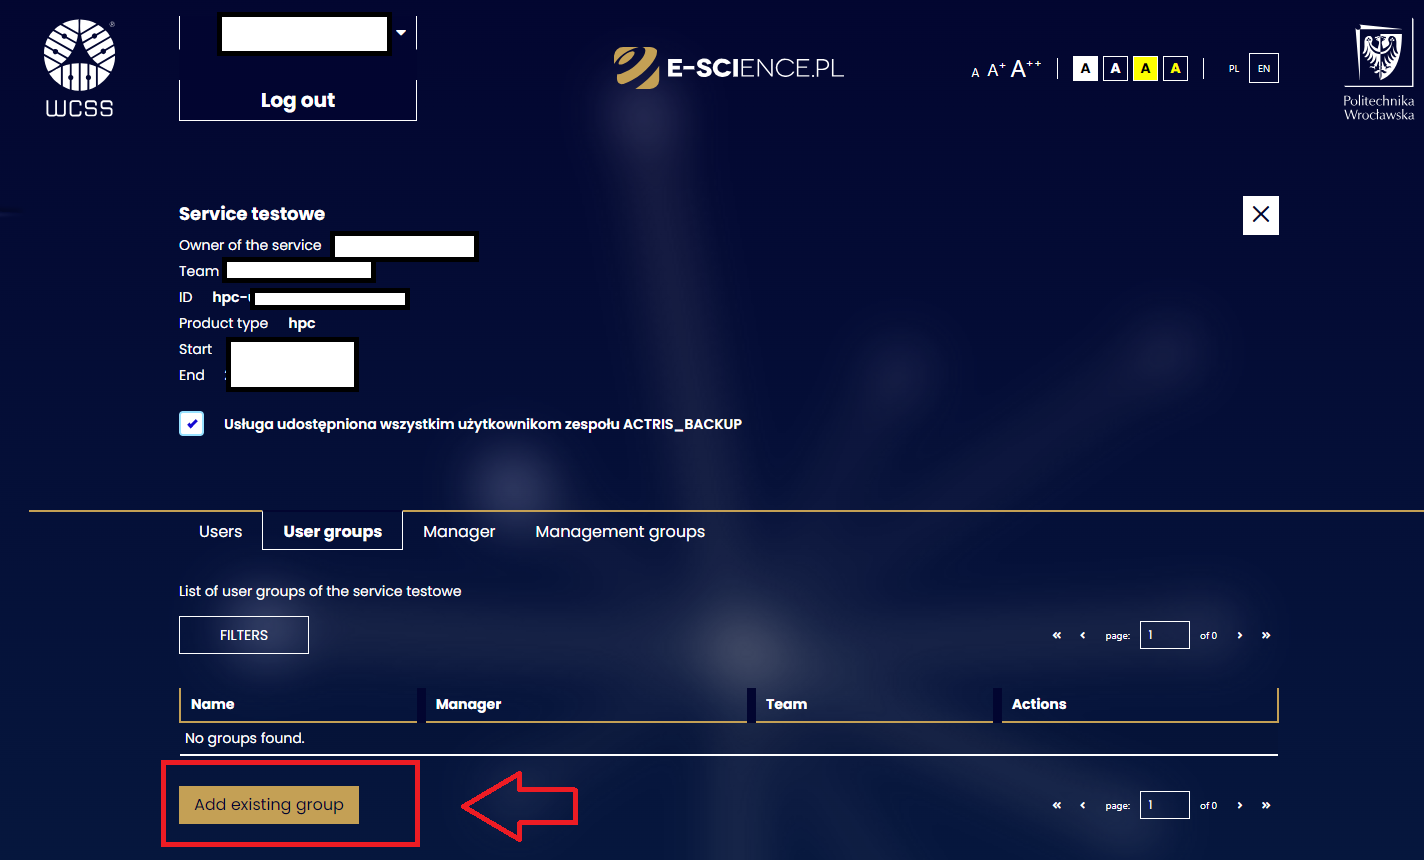
- From the displayed list of groups, select the appropriate one - and click the ADD button next to its data, located in the Actions column. If the list contains more groups - you can use a set of search filters (by group name, its description, the team it is a member of or activity).
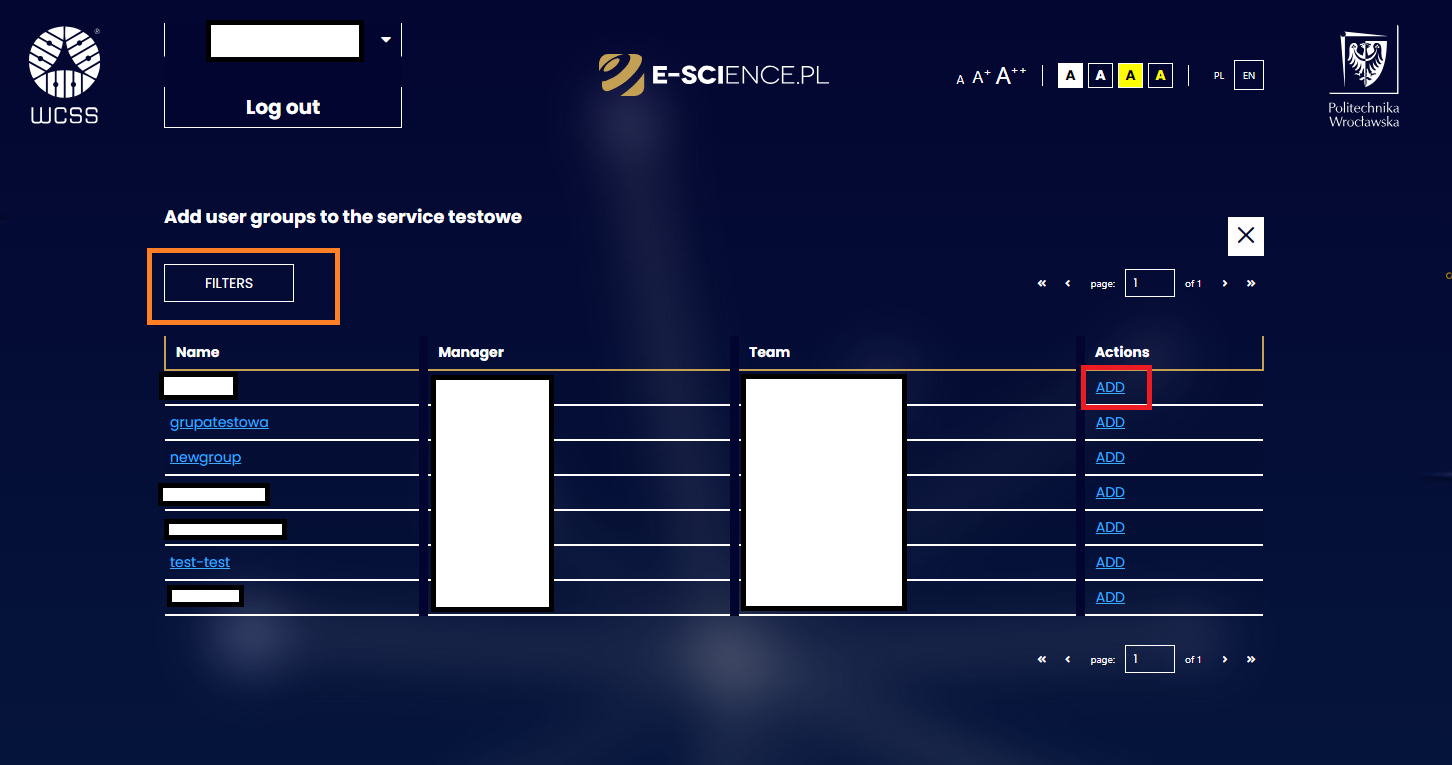
- Once a user group is added, all members of it can use the service.
¶ Deleting a user group
To delete a user group from your service, you must:
- Be the owner or manager of the service.
- Select a service from the range visible in the Services tab.
- After going to the service - select the User Groups tab
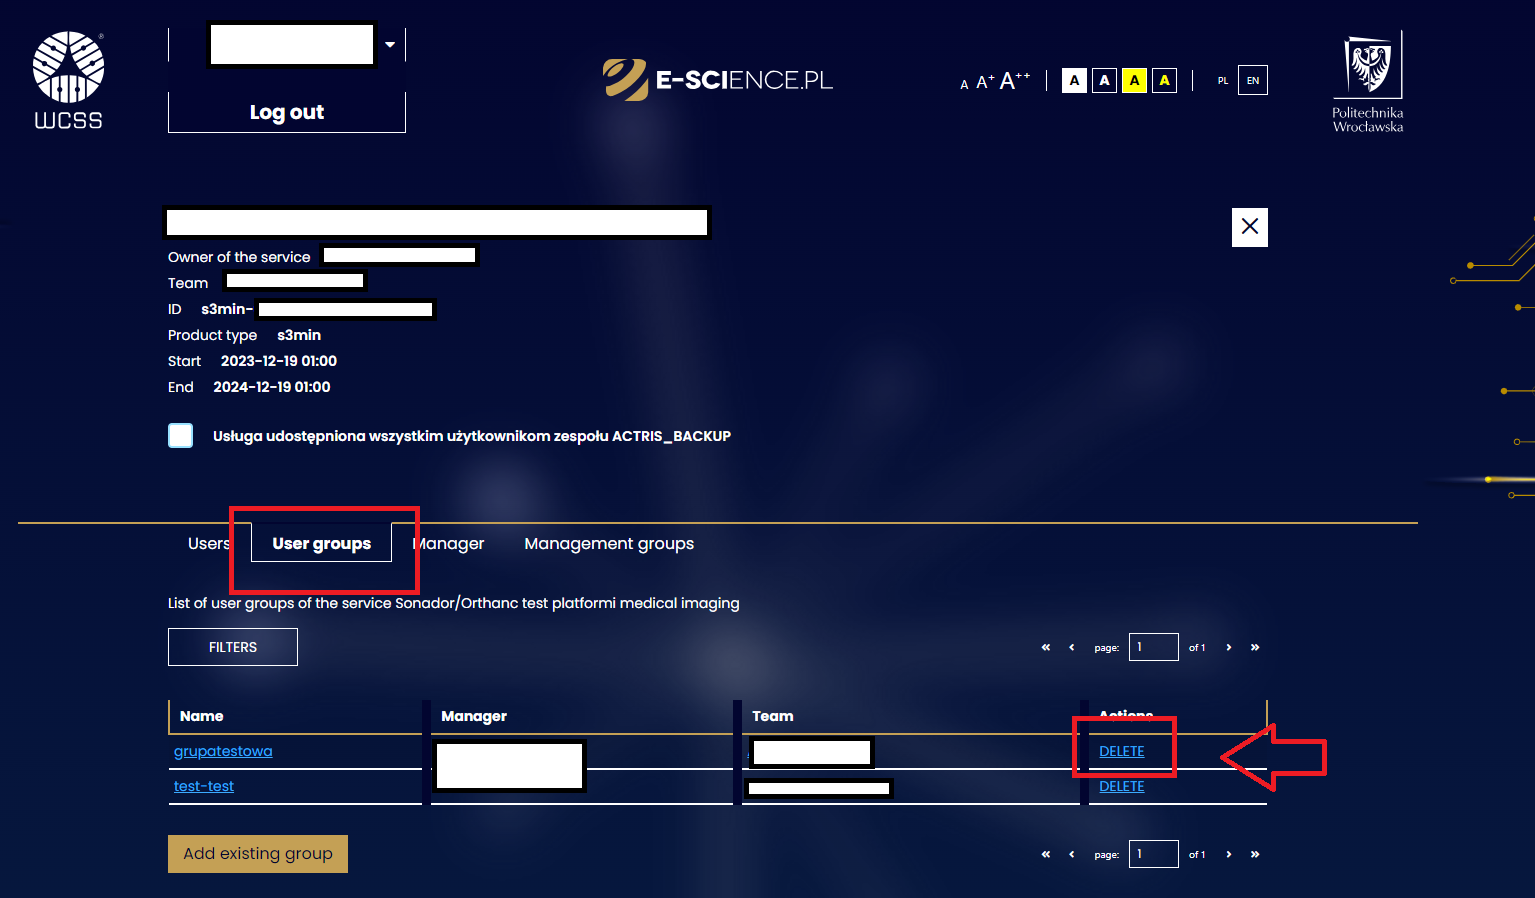
- Use the REMOVE button in the Actions column next to the name of the appropriate group. If the list contains more groups, you can use filtering by group name, description, team it is a part of, or activity.
- Once a user group is deleted, its members lose access to the service.
¶ The Manager
¶ Adding a manager
To add a manager to your service, you must:
- Be the owner of the service.
- Select the service from the list visible in the Services tab.
- After going to the service - select the Manager tab.
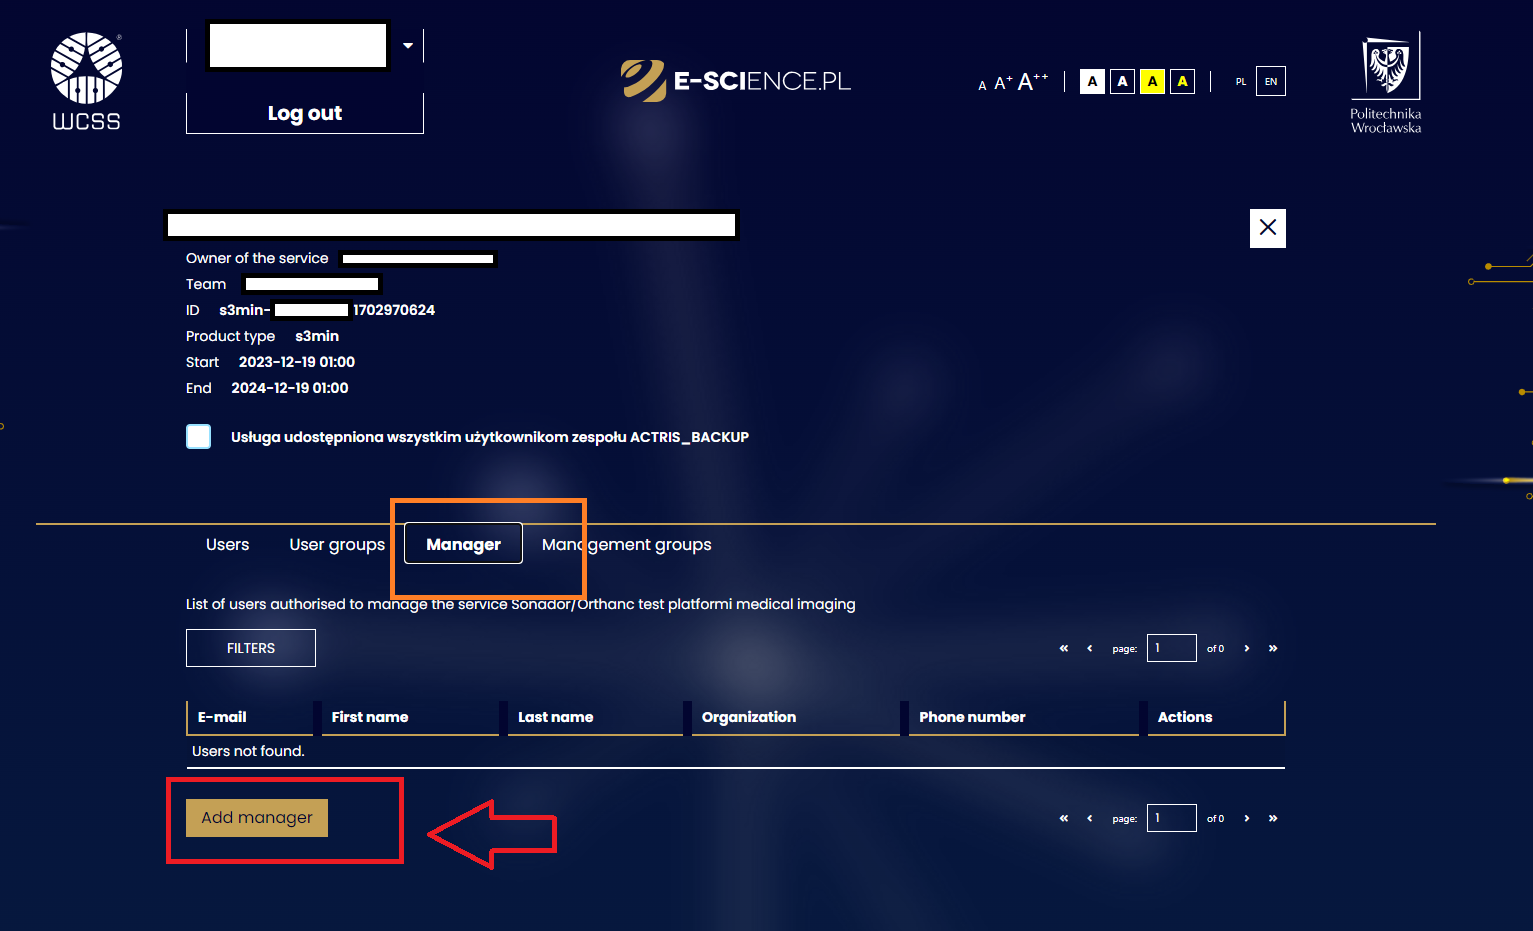
- Use the Add manager button.
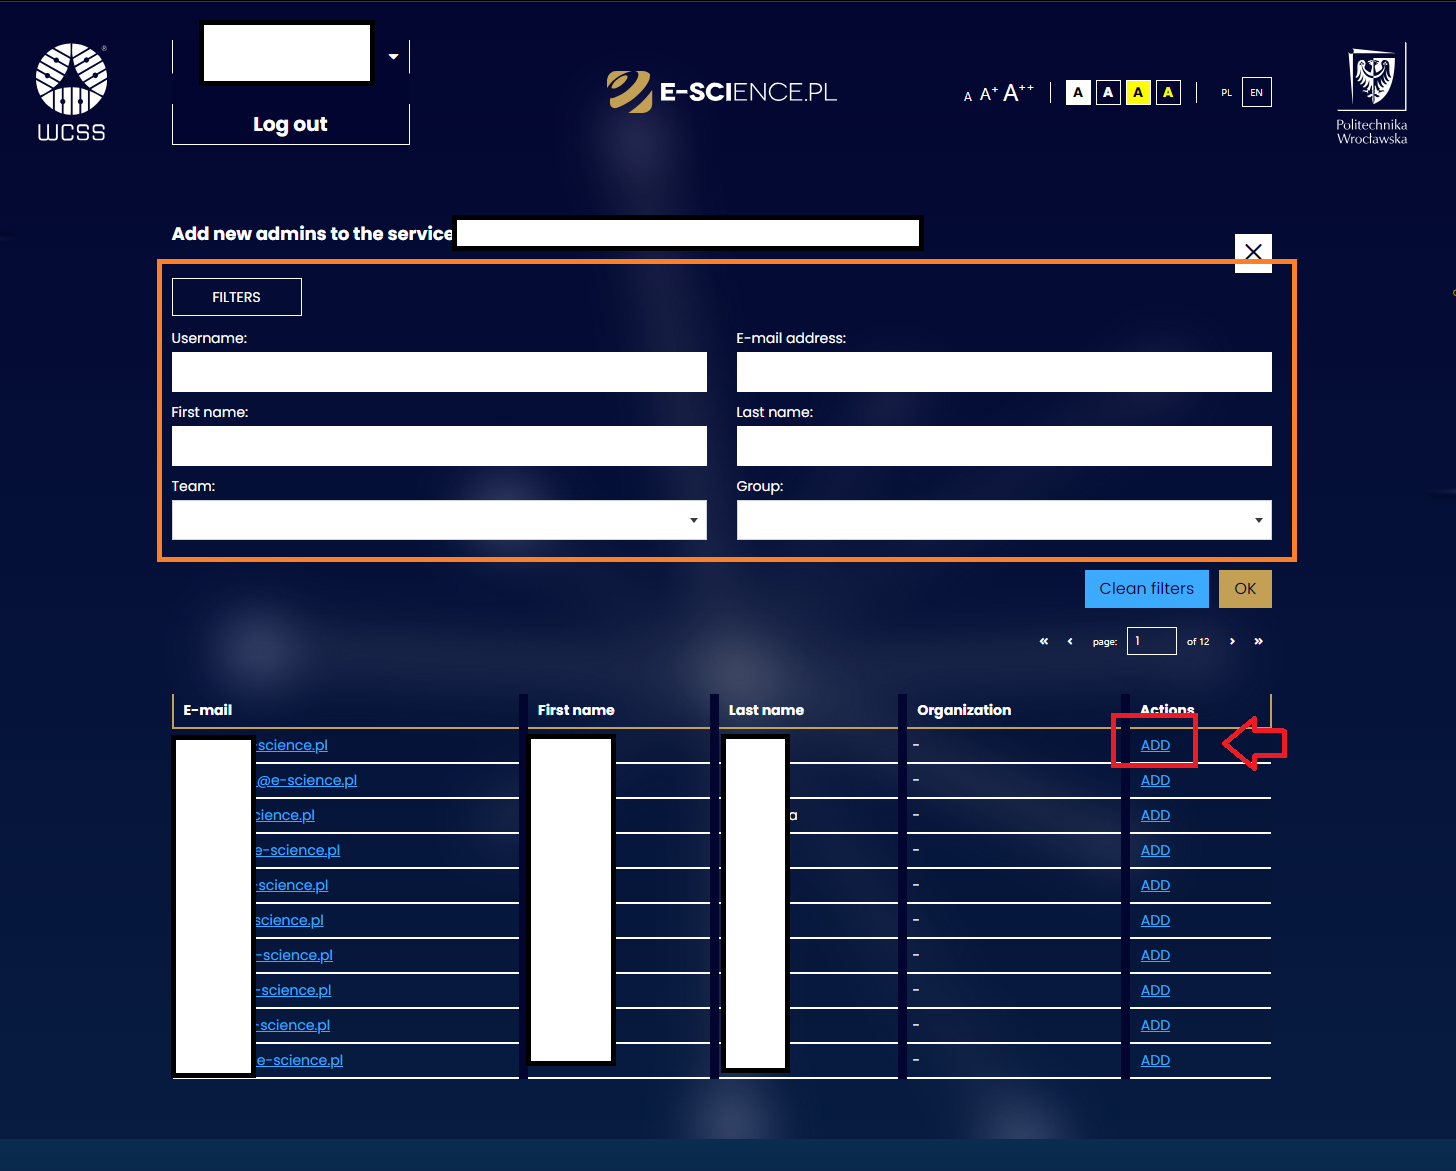
- Select the desired person from the displayed list of users by clicking ADD next to the selected user's data in the Actions column.
To narrow down the list of presented users, use the available search filters (there are options to narrow down the results by username, email address, first name, last name, team or group to which they belong).
- After adding a manager to the service - they can manage the service on behalf of the owner - having the same permissions as the owner.
¶ Removing a manager
To remove a manager from your service, you must:
-
Be the owner of the service.
-
Select the service from the list visible in the Services tab.
-
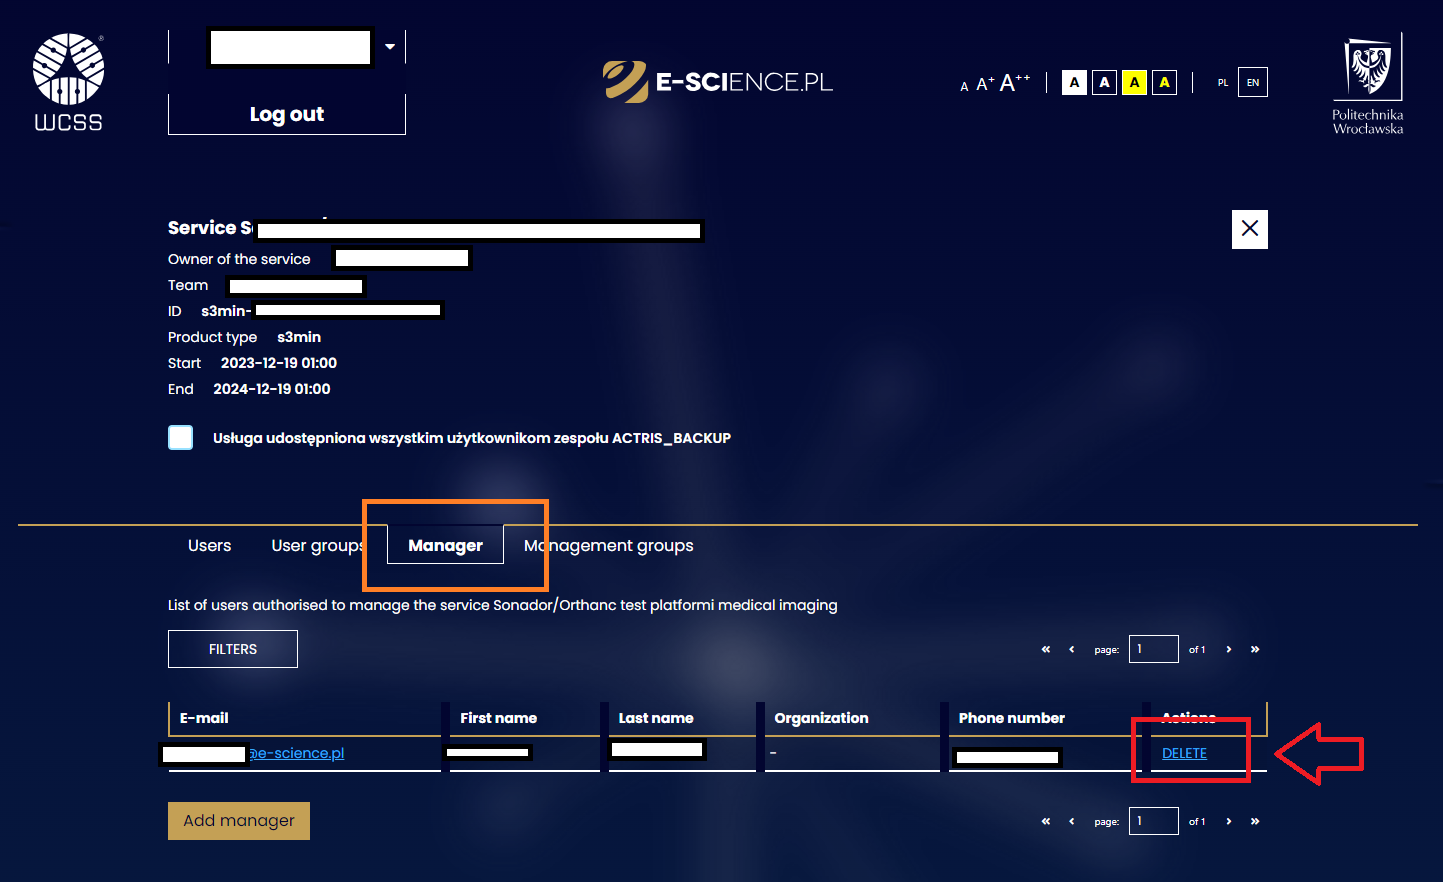
After going to the service - select the Manager tab.
-
Select the person from the displayed list of administrators for whom the action of revoking permissions is to be carried out. Click the DELETE button next to their data (in the last column - Actions). If the service has multiple administrators - you can use the available search filters (name, description, team, activity).
-
After removing the manager - this person can no longer manage the service on behalf of the owner
¶ Management Groups
¶ Adding a management group (admin groups)
To add a management group to your service, you must:
-
Be **the owner of **the service.
-
Select the service from the list visible in the Services tab.
-
After going to the service - select the Management groups tab.
-
Click the Add existing group button.
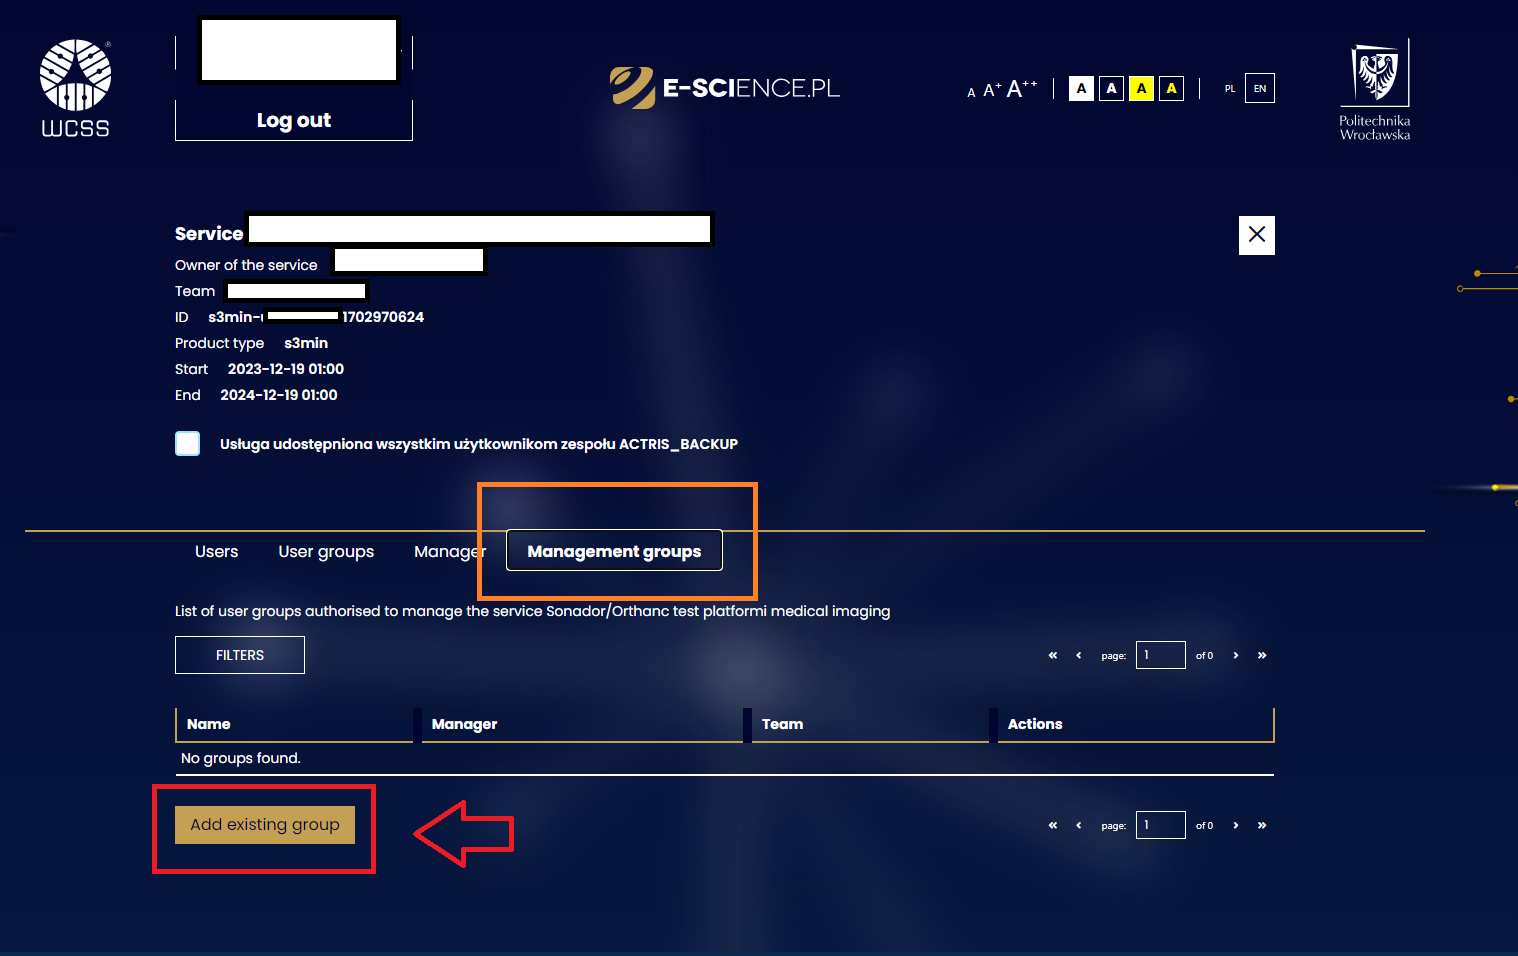
- Select the group you are looking for from the list of available groups and click the ADD button next to its data, located in the Actions column.
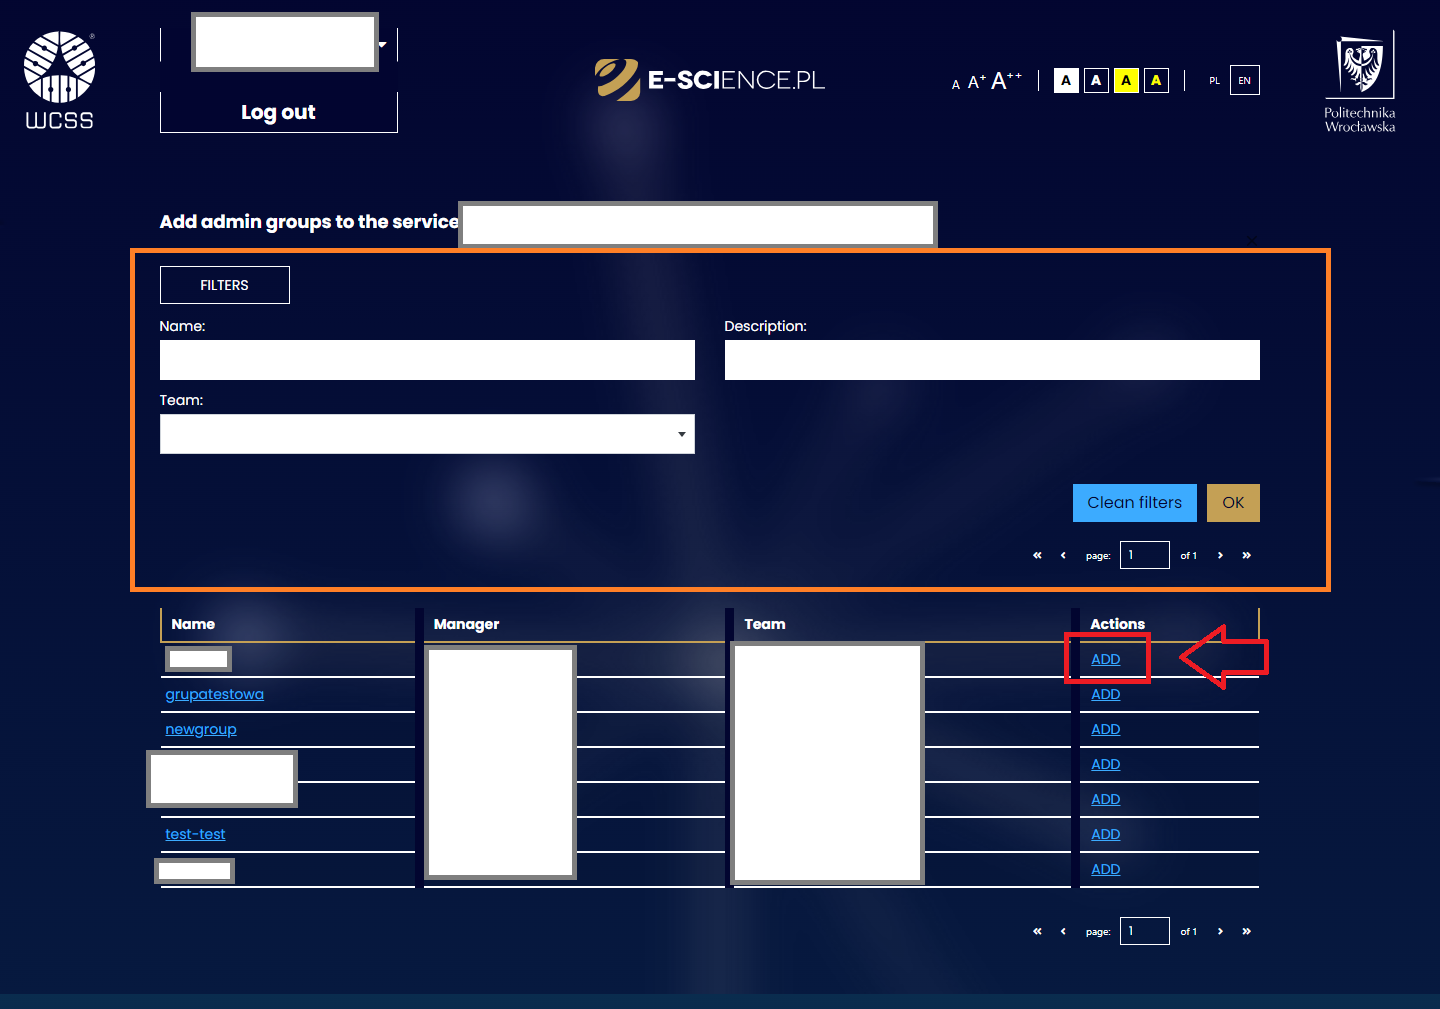
If the list contains a larger number of groups, you can narrow down the set of results using the available search filters (by group name, its description, or the name of the team it is a member of).
- After adding a management group, all people belonging to it can manage the service on behalf of the owner.
¶ Removing a management group
To remove a management group from your service, you must:
-
Be the owner of the service.
-
Select the service from the list visible in the Services tab.
-
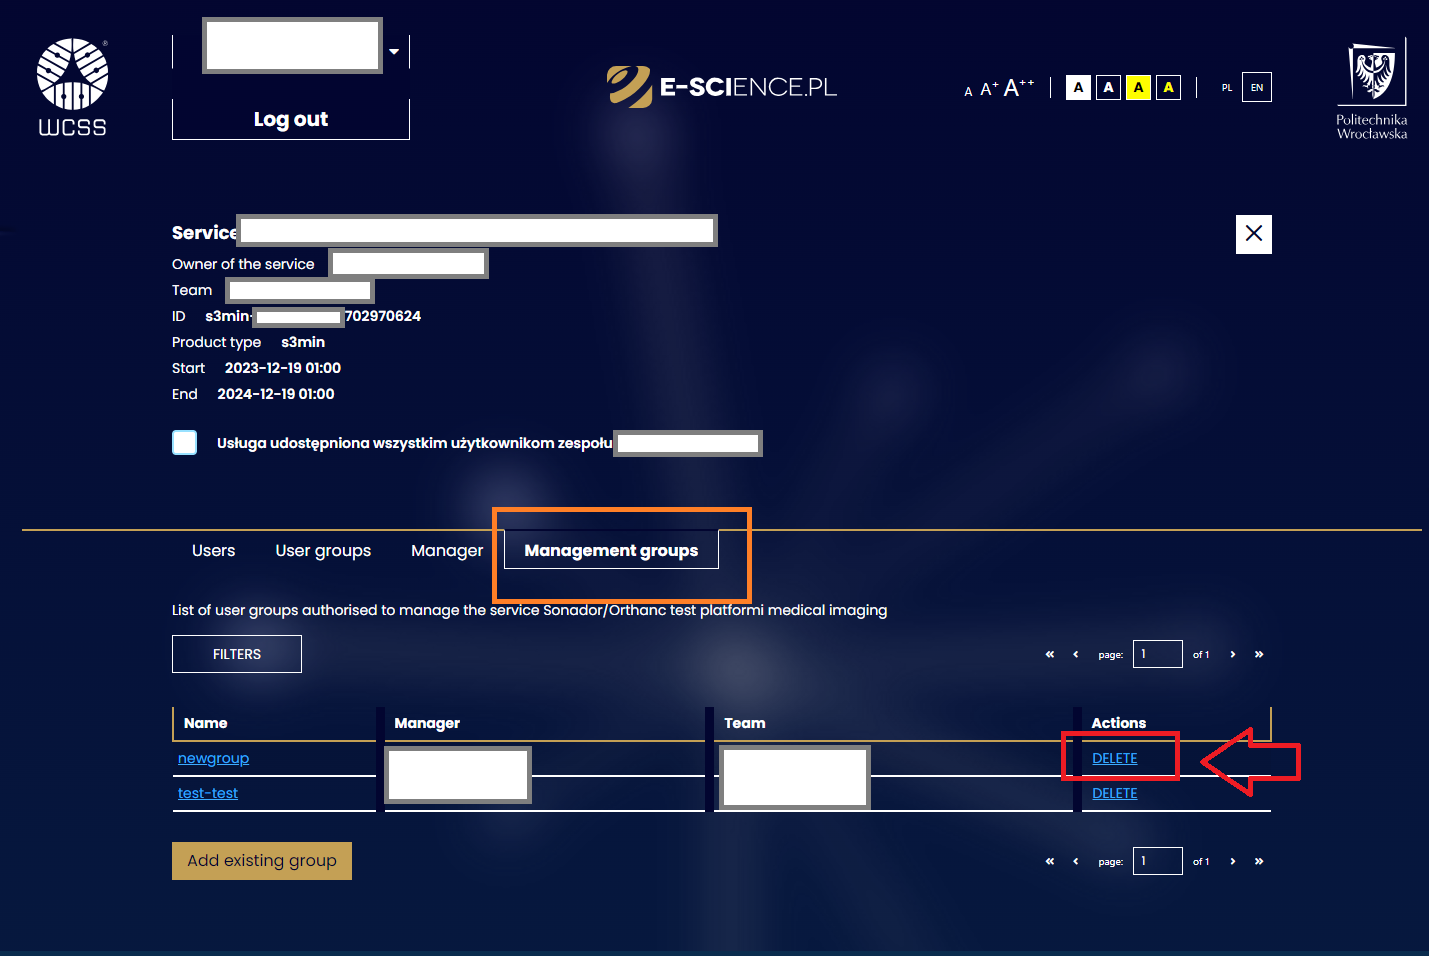
After going to the service - select the Management Groups tab.
-
Select the management group from the displayed list that you want to be stripped of permissions. Click the DELETE button in the Actions column. If the service has several management groups, you can use the search filters.
-
After removing the management group, the people belonging to it lose the right to manage the service on behalf of the owner.
¶ Optimal Management
Managing services on our E-SCIENCE.PL Platform is simple, thanks to teams and groups.
Here's how it works:
-
Creating Teams A team is a basic organizational unit, such as a project team or a research team. It is a place where collaborators work on a project.
-
Creating Groups You can create user groups within a team. This is an ideal place to organize work on specific tasks.
-
Delegating Group Management Group management can be delegated to other users, which makes it easier to divide tasks and organize work.
-
Inviting New Users You can invite new people to a team or group. However, it is worth remembering that accepting an invitation involves creating an account on the E-SCIENCE.PL Platform, if they do not already have one.
-
Assigning Service Permissions Grant service permissions to both individual users and entire groups, depending on the needs of the project. This structure of teams and groups allows for flexible work organization and organizes the project management process. Thanks to this, you can work effectively as a team and achieve your goals with the E-SCIENCE.PL Platform.
¶ Team organization
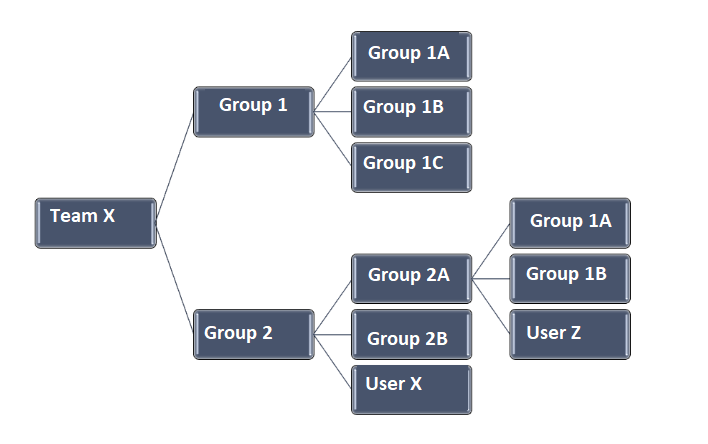
In the above example, we have a team called "TEAM X" that contains two main groups:
"GROUP 1" and "GROUP 2".
Group "GROUP 1" contains three subgroups: "GROUP 1A", "GROUP 1B" and "GROUP 1C".
In turn, group "GROUP 2" contains three subgroups: "GROUP 2A", "GROUP 2B" and a user called "USER Y". It is worth noting that "GROUP 2A" also contains members from "GROUP 1A" and "GROUP 1B" and a user called "USER Z".
This structure allows for flexible management of team members and groups and assigning permissions depending on the needs of the project.
Large project team If you plan to use the E-SCIENCE.PL platform services with a larger group of people (more than 5), it is worth considering creating groups within the project team to make it easier to assign permissions to the services.
Thanks to the well-thought-out organization of the project team and groups, you can effectively manage access and permissions on the E-SCIENCE.PL Platform.
Make sure to assign permissions appropriately and adapt the structure of the team and groups to the needs of the project.
¶ How to do it?
Step 1: Creating a Project Team Start by creating a project team on the platform. The team will be the central organizational unit in which you will manage all project members.
Step 2: Inviting Users Invite all project participants to the team.
Step 3: Creating Groups You can create different groups in the team depending on the tasks to be performed and the roles that users are to fulfill. For example, you can create a "Users" and "Administrators" group.
Step 4: Assigning Permissions to Services Grant service permissions to groups. For example, the "Administrators" group may have extended permissions compared to the "Users" group. This will allow for effective management of access to Services.
¶ Organizing groups
You are starting a research project that requires efficient team management and assigning permissions to various services on the platform.
You are going to use two services: "Store data in the cloud" and "Process on a supercomputer", each of which is intended for a different group of users.
¶ Division of Permissions
Divide users into three groups based on their permissions:
User Group 1: Will use the "Store data in the cloud" service.
User Group 2: Will use the "Process on a supercomputer" service.
Technical Group: Have access to both services and provide technical support.
¶ Effective Separation of Duties
The technical group, being knowledgeable in their field, focuses on ensuring the smooth operation of the services. Contractors from Group 1 and Group 2 can focus on performing design tasks related to their services.
¶ Expanding the Team
As the project grows, you decide to add students to the team to help with research work. Create another group for students to control their activity and give them permissions to the services.
¶ Delegating Permissions
You are able to delegate service management permissions to different groups, which makes project and team management more efficient. Thanks to this flexible organization of teams and groups, project work can be carried out more efficiently.
¶ Settings
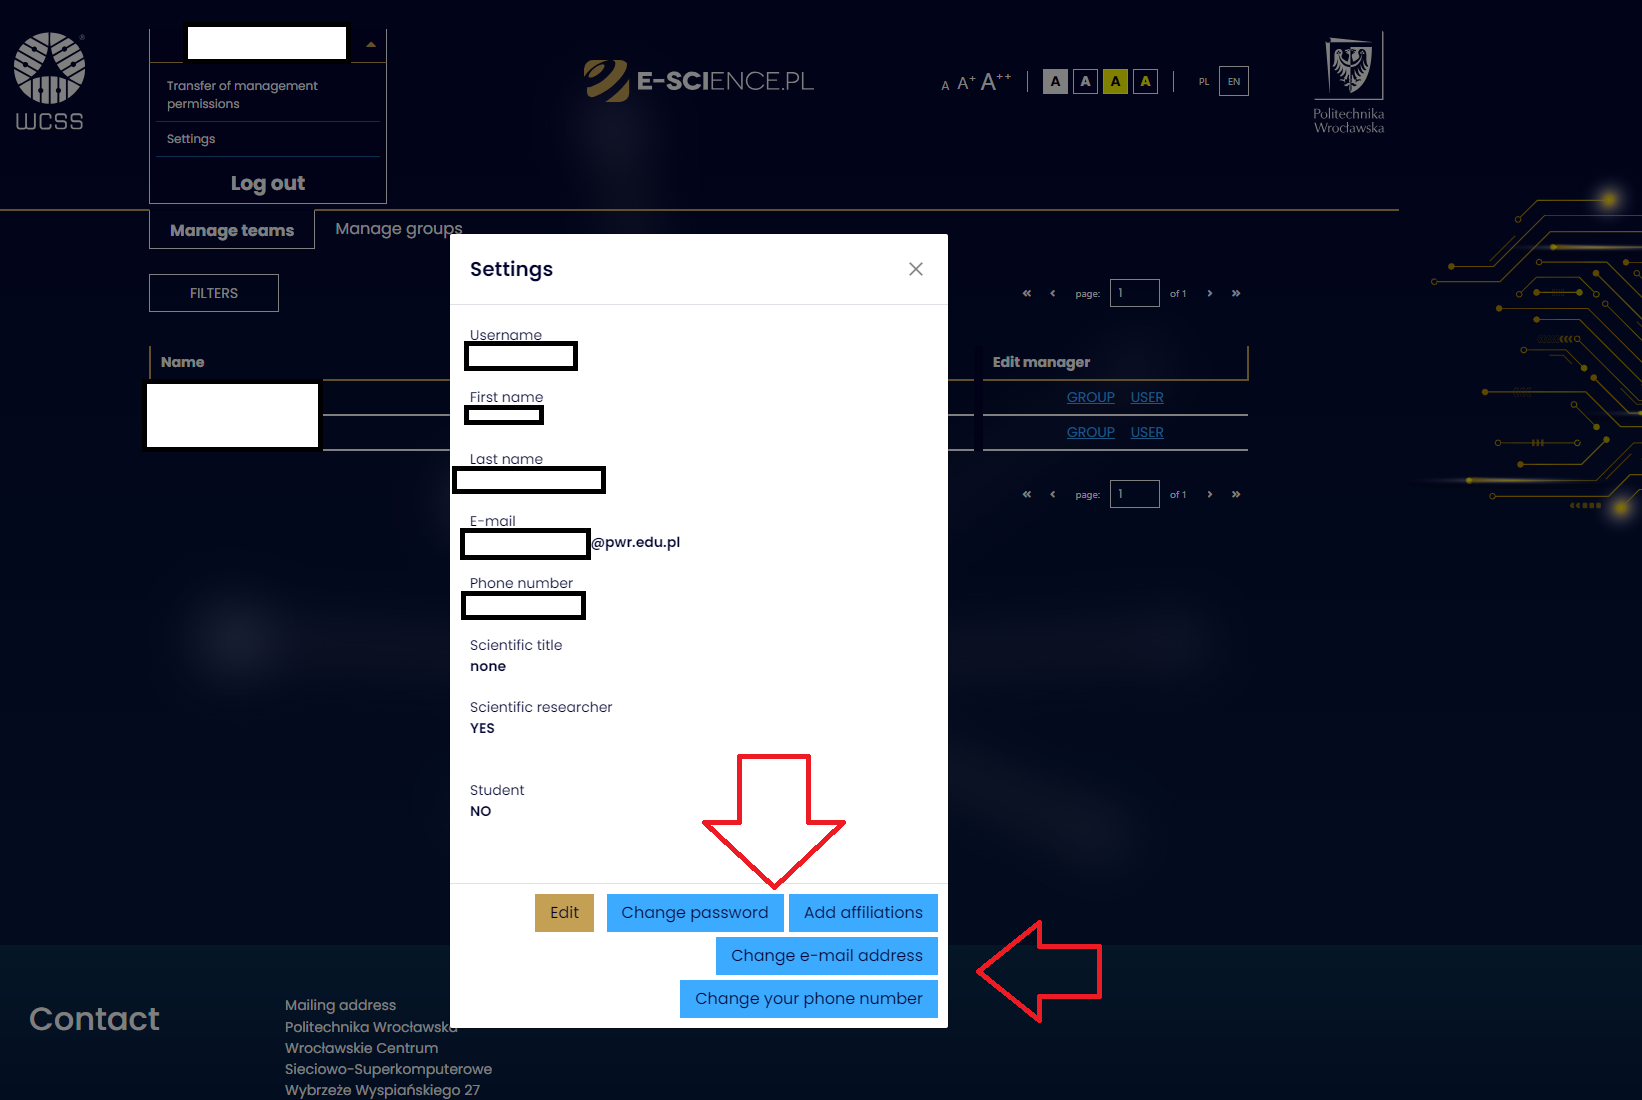
To go to account settings, expand the submenu next to the user's name and surname and select Settings.

A window will open with user data and possible options:
- Edit
- Change password
- Add affiliation
- Change email address
- Change phone number
¶ Edit
The Edit button takes the user to the data update page.
The fields that cannot be changed are:
- Username,
- Email address,
- Phone number.
You can update the fields:
- First name,
- Last name,
- NIP identification number of the organization you work for
Changes must be confirmed by pressing the SAVE button.
¶ Change password
The Change Password button takes the user to a page where they must enter:
- old password,
- new password in accordance with the Password Policy (or generate a random password using the password generator),
- confirm the new password
After filling in the required fields, select the SAVE button to confirm the changes
¶ Add affiliations
The Add affiliations button takes the user to pages where you need to:
-
enter the name of the institution where the user is an employee or student and select it.
-
enter your credentials into the login system of the selected institution agree to share your data with the E-SCIENCE.PL service
-
a message will appear that the affiliation has been added to the account
¶ Change email address
The Change email address button takes the user to a page where you need to enter:
- new email address,
- current password,
- captcha
After filling in the required fields, select the SAVE button to confirm the changes.
A message with a link confirming the changes will be sent to your mailbox, which you should click to confirm the assignment of a new email address